Devise入門 64のレシピ
- 環境
- 第1章 Deviseをはじめよう
- 第2章 モジュールを使う
- 第3章 ビューをカスタマイズする
- 第4章 コントローラーをカスタマイズする
- 第5章 モデルをカスタマイズする
- 第6章 ルーティングをカスタマイズする
- 第7章 メーラーをカスタマイズする
- 第8章 I18nをカスタマイズする
- 第9章 設定をカスタマイズする
- 第10章 その他のカスタマイズ(Wikiまとめ)
- 第11章 Tips
- 第12章 Deviseのエコシステム
- 第13章 Devise内部を知る
- 第14章 認証gemの比較
- Deviseの情報源
- チートシート
これは「フィヨルドブートキャンプ Advent Calendar 2020」の1日目の記事です。
フィヨルドブートキャンプ Part 1 Advent Calendar 2020 - Adventar
フィヨルドブートキャンプ Part 2 Advent Calendar 2020 - Adventar
環境
Ruby: 2.7.1
Rails: 6.0.3
Devise: 4.7.3
第1章 Deviseをはじめよう
🐱 DeviseはRailsに認証機能を提供するgemだよ。Deviseを使うとユーザーはサインアップやログインができるようになるよ。
001 Deviseを使ってみよう
🐱 Deviseがどんな感じなのか実際に使ってみよう!
🐱 まずはDeviseをinstallするよ。
# Gemfile

gem "devise"
$ bundle install
🐱 次は$ rails g devise:installコマンドを実行してね。Deviseの設定ファイル(devise.rb)とロケールファイル(devise.en.yml)が作成されて、英語でセットアップの指示が表示されるよ。
$ rails g devise:install
      create  config/initializers/devise.rb
      create  config/locales/devise.en.yml
===============================================================================
Depending on your application's configuration some manual setup may be required:

  1. Ensure you have defined default url options in your environments files. Here
     is an example of default_url_options appropriate for a development environment
     in config/environments/development.rb:

       config.action_mailer.default_url_options = { host: 'localhost', port: 3000 }

     In production, :host should be set to the actual host of your application.

     * Required for all applications. *

  2. Ensure you have defined root_url to *something* in your config/routes.rb.
     For example:

       root to: "home#index"

     * Not required for API-only Applications *

  3. Ensure you have flash messages in app/views/layouts/application.html.erb.
     For example:

       <p class="notice"><%= notice %></p>
       <p class="alert"><%= alert %></p>

     * Not required for API-only Applications *

  4. You can copy Devise views (for customization) to your app by running:

       rails g devise:views

     * Not required *

===============================================================================
🐱 指示通りにセットアップを進めていくよ。まずはActionMailerにデフォルトURLを設定するよ。Deviseはパスワードリセットなどでユーザーにメールを送信するのだけど、これを設定しておくことでメール内のリンクを正しく表示できるようになるよ。開発環境と本番環境の設定ファイルにそれぞれ設定してね。
# config/environments/development.rb

# 開発環境はこのままコピペでいいよ
config.action_mailer.default_url_options = { host: 'localhost', port: 3000 }
# config/environments/production.rb

# 本番環境ではhost名を指定してね
config.action_mailer.default_url_options = { host: 'xxxx.com' }
🐱 次はrootのルーティングを設定するよ。ここではHomeControllerのindexアクションを設定するよ。
# config/routes.rb

root to: "home#index"
🐱 HomeControllerを作成しておくね。
$ rails g controller home index
🐱 flashメッセージを表示できるようにするよ。これを設定しておくと、ユーザーがログインした時などに『ログインしました。』のようなメッセージを画面に表示できるようになるよ。レイアウトアウトテンプレートにnoticeとalertを表示するコードを追加してね。
# app/views/layouts/application.html.erb

<!DOCTYPE html>
<html>
  <head>
    <title>DemoApp</title>
    <%= csrf_meta_tags %>
    <%= csp_meta_tag %>

    <%= stylesheet_link_tag 'application', media: 'all', 'data-turbolinks-track': 'reload' %>
    <%= javascript_pack_tag 'application', 'data-turbolinks-track': 'reload' %>
  </head>

  <body>
    <!-- この2行を追加してね -->
    <p class="notice"><%= notice %></p>
    <p class="alert"><%= alert %></p>

    <%= yield %>
  </body>
</html>
🐱 次はDeviseのビューファイルを自分のプロジェクトにコピーするよ。このままでもDeviseは動くけど、コピーしておくことでビューファイルを自由にカスタマイズできるようになるよ。
$ rails g devise:views
      invoke  Devise::Generators::SharedViewsGenerator
      create    app/views/devise/shared
      create    app/views/devise/shared/_error_messages.html.erb
      create    app/views/devise/shared/_links.html.erb
      invoke  form_for
      create    app/views/devise/confirmations
      create    app/views/devise/confirmations/new.html.erb
      create    app/views/devise/passwords
      create    app/views/devise/passwords/edit.html.erb
      create    app/views/devise/passwords/new.html.erb
      create    app/views/devise/registrations
      create    app/views/devise/registrations/edit.html.erb
      create    app/views/devise/registrations/new.html.erb
      create    app/views/devise/sessions
      create    app/views/devise/sessions/new.html.erb
      create    app/views/devise/unlocks
      create    app/views/devise/unlocks/new.html.erb
      invoke  erb
      create    app/views/devise/mailer
      create    app/views/devise/mailer/confirmation_instructions.html.erb
      create    app/views/devise/mailer/email_changed.html.erb
      create    app/views/devise/mailer/password_change.html.erb
      create    app/views/devise/mailer/reset_password_instructions.html.erb
      create    app/views/devise/mailer/unlock_instructions.html.erb
🐱 Userモデルを作成するよ。$ rails g devise Userを実行すると、Userモデルとusersテーブルを作成するためのmigrationファイルが作成されるよ。
$ rails g devise User
      invoke  active_record
      create    db/migrate/20201103065100_devise_create_users.rb
      create    app/models/user.rb
      invoke    test_unit
      create      test/models/user_test.rb
      create      test/fixtures/users.yml
      insert    app/models/user.rb
       route  devise_for :users
🐱 db:migrateを実行してusersテーブルを作成してね。
$ rails db:migrate
🐱 これで完了だよ。サーバーを起動して、ブラウザから http://localhost:3000/users/sign_in にアクセスするとログイン画面が表示されるよ。
$ rails server
🐱 ログインだけでなく、サインアップなどの機能も使えるので遊んでみてね。
002 ヘルパーを使ってみよう
🐱 Deviseはコントローラーとビューで使えるヘルパーメソッドを提供してくれるよ。
🐱 HomeControllerに以下のコードを追加してね。
# app/controllers/home_controller.rb

class HomeController < ApplicationController
  # リクエストしてきたユーザーを認証する。
  # ユーザーがログイン済みの場合はアクセスを許可して、未ログインの場合はroot_pathにリダイレクトする。
  before_action :authenticate_user!

  def index
  end
end
🐱 before_action :authenticate_user!を利用することで、HomeControllerへのアクセスを認証できるようになるよ。もしユーザーが未ログインだったらこのコントローラーにはアクセスできずに、root_pathへリダイレクトされることになるよ。
🐱 指定のアクションだけ認証したい場合はonlyオプションを使えばOKだよ。
# app/controllers/home_controller.rb

class HomeController < ApplicationController
  before_filter :authenticate_user!, only: %i(index)

  def index
  end

  def new
  end
end
🐱 これでnewアクションは認証しないので、未ログイン状態でもアクセスできるよ。
🐱 他にもuser_signed_in?やcurrent_userなどのメソッドが追加されるよ。
# app/controllers/home_controller.rb

class HomeController < ApplicationController
  def index
    # user_signed_in?: ログイン済みの場合はtrueを返す。
    # current_user: ログイン済みの場合はログインユーザーを返す。
    # ログイン済みの場合、ログインユーザーのidをログに書き込む。
    if user_signed_in?
      logger.debug current_user.id
    end

    # ...省略...
  end
end
🐱 これらのヘルパーを使ってアプリケーションを開発していくことになるよ。他のヘルパーについては コントローラー・ビューのメソッド を参照してね。
第2章 モジュールを使う
003 モジュールとは?
🐱 認証では『ログイン』以外にも、『サインアップ』や『パスワードリセット』など、いろんな機能が必要になるよね。Deviseは認証の各機能をモジュールとして提供しているよ。例えば『ログイン時に何度もパスワードを間違えた場合は、アカウントをロックしたい。』みたいな場合がある。そんな時はLockableモジュールを有効にしてあげれば、自分でコードを書かなくてもDeviseがアカウントロックの機能を追加してくれるんだ。アプリケーションによって要件は変わるけれども、Deviseは各機能がモジュール形式になっているので、必要なモジュールだけを選んで使うことができるよ。
モジュールの種類
🐱 モジュールは全部で10個あるよ。
| モジュール名 | 機能 | デフォルト |
|---|---|---|
| Registerable | サインアップ機能 | 有効 |
| Database Authenticatable | Email/Password入力によるログイン機能 | 有効 |
| Rememberable | Remember Me機能(ブラウザを閉じてもログインが継続する機能) | 有効 |
| Recoverable | パスワードリセット機能 | 有効 |
| Validatable | Email/Passwordのバリデーション機能 | 有効 |
| Confirmable | サインアップ時に本登録用のメールを送信して、メールアドレスを確認する機能 | 無効 |
| Trackable | ログイン時の情報(IPアドレスなど)をDBに保存する機能 | 無効 |
| Timeoutable | 一定期間アクセスがないと強制ログアウトさせる機能 | 無効 |
| Lockable | 指定回数ログイン失敗でアカウントをロックする機能 | 無効 |
| Omniauthable | Omniauthとの連携機能(Twitter・Googleアカウントなどでログインできる) | 無効 |
🐱 モジュールはUserモデルのdeviseメソッドで指定すると有効にできるんだ。デフォルトではdatabase_authenticatable、registerable、recoverable、rememberable、validatableの5つのモジュールが有効になっているよ。
# app/models/user.rb

class User < ApplicationRecord
  # 以下の5つのモジュールはデフォルトでは無効だよ。
  # :confirmable, :lockable, :timeoutable, :trackable, :omniauthable

  # 以下の5つのモジュールがデフォルトで有効だよ。
  devise :database_authenticatable, :registerable,
         :recoverable, :rememberable, :validatable
end
🐱 デフォルトで有効になっている5つのモジュールは、特別な事情がない限りそのまま有効にしておけばいいと思うよ。デフォルトで無効になっている5つのモジュールは必要に応じて有効にしてね。
モジュールのカラム
🐱 モジュールによってはusersテーブルにカラムを追加する必要があるよ。
🐱 rails g devise:installコマンドで作成されたマイグレーションファイルを見てみるよ。
# db/migrate/20201103065100_devise_create_users.rb

# frozen_string_literal: true

class DeviseCreateUsers < ActiveRecord::Migration[6.0]
  def change
    create_table :users do |t|
      ## Database authenticatable
      t.string :email,              null: false, default: ""
      t.string :encrypted_password, null: false, default: ""

      ## Recoverable
      t.string   :reset_password_token
      t.datetime :reset_password_sent_at

      ## Rememberable
      t.datetime :remember_created_at

      ## Trackable
      # t.integer  :sign_in_count, default: 0, null: false
      # t.datetime :current_sign_in_at
      # t.datetime :last_sign_in_at
      # t.string   :current_sign_in_ip
      # t.string   :last_sign_in_ip

      ## Confirmable
      # t.string   :confirmation_token
      # t.datetime :confirmed_at
      # t.datetime :confirmation_sent_at
      # t.string   :unconfirmed_email # Only if using reconfirmable

      ## Lockable
      # t.integer  :failed_attempts, default: 0, null: false # Only if lock strategy is :failed_attempts
      # t.string   :unlock_token # Only if unlock strategy is :email or :both
      # t.datetime :locked_at


      t.timestamps null: false
    end

    add_index :users, :email,                unique: true
    add_index :users, :reset_password_token, unique: true
    # add_index :users, :confirmation_token,   unique: true
    # add_index :users, :unlock_token,         unique: true
  end
end
🐱 こんな感じでモジュール毎に必要なカラムが用意されているよ。例えばConfirmableモジュールを有効にしたい場合は、コメントアウトされているconfirmation_tokenなどをアンコメントする必要があるよ。
# db/migrate/20201103065100_devise_create_users.rb

# frozen_string_literal: true

class DeviseCreateUsers < ActiveRecord::Migration[6.0]
  def change
    create_table :users do |t|
      ## Database authenticatable
      t.string :email,              null: false, default: ""
      t.string :encrypted_password, null: false, default: ""

      ## Recoverable
      t.string   :reset_password_token
      t.datetime :reset_password_sent_at

      ## Rememberable
      t.datetime :remember_created_at

      ## Trackable
      # t.integer  :sign_in_count, default: 0, null: false
      # t.datetime :current_sign_in_at
      # t.datetime :last_sign_in_at
      # t.string   :current_sign_in_ip
      # t.string   :last_sign_in_ip

      ## Confirmable
      # これらのカラムが必要になるのでアンコメントしてね。
      t.string   :confirmation_token
      t.datetime :confirmed_at
      t.datetime :confirmation_sent_at
      t.string   :unconfirmed_email # Only if using reconfirmable

      ## Lockable
      # t.integer  :failed_attempts, default: 0, null: false # Only if lock strategy is :failed_attempts
      # t.string   :unlock_token # Only if unlock strategy is :email or :both
      # t.datetime :locked_at


      t.timestamps null: false
    end

    add_index :users, :email,                unique: true
    add_index :users, :reset_password_token, unique: true

    # カラムに対応するインデックスもアンコメントしてね。
    add_index :users, :confirmation_token,   unique: true
    # add_index :users, :unlock_token,         unique: true
  end
end
🐱 これでマイグレーションを実行すればモジュールに必要なカラムを追加できるよ。
$ rails db:migrate
🐱 後からモジュールを追加する場合は、カラムを追加するマイグレーションファイルを作成すればOKだよ。
$ rails g migration add_confirmable_columns_to_users
      invoke  active_record
      create    db/migrate/20201115225427_add_confirmable_columns_to_users.rb
# db/migrate/20201115225427_add_confirmable_columns_to_users.rb

class AddConfirmableColumnsToUsers < ActiveRecord::Migration[6.0]
  def change
    change_table :users do |t|
      # Confirmableに必要なカラム
      t.string   :confirmation_token
      t.datetime :confirmed_at
      t.datetime :confirmation_sent_at
      t.string   :unconfirmed_email
    end

    add_index :users, :confirmation_token, unique: true
  end
end
モジュールのルーティング
🐱 Deviseのルーティングはdevise_forメソッドが用意してくれるよ。
# config/routes.rb

Rails.application.routes.draw do
  devise_for :users
end
🐱 モジュールを有効にすると、devise_forメソッドによってモジュールに対応するルーティングが自動的に追加されるよ。デフォルトでは5つのモジュールが有効になっているので、それに対応するルーティングが追加されているよ。ただ、全てのモジュールにコントローラーがあるわけではなく、今回であればdatabase_authenticatable、registerable、recoverableの3つのモジュールにコントローラーが存在するんだ。そのためこの3つのコントローラーに対応するルーティングが追加されるよ。
$ rails routes
                  Prefix Verb   URI Pattern                    Controller#Action
        new_user_session GET    /users/sign_in(.:format)       devise/sessions#new
            user_session POST   /users/sign_in(.:format)       devise/sessions#create
    destroy_user_session DELETE /users/sign_out(.:format)      devise/sessions#destroy
       new_user_password GET    /users/password/new(.:format)  devise/passwords#new
      edit_user_password GET    /users/password/edit(.:format) devise/passwords#edit
           user_password PATCH  /users/password(.:format)      devise/passwords#update
                         PUT    /users/password(.:format)      devise/passwords#update
                         POST   /users/password(.:format)      devise/passwords#create
cancel_user_registration GET    /users/cancel(.:format)        devise/registrations#cancel
   new_user_registration GET    /users/sign_up(.:format)       devise/registrations#new
  edit_user_registration GET    /users/edit(.:format)          devise/registrations#edit
       user_registration PATCH  /users(.:format)               devise/registrations#update
                         PUT    /users(.:format)               devise/registrations#update
                         DELETE /users(.:format)               devise/registrations#destroy
                         POST   /users(.:format)               devise/registrations#create
🐱 Confirmableモジュールを有効にすると、Confirmableモジュール用のルーティングが追加されるよ。
# app/models/user.rb

class User < ApplicationRecord
  # Confirmableモジュールを追加する
  devise :database_authenticatable, :registerable,
         :recoverable, :rememberable, :validatable,
         :confirmable
end
$ rails routes
                  Prefix Verb   URI Pattern                       Controller#Action
        new_user_session GET    /users/sign_in(.:format)          devise/sessions#new
            user_session POST   /users/sign_in(.:format)          devise/sessions#create
    destroy_user_session DELETE /users/sign_out(.:format)         devise/sessions#destroy
       new_user_password GET    /users/password/new(.:format)     devise/passwords#new
      edit_user_password GET    /users/password/edit(.:format)    devise/passwords#edit
           user_password PATCH  /users/password(.:format)         devise/passwords#update
                         PUT    /users/password(.:format)         devise/passwords#update
                         POST   /users/password(.:format)         devise/passwords#create
cancel_user_registration GET    /users/cancel(.:format)           devise/registrations#cancel
   new_user_registration GET    /users/sign_up(.:format)          devise/registrations#new
  edit_user_registration GET    /users/edit(.:format)             devise/registrations#edit
       user_registration PATCH  /users(.:format)                  devise/registrations#update
                         PUT    /users(.:format)                  devise/registrations#update
                         DELETE /users(.:format)                  devise/registrations#destroy
                         POST   /users(.:format)                  devise/registrations#create
   # Confirmableモジュール用のルーティングが追加される
   new_user_confirmation GET    /users/confirmation/new(.:format) devise/confirmations#new
       user_confirmation GET    /users/confirmation(.:format)     devise/confirmations#show
                         POST   /users/confirmation(.:format)     devise/confirmations#create
🐱 ルーティングは有効なモジュールによって自動で決まるので、routes.rbの編集は不要だよ。
モジュールのコントローラーとビュー
🐱 モジュールによってはコントローラーとビューを提供するものもあるよ。例えばConfirmableモジュールはDevise::ConfirmationsControllerとそれに対応するビューを提供するよ。
| HTTPメソッド | path | コントローラー#アクション | 目的 |
|---|---|---|---|
| GET | /users/confirmation | devise/confirmations#show | confirm。メールのリンク先はここ。クエリパラメーターのconfirmation_tokenが一致しないとアクセスできない。 |
| GET | /users/confirmation/new | devise/confirmations#new | confirm指示メール再送信画面。 |
| POST | /users/confirmation | devise/confirmations#create | confirm指示メール送信。 |
モジュールのメソッド
🐱 モジュールを追加するとUserにメソッドが追加されるよ。例えばConfirmableモジュールを追加すると、確認メールを送信するためのUser#send_confirmation_instructionsメソッドなどが追加されるよ。通常であればユーザーに対する操作は用意されたDeviseのコントローラーから行うので、これらのメソッドを直接使うことは少ないよ。ただ手動で操作したい場合には、直接これらのメソッドを使うことになるよ。
# 手動でConfirmメールを送信
user.send_confirmation_instructions

# confirmする
# 具体的にはconfirmed_atに現在時刻を設定する
user.confirm

# confirm済みなら、true
user.confirmed?
モジュールのメール送信
🐱 メールを送信するためにActionMailerを利用するモジュールもあるよ。例えばConfirmableモジュールであれば確認メールであるDevise::Mailer#confirmation_instructionsを提供するよ。
モジュールの設定
🐱 各モジュールは専用の設定があり、設定を変更することでモジュールの挙動を変更できるよ。
# config/initializers/devise.rb

# Confirmableモジュールの設定
# 確認メールの有効期限
config.confirm_within = 3.days
004 Registerableモジュール
🐱 ここからは各モジュールの解説をしていくね。
🐱 Registerableモジュールはサインアップ機能を提供するよ。具体的にはUserレコードを作成/更新/削除する機能を提供するよ。
コントローラーとルーティング
🐱 RegisterableモジュールではDevise::RegistrationsControllerというコントローラーと以下の6つのアクションが用意されるよ。
| HTTPメソッド | path | コントローラー#アクション | 目的 |
|---|---|---|---|
| GET | /users/sign_up | devise/registrations#new | サインアップ画面 |
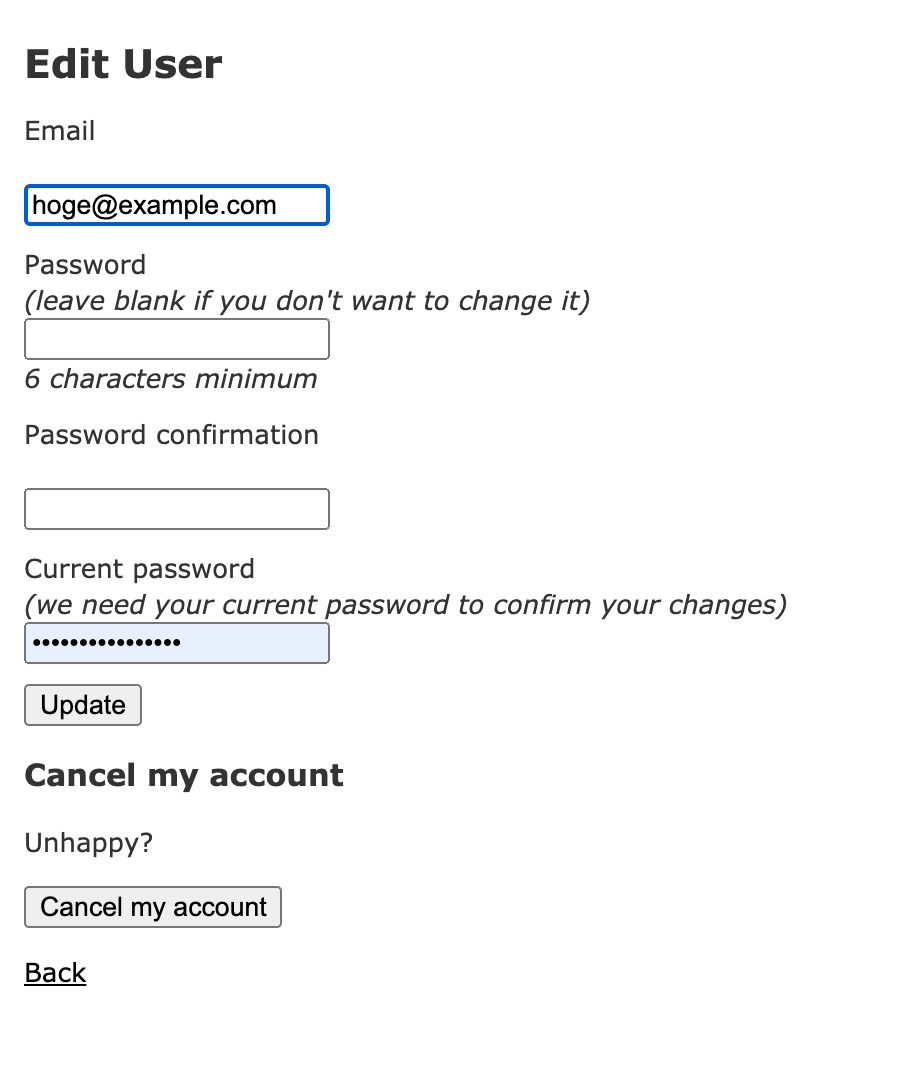
| GET | /users/edit | devise/registrations#edit | アカウント編集画面。emailやpasswordを編集できる。 |
| POST | /users | devise/registrations#create | アカウント登録 |
| PATCH/PUT | /users | devise/registrations#update | アカウント更新 |
| DELETE | /users | devise/registrations#destroy | アカウント削除 |
| GET | /users/cancel | devise/registrations#cancel | session削除。OAuthのsessionデータを削除したい場合に使う。 |
🐱 /users/sign_up を開くとサインアップ画面が表示されるよ。
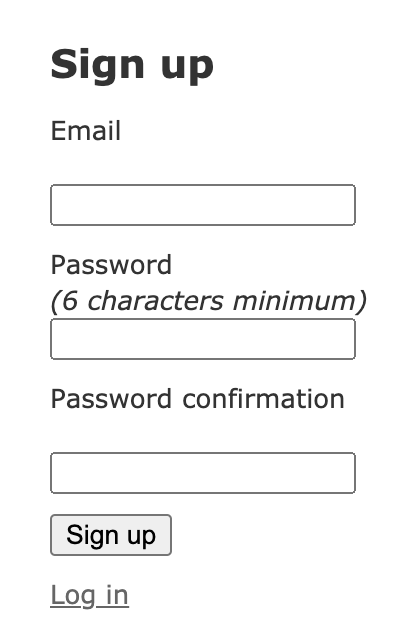
🐱 Registration(登録)というリソースをnew(新規作成)するためDevise::RegistrationsController#newになっているよ。pathはRestfulに考えると/registration/newになるのだけど、サインアップ画面であることがわかりやすくなるように/users/sign_upとなっているよ。
🐱 サインアップするとUserレコードが作成されて、サインイン状態になり、アカウント編集画面(/users/edit)にリダイレクトされるよ。アカウント編集画面ではユーザーが自分のアカウント情報であるemailやpasswordを編集できるよ。
設定
🐱 Registerableモジュールで設定できる項目は以下の通りだよ。
# config/initializers/devise.rb

# パスワード変更後に自動的にサインインさせる。
config.sign_in_after_change_password = true
参考
005 Database Authenticatableモジュール
🐱 Database Authenticatableモジュールを使うと、emailとpasswordでログインできるようになるよ。
👦🏻 emailとpassword以外のログイン方法もあるってこと?
🐱 そうだよ。後ででてくるけど、例えばOmniauthableモジュールを使えば、TwitterやGoogleのアカウントを使ってログインできるようになるよ。ここではDatabase Authenticatableモジュールを使ったemailとpasswordでのログインについて解説するね。
コントローラーとルーティング
🐱 Database AuthenticatableモジュールではDevise::SessionsControllerというコントローラーと以下の3つのアクションが用意されるよ。
| HTTPメソッド | path | コントローラー#アクション | 目的 |
|---|---|---|---|
| GET | /users/sign_in | devise/sessions#new | ログイン画面 |
| POST | /users/sign_in | devise/sessions#create | ログイン |
| DELETE | /users/sign_out | devise/sessions#destroy | ログアウト |
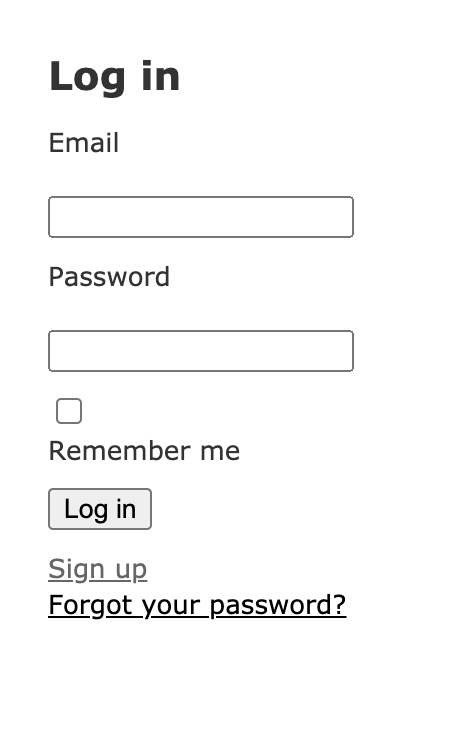
🐱 ブラウザから localhost:3000/users/sign_in を開くとログイン画面が表示されるよ。
🐱 Deviseではログイン時にSessionを作成するよ。Sessionをリソースだと考えて、それをnew(新規作成)するため、ログイン画面のアクションはDevise::SessionsController#newとなっているよ。pathはログイン画面だということがわかりやすいように、/session/newではなく/users/sign_inとなっているよ。
🐱 ログイン後にDevise::SessionsController#destroyを叩けばログアウトできるよ。こんな感じのリンクを用意してね。
<!-- destroy_user_session_pathは`/users/sign_out`を指すURLヘルパーだよ -->
<!-- HTTPメソッドにはDELETEメソッドを指定してね -->
<%= link_to "ログアウト", destroy_user_session_path, method: :delete %>
カラム
🐱 Database Authenticatableモジュールでは、usersテーブルに以下の2つのカラムが必要になるよ。
| カラム | 概要 |
|---|---|
| メールアドレス。 認証に利用。 DB的にはユニークキーになり、ユーザーは重複するメールアドレスを登録することができないよ。 |
|
| encrypted_password | ハッシュ化されたパスワード。 認証に利用。 パスワードを直接DBに保存するのはセキュリティー的に問題があるので、ハッシュ化したパスワードをDBに保存するよ。Deviseでは内部的にbcryptというハッシュ化関数を使っていて、DB保存前に自動的にハッシュ化してくれるよ。 |
設定
🐱 Database Authenticatableモジュールで設定できる項目は以下の通りだよ。
# config/initializers/devise.rb

# ハッシュ化のレベル。
# ハッシュ化には結構時間がかかる。
# bcrypt(デフォルトのアルゴリズム)の場合レベルに応じて指数関数的に遅くなり、例えばレベル20では60秒程度かかる。
# テストの時はレベル1にして速度を上げる。
# 本番ではレベル10以下は利用すべきでない。
config.stretches = Rails.env.test? ? 1 : 11

# ハッシュ化する際のペッパー。(saltみたいなやつ。)
# 詳細は https://stackoverflow.com/questions/6831796/whats-the-most-secure-possible-devise-configuration
config.pepper = 'e343ec013eac51040db52ee0cc22175d262f8bd87badc7ec87dcba597ccde6e4449b7890bba62d8598fd8f33b0ffbb7ad128ee5e39a18509691851cbfc81b80a'

# email変更時にemail変更完了メールを送信する。
config.send_email_changed_notification = false

# password変更時にpassword変更完了メールを送信する。
config.send_password_change_notification = false
メソッド
🐱 Database AuthenticatableモジュールではUserモデルに以下のメソッドを提供するよ。
# passwordをセットする。
# 内部で暗号化して`encrypted_password`にセットしてくれるよ。
user.password = "password"
user.encrypted_password #=> "$2a$12$V/xUMhmLEZApbyv2Y0jI4eyJ0gYE8JlVPL2/1Yr9jcFXChnQzC0Hi"

# パスワードが正しければtrue。
# 引数のパスワードをハッシュ化してencrypted_passwordの値と比較してくれる。
user.valid_password?('password') #=> true

# passwordとpassword_confirmationにnilをセット。
user.clean_up_passwords
user.password #=> nil
user.password_confirmation #=> nil
メール
🐱 Database Authenticatableモジュールでは以下の2つのメールを送信するよ。
| メーラー#メソッド | 概要 |
|---|---|
| Devise::Mailer#email_changed | Eメール変更完了メール。Eメール変更時に送信する。 |
| Devise::Mailer#password_change | パスワード変更完了メール。パスワード変更時に送信する。 |
🐱 この2つはデフォルトではメール送信しない設定になっているので、もしメール送信したい場合は設定を変更してね。
# config/initializers/devise.rb

# email変更時にemail変更完了メールを送信する。
config.send_email_changed_notification = true

# password変更時にpassword変更完了メールを送信する。
config.send_password_change_notification = true
参考
006 Rememberableモジュール
🐱 RememberableモジュールはRemember Me機能を提供するよ。Cookieにユーザーのトークンを保存することで、セッションが切れてもCookieからユーザーを取得して、ログイン状態を維持できるよ。
🐱 Rememberableモジュールが有効だと、ログイン画面にRemember meというチェックボックスが用意されるよ。ユーザーはここにチェックを入れてログインすることで、Remember Meを利用できるんだ。
カラム
| カラム | 概要 |
|---|---|
| remember_created_at | Remenber Meした時刻 |
| remember_token | remember_me用のtoken remember_tokenカラムがなければ、encrypted_passwordの先頭30文字で代用するので、別になくてもOKだよ。マイグレーションファイルにも記載されないよ。 |
設定
# config/initializers/devise.rb

# Sessionが切れるまでの時間。
# デフォルトは2.weeks。
config.remember_for = 2.weeks

# ログアウト時にremember_tokenを期限切れにする。
config.expire_all_remember_me_on_sign_out = true

# cookie利用時に期間を伸ばす。
config.extend_remember_period = false

# cookieにセットするオプション。
config.rememberable_options = {secure: true}
メソッド
# remember_tokenを作成
user.remember_me!

# remember_tokenを削除
user.forget_me!

# user情報を使ってcookieを作成
User.serialize_into_cookie(user)

# cookie情報を使ってuserを取得
User.serialize_from_cookie(cookie_string)
参考
- devise/rememberable.rb at master · heartcombo/devise · GitHub
- Devise3.2.2 のデフォルト設定では、Rememberable の remember_token のカラムがないのでソースを解読してみた | EasyRamble
007 Recoverableモジュール
🐱 Recoverableモジュールはパスワードリセット機能を提供するよ。パスワードを忘れてログインできないユーザーのために、パスワードを再設定できるリンクをメールで送信できるよ。Recoverableモジュールはログイン前にパスワードを変更する機能なので、ログイン後にパスワードを変更したい場合はRegisterableモジュールのアカウント編集機能(/users/edit)を使ってね。
🐱 実際にどんな機能か使ってみるね。ログイン画面に行くと一番下に『Forgot your password?』というリンクがあるからここをクリックしてね。
🐱 パスワードリセットのメール送信画面(/users/password/new)に遷移するよ。ここでパスワードリセットしたいアカウントのメールアドレスを入力してsubmitしてね。
🐱 すると入力したメールアドレス宛に、こんなメールが送信されるよ。

🐱 メール内の『Change my password』というリンクをクリックしてね。パスワード再設定画面(/users/password/edit)に遷移するよ。
🐱 パスワードと確認用パスワードを入力してsubmitすると、パスワードが再設定されて、ログイン状態になるよ。
コントローラーとルーティング
🐱 RecoverableモジュールではDevise::PasswordsControllerというコントローラーと以下の4つのアクションが用意されるよ。
| HTTPメソッド | path | コントローラー#アクション | 目的 |
|---|---|---|---|
| GET | /users/password/new | devise/passwords#new | パスワードリセットのメール送信画面 |
| GET | /users/password/edit | devise/passwords#edit | パスワード再設定画面 |
| POST | /users/password | devise/passwords#create | パスワードリセットのメール送信 |
| PATCH/PUT | /users/password | devise/passwords#update | パスワード再設定 |
カラム
🐱 Recoverableモジュールでは、usersテーブルに以下の2つのカラムが必要になるよ。
| カラム | 概要 |
|---|---|
| reset_password_token | パスワードリセットで利用するトークン。 一意のランダムなトークンが生成される。 パスワードリセットメールからパスワード再設定画面( /users/password/edit)へアクセスする際に、ユーザーを判定するのに利用する。 |
| reset_password_sent_at | パスワードリセットメール送信時刻。 パスワードリセットメールの有効期限の判定に利用する。 |
設定
# config/initializers/devise.rb

# パスワードリセット時にキーになるカラム。
config.reset_password_keys = [:email]

# パスワードリセットの有効期限。
config.reset_password_within = 6.hours

# パスワードリセット後に自動ログイン。
config.sign_in_after_reset_password = true
メソッド
# パスワードリセットメール送信
user.send_reset_password_instructions

# パスワードリセット
# user.reset_password(new_password, new_password_confirmation)
user.reset_password('password123', 'password123')

# reset_password_tokenが有効期限内かどうかを、reset_password_sent_atを使い判定
user.reset_password_period_valid? #=> true

# tokenを使ってuserを取得
User.with_reset_password_token(token) #=> user
メール
| メーラー#メソッド | 概要 |
|---|---|
| Devise::Mailer#reset_password_instructions | パスワードリセットメール |
参考
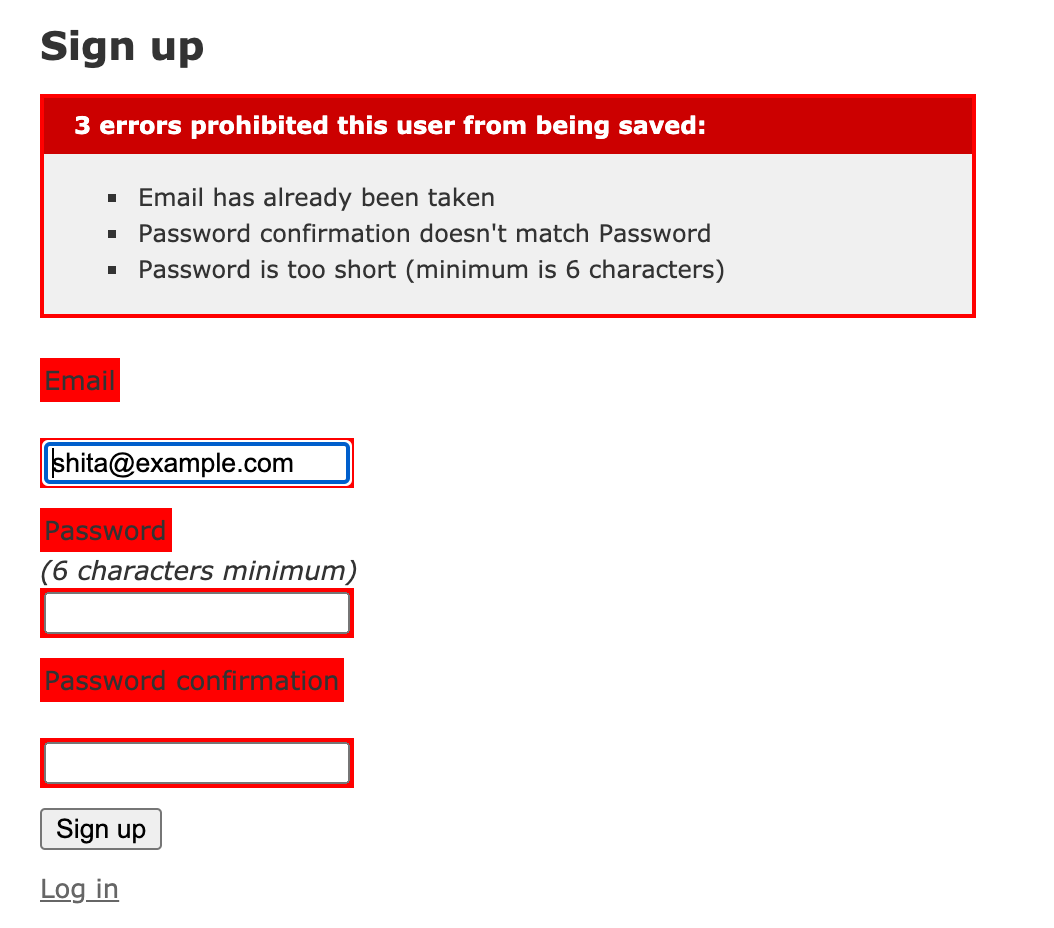
008 Validatableモジュール
🐱 Validatableモジュールはemailとpasswordのバリデーションを提供するよ。Validatableモジュールを利用すると、サインアップで不正なemailとpasswordを入力した際にバリデーションエラーを表示してくれるようになるよ。
バリデーション項目
🐱 emailに対しては以下の3つのバリデーションを設定するよ。
# emailが存在すること
validates_presence_of   :email, if: :email_required?

# emailがユニークであること
validates_uniqueness_of :email, allow_blank: true, if: :email_changed?

# emailが正規表現にマッチすること
# デフォルトのemail正規表現は`/\A[^@\s]+@[^@\s]+\z/`
validates_format_of     :email, with: email_regexp, allow_blank: true, if: :email_changed?
🐱 passwordに対しては以下の3つのバリデーションを設定するよ。
# passwordが存在すること
validates_presence_of     :password, if: :password_required?

# passwordとpassword_confirmationが合致すること
validates_confirmation_of :password, if: :password_required?

# passwordが指定文字数以内であること
# デフォルトは6文字から128文字
validates_length_of       :password, within: password_length, allow_blank: true
設定
# config/initializers/devise.rb

# passwordの長さ。
# Rangeで指定。この場合は6文字から128文字。
config.password_length = 6..128

# emailバリデーションで利用する正規表現
config.email_regexp = /\A[^@\s]+@[^@\s]+\z/
参考
009 Confirmableモジュール
🐱 Confirmableモジュールはサインアップ時に本登録用のメールを送信して、登録されたメールアドレスが実際にユーザーのものであるか確認する機能を提供するよ。サインアップ時に仮登録になって、メール内のリンクをクリックすると本登録になる、よくあるやつだね。Confirmableモジュールを使わない場合は、emailとpasswordでユーザー登録した時点で本登録になるよ。
導入
🐱 Confirmableモジュールはデフォルトで無効になっているので、有効にしていくよ。
🐱 UserモデルでConfirmableモジュールを有効にするよ。
# app/models/user.rb

class User < ApplicationRecord
  # :confirmableを追加
  devise :database_authenticatable, :registerable,
         :recoverable, :rememberable, :validatable,
         :confirmable
end
🐱 Confirmableモジュールで必要となるカラムを追加するよ。
$ rails g migration add_confirmable_columns_to_users
      invoke  active_record
      create    db/migrate/20201115225427_add_confirmable_columns_to_users.rb
# db/migrate/20201115225427_add_confirmable_columns_to_users.rb

class AddConfirmableColumnsToUsers < ActiveRecord::Migration[6.0]
  def change
    change_table :users do |t|
      # Confirmableに必要なカラム
      t.string   :confirmation_token
      t.datetime :confirmed_at
      t.datetime :confirmation_sent_at
      t.string   :unconfirmed_email
    end

    add_index :users, :confirmation_token, unique: true
  end
end
$ rails db:migrate
🐱 これで完了だよ。
🐱 実際に試してみるね。設定を反映させるためにサーバーを再起動してね。まずはサインアップするよ。
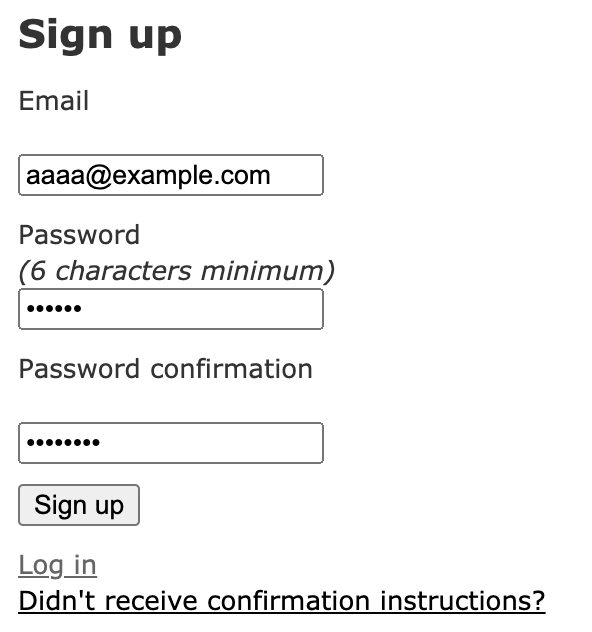
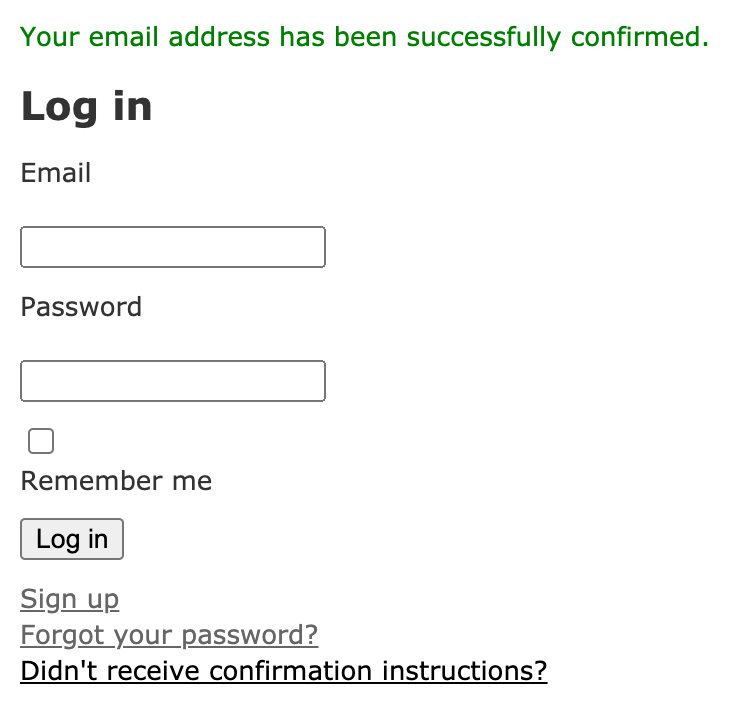
🐱 サインアップすると『メールを送ったので、リンクをクリックしてアカウントをアクティベートしてね』的なメッセージが表示され、同時にConfirm指示メールが送信されるよ。
メッセージ

メール
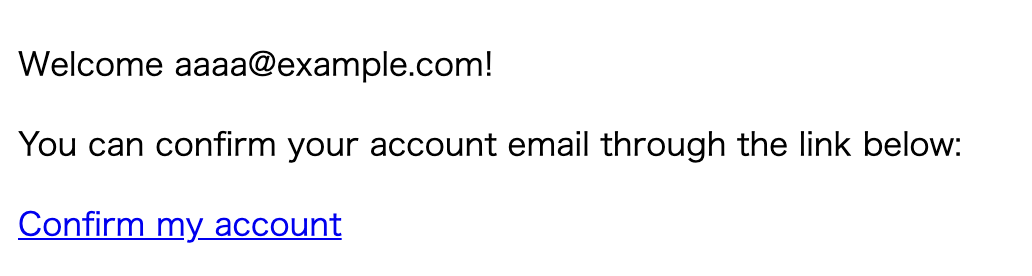
🐱 ちなみにこの時点ではまだユーザーは仮登録のような状態なのでログインすることはできないよ。ログインしようとするとこんなエラーメッセージが表示されるよ。
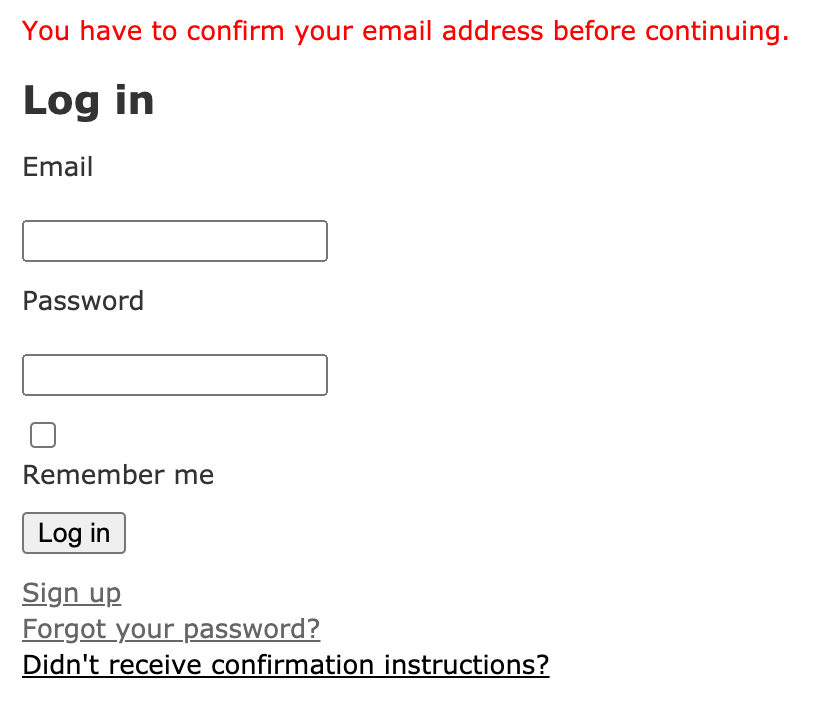
🐱 Confirm指示メールの『Confirm my account』リンクをクリックすると、アカウントがConfirmされてログインできるようになるよ。
コントローラーとルーティング
🐱 ConfirmableモジュールではDevise::ConfirmationsControllerというコントローラーと以下の3つのアクションが用意されるよ。
| HTTPメソッド | path | コントローラー#アクション | 目的 |
|---|---|---|---|
| GET | /users/confirmation | devise/confirmations#show | confirm。 メールのリンク先はここ。 クエリパラメーターのconfirmation_tokenが一致しないとアクセスできない。 |
| GET | /users/confirmation/new | devise/confirmations#new | confirm指示メール再送信画面。 |
| POST | /users/confirmation | devise/confirmations#create | confirm指示メール送信。 |
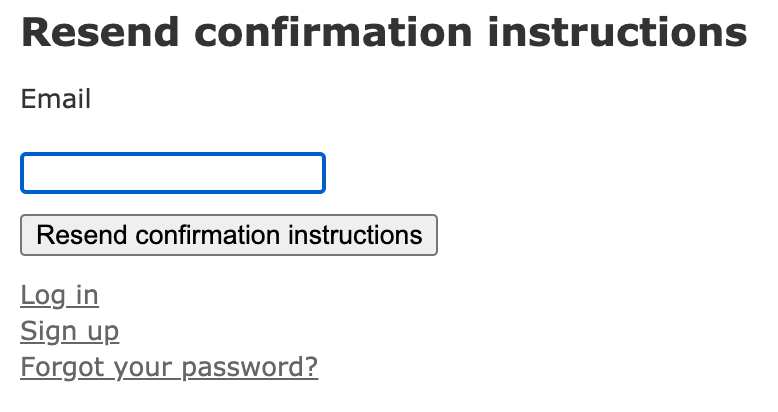
🐱 /users/confirmation/newはconfirm指示再送信画面で、ここからconfirm指示メールを再送信できるよ。
カラム
🐱 Confirmableモジュールでは、usersテーブルに以下の4つのカラムが必要になるよ。
| カラム | 概要 |
|---|---|
| confirmation_token | confirmする際に利用するトークン。 一意のランダムなトークンが生成される。 confirm指示メールからconfirmアクション( /users/confirmattion)へアクセスする際に、ユーザーを判定するのに利用する。 |
| confirmed_at | confirmされた時刻。 confirm済みかどうかはこのカラムがnilかどうかで判定する。 |
| confirmation_sent_at | confirmation_token作成時刻。 |
| unconfirmed_email | まだconfirmされていないメールアドレス。 email変更時のconfirmで利用する。 config.unconfirmed_email = trueの場合だけ必要。confirmされるまでは新しいはemailはこのカラムに保存され、confirm時にemailのカラムにコピーされる。 |
設定
# config/initializers/devise.rb

# confirmなしでログインできる期間。
# これを設定すると一定期間はconfirm前でもログインできるようになる。
# nilに設定すると無期限にログインできるようになる。
# デフォルトは 0.days。(confirmなしにはログインできない。)
config.allow_unconfirmed_access_for = 2.days

# confirmation_tokenの有効期限。
# ユーザーはこの期限内にconfirm指示メールのリンクをクリックしないといけない。
# デフォルトは nil。(制限なし。)
config.confirm_within = 3.days

# サインアップ時だけでなく、email変更時にもConfirmメールを送信する。
# unconfirmed_emailカラムが必要。
config.reconfirmable = true

# confirmのキー。
config.confirmation_keys = [:email]
メソッド
# confirmする
# 具体的にはconfirmed_atに現在時刻を設定する
user.confirm

# confirm済みなら、true
user.confirmed?

# 手動でConfirmメールを送信
user.send_confirmation_instructions
メール
| メーラー#メソッド | 概要 |
|---|---|
| Devise::Mailer#confirmation_instructions | confirm指示メール |
参考
010 Trackableモジュール
🐱 Trackableモジュールはログイン時にIPアドレス・ログイン時刻・ログイン回数をDBに保存する機能を提供するよ。データはただ保存するだけで、Devise内部で使うわけではないよ。
導入
🐱 Trackableモジュールはデフォルトで無効になっているので、有効にしていくよ。
🐱 まずはUserモデルでTrackableモジュールを有効にするよ。
# app/models/user.rb

class User < ApplicationRecord
  # :trackableを追加
  devise :database_authenticatable, :registerable,
         :recoverable, :rememberable, :validatable,
         :trackable
end
🐱 Trackableモジュールで必要となるカラムを追加するよ。
$ rails g migration add_trackable_columns_to_users
      invoke  active_record
      create    db/migrate/20201115004935_add_trackable_columns_to_users.rb
# db/migrate/20201115004935_add_trackable_columns_to_users.rb

class AddTrackableColumnsToUsers < ActiveRecord::Migration[6.0]
  def change
    change_table :users do |t|
      # Trackableに必要なカラム
      t.integer  :sign_in_count, default: 0, null: false
      t.datetime :current_sign_in_at
      t.datetime :last_sign_in_at
      t.string   :current_sign_in_ip
      t.string   :last_sign_in_ip
    end
  end
end
$ rails db:migrate
🐱 これで完了だよ。サーバーを再起動してユーザーがログインすると、追加したカラムに自動的にログイン情報が保存されるよ。
user.sign_in_count #=> 1
user.current_sign_in_at #=> Sun, 15 Nov 2020 00:55:35 UTC +00:00
カラム
🐱 Trackableモジュールでは、usersテーブルに以下の5つのカラムが必要になるよ。ログイン時にこれらのカラムにデータが保存されるよ。
| カラム | 概要 |
|---|---|
| sign_in_count | ログイン回数 |
| current_sign_in_at | 最新のログイン時刻 |
| last_sign_in_at | 1つ前のログイン時刻 |
| current_sign_in_ip | 最新のログイン時IPアドレス |
| last_sign_in_ip | 1つ前のログイン時IPアドレス |
011 Timeoutableモジュール
🐱 Timeoutableモジュールは一定期間アクセスがないと強制ログアウトさせる機能を提供するよ。
導入
🐱 Timeoutableモジュールはデフォルトで無効になっているので、有効にしていくよ。
🐱 UserモデルでTimeoutableモジュールを有効にするよ。
# app/models/user.rb

class User < ApplicationRecord
  # :timeoutableを追加
  devise :database_authenticatable, :registerable,
         :recoverable, :rememberable, :validatable,
         :timeoutable
end
🐱 次にタイムアウト時間の設定を行うよ。今回は動作確認のために10秒でタイムアウトになるように設定するね。
# config/initializers/devise.rb

- #config.timeout_in = 30.minutes
+ config.timeout_in = 10.seconds
🐱 これで完了だよ。
🐱 実際に試してみるね。設定を反映させるためにサーバーを再起動してね。ユーザーがログインしてから10秒間何もせずに放置してからアクセスすると、強制ログアウトになりログイン画面にリダイレクトされるよ。
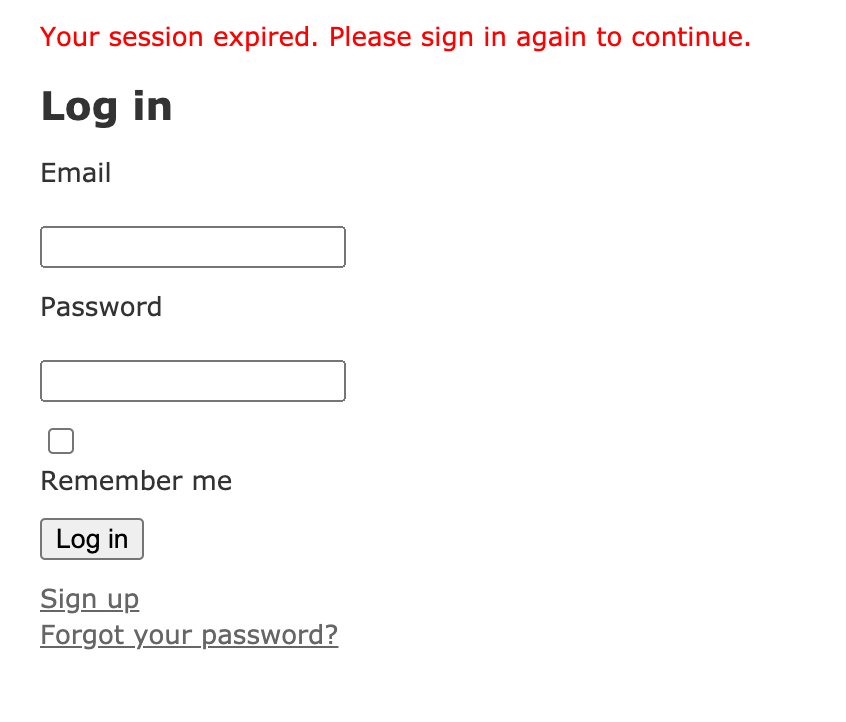
🐱 Timeoutableモジュールは、ログイン後にユーザーがアクセスする度に、sessionにアクセス時刻を保存しているんだ。そして前回のリクエスト時刻と今回のリクエスト時刻を比較して、config.timeout_in(タイムアウト時間)を超えている場合にログアウトさせているよ。
設定
# config/initializers/devise.rb

# タイムアウト時間
config.timeout_in = 30.minutes
メソッド
# タイムアウトならtrue
user.timedout?(Time.current)
参考
012 Lockableモジュール
🐱 Lockableモジュールはログイン時に指定回数パスワードを間違えるとアカウントをロックする機能を提供するよ。
導入
🐱 Lockableモジュールはデフォルトで無効になっているので、有効にしていくよ。
🐱 UserモデルでLockableモジュールを有効にするよ。
# app/models/user.rb

class User < ApplicationRecord
  # :lockableを追加
  devise :database_authenticatable, :registerable,
         :recoverable, :rememberable, :validatable,
         :lockable
end
🐱 Lockableモジュールで必要となるカラムを追加するよ。
$ rails g migration add_lockable_columns_to_users
      invoke  active_record
      create    db/migrate/20201115111752_add_lockable_columns_to_users.rb
# db/migrate/20201115111752_add_lockable_columns_to_users.rb

class AddTrackableColumnsToUsers < ActiveRecord::Migration[6.0]
  def change
    change_table :users do |t|
      # Lockableに必要なカラム
      t.integer  :failed_attempts, default: 0, null: false
      t.string   :unlock_token
      t.datetime :locked_at
    end

    add_index :users, :unlock_token, unique: true
  end
end
$ rails db:migrate
🐱 次にログインの上限試行回数の設定を行うよ。今回は動作確認のために2回ログインに失敗したらロックするように設定するよ。
# config/initializers/devise.rb

- # config.maximum_attempts = 20
+ config.maximum_attempts = 2
🐱 これで完了だよ。
🐱 実際に試してみるね。設定を反映させるためにサーバーを再起動してね。ログインで2回パスワードを間違えると『アカウントがロックされました。』的なエラーメッセージが表示されて、これ以降は正しいパスワードを入力してもログインできなくなるよ。
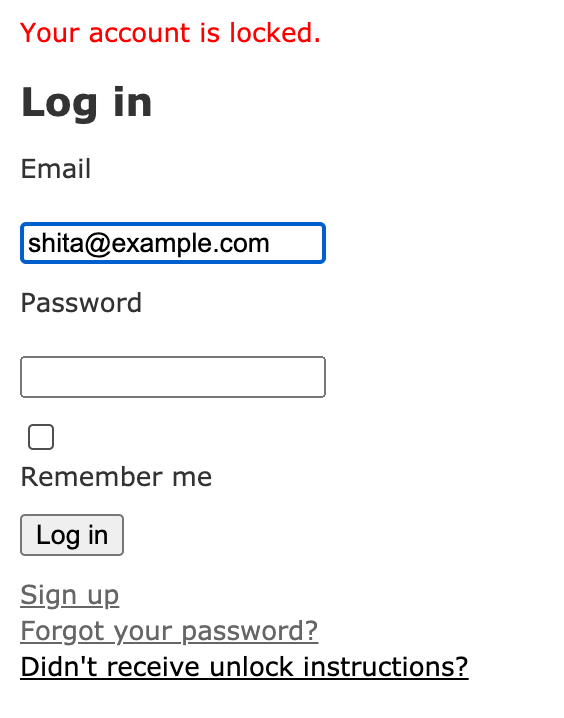
🐱 アカウントロック時には、ユーザーに以下のようなアンロック指示メールが送信されるよ。
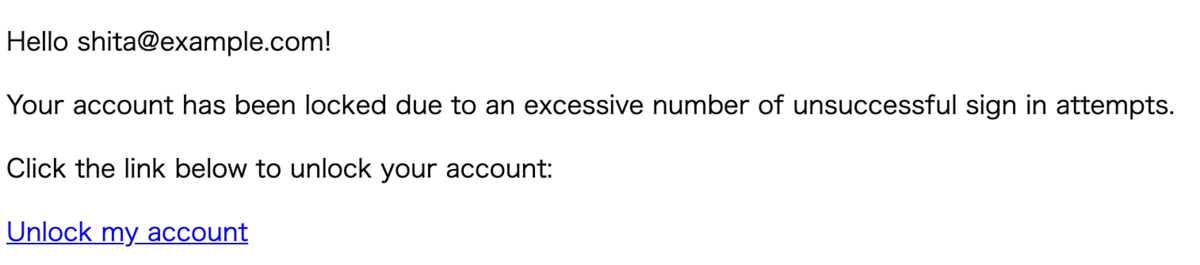
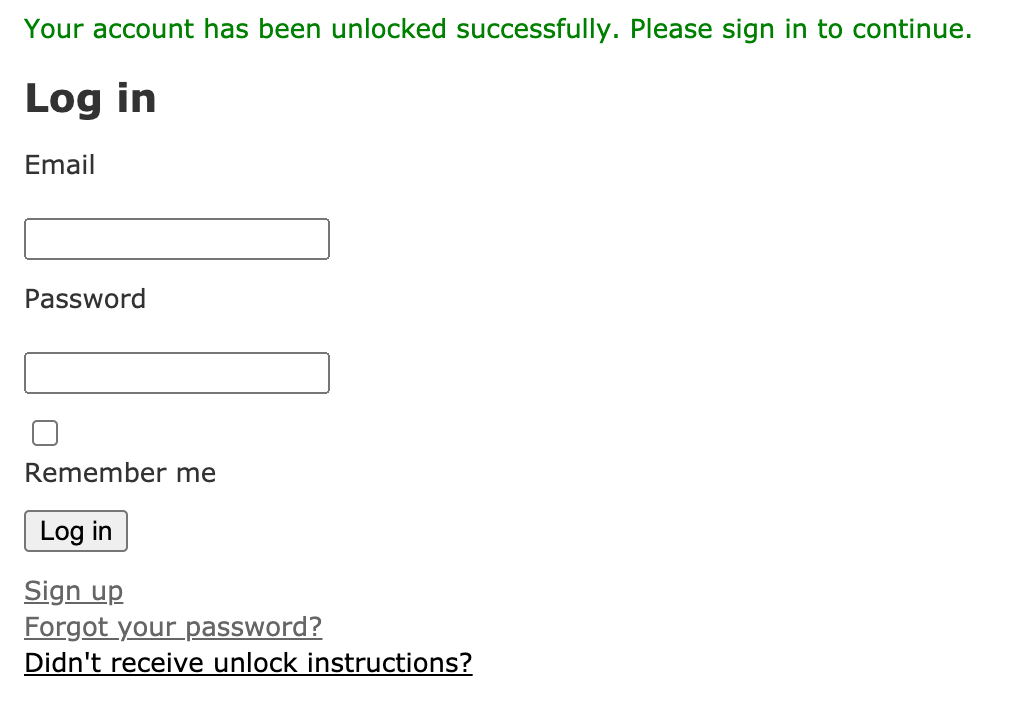
🐱 ユーザーはこのメールの『Unlock my account』リンクをクリックすると、アカウントがアンロックされて、再びログインできるようになるよ。
メールではなく一定時間経過でアンロックさせる
🐱 Lockableモジュールではメールでアンロックする方法以外に、一定時間経過でアンロックする方法も提供しているよ。以下の設定を行うとメールではなく時間経過でアンロックできるよ。
# config/initializers/devise.rb

- # config.unlock_strategy = :email
+ config.lock_strategy = :time
🐱 次にアンロックまでの時間の設定を行うよ。今回は動作確認のために10秒でアンロックするように設定するよ。
# config/initializers/devise.rb

- # config.unlock_in = 1.hour
+ config.unlock_in = 10.seconds
🐱 これで完了だよ。
🐱 実際に試してみるね。設定を反映させるためにサーバーを再起動してね。ログインで2回パスワードを間違えるとアカウントがロックされるよ。その後10秒待つと、アカウントが自動でアンロックされて、再びログインできるようになるよ。
コントローラーとルーティング
🐱 LockableモジュールではDevise::UnlocksControllerというコントローラーと以下の3つのアクションが用意されるよ。
| HTTPメソッド | path | コントローラー#アクション | 目的 |
|---|---|---|---|
| GET | /users/unlock | devise/unlocks#show | アンロック。 メールのリンク先はここ。 クエリパラメーターのunlock_tokenが一致しないとアクセスできない。 |
| GET | /users/unlock/new | devise/unlocks#new | アンロック指示メール再送信画面。 |
| POST | /users/unlock | devise/unlocks#create | アンロック指示メール送信。 |
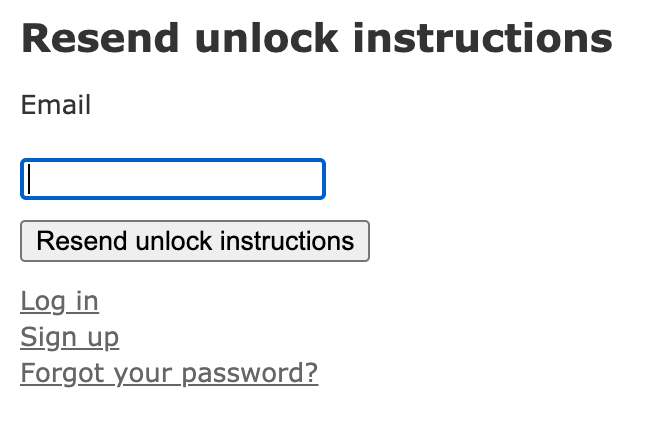
🐱 /users/unlock/newはアンロック指示メール再送信画面で、ここからアンロック指示メールを再送信できるよ。
カラム
🐱 Lockableモジュールでは、usersテーブルに以下の3つのカラムが必要になるよ。
| カラム | 概要 |
|---|---|
| failed_attempts | 失敗回数。config.lock_strategyが:failed_attemptsの場合にだけ必要。 |
| unlock_token | メールからアンロックする際に利用するtoken。 一意のランダムなトークンが生成される。 アンロック指示メールからアンロックアクション( /users/unlock)へアクセスする際に、ユーザーを判定するのに利用する。config.unlock_strategyが:emailか:bothの場合にだけ必要。 |
| locked_at | ロック時刻。 これがnullでない場合にロック状態とみなされる。 |
設定
# config/initializers/devise.rb

# ロック方法
#   - failed_attempts: 指定回数間違えたらロック
#   - none: 自動ロックはなしで、サーバ管理者が手動でロック
config.lock_strategy = :failed_attempts

# アンロックのキー
config.unlock_keys = [:email]

# アンロック方法
#   - email: メールでアンロックのリンクを送信(config.maximum_attemptsと一緒に使う)
#   - time: 数時間後にアンロック(config.unlock_inと一緒に使う)
#   - both: emailとtimeの両方
#   - none: 自動アンロックはなしで、サーバ管理者が手動でアンロック
config.unlock_strategy = :both

# ロックまでの回数
config.maximum_attempts = 20

# アンロックまでの時間(`config.unlock_strategy = :time`の場合)
config.unlock_in = 1.hour

# ロック前に警告する
config.last_attempt_warning = true
メソッド
# ロック(メール送信もする)
user.lock_access!

# ロック(メール送信しない)
user.lock_access!(send_instructions: false)

# アンロック
user.unlock_access!

# アンロックのメール送信
user.resend_unlock_instructions
メール
| メーラー#メソッド | 概要 |
|---|---|
| Devise::Mailer#unlock_instructions | アカウントアンロック指示メール |
参考
013 Omniauthableモジュール
🐱 OmniauthableモジュールはDeviseとOmniAuth gemとの連携機能を提供するよ。Omniauthableモジュールを使うことで、ユーザーはTwitterアカウントやGoogleアカウントなどでログインできるようになるよ。
OmniAuthとは?
👦🏻 OmniAuthってなに?
🐱 すごくざっくりいうと、OAuthを利用して、TwitterやGoogleのアカウントでアプリケーションにログインできるようにするgemだよ。もう少しちゃんと説明すると、OmniAuthは複数プロバイダーを介した認証を標準化するgemだよ。OmniAuthはStrategyという仕組みを提供することで、別個の認証を共通のインターフェースで認証できるようになるんだ。例えばTwitterアカウントとGoogleアカウントでログインできるようなアプリケーションを考えてみてね。このときTwitterとGoogleでプロバイダーが異なるんだけど、Twitterに対応するStrategyとGoogleに対応するStrategyを用意すれば、OmniAuthを介して同じインターフェースで認証ができるようになるよ。
🐱 Strategyは自分で用意することもできるけど、主要なプロバイダーに対応するStrategyは既にgemとして用意されているから、それを使えばOKだよ( List of Strategies · omniauth/omniauth Wiki · GitHub )。これらのStrategyのgemはブラックボックスとして利用することができて、OAuthのような複雑なフローを自分で実装することなく、簡単にOAuthを実現できるようになっているよ。StrategyはRackミドルウェアとして実装されて、omniauth-<プロバイダー名>のような名称のgemとして提供されるよ。
🐱 OmniAuthをOmniauthableモジュール経由で使う場合は、omniauth-twitterやomniauth-google-oauth2などのOAuthを利用したログインを実装することがほとんどだよ。ただOmniAuth自体はOAuthだけでなくemail/passwordによる認証やBasic認証なんかもStrategyとして利用できるようになっているよ。
🐱 Twitterであれ、Googleであれ、OmniAuthの使い方はだいたい同じだよ。ただプロバイダーから取得できるデータ(emailを取得できたりできなかったり)やAPI keyの取得方法など、細かい点は変わってくるよ。
参考
- GitHub - omniauth/omniauth: OmniAuth is a flexible authentication system utilizing Rack middleware.
- OmniAuth OAuth2 を使って OAuth2 のストラテジーを作るときに知っていると幸せになれるかもしれないこと - Qiita
OmniAuth Twitter - Twitterアカウントによるログイン
🐱 omniauth-twitter gemを使えばTwitterアカウントでログインできるようになるよ。詳しくは以下の記事を参考にしてね。
- GitHub - arunagw/omniauth-twitter: OmniAuth strategy for Twitter
- [Rails] deviseの使い方(rails6版) - Qiita
- [Rails] Facebook/Twitter/Googleでのユーザー登録をDevise & Omniauthを使って爆速で実装する - Qiita
OmniAuth Google OAuth2 - Googleアカウントによるログイン
🐱 omniauth-google-oauth2 gemを使えばGoogleアカウントでログインできるようになるよ。詳しくは以下の記事を参考にしてね。
- GitHub - zquestz/omniauth-google-oauth2: Oauth2 strategy for Google
- 爆速ッ!! gem omniauth-google-oauth2 で認証させる - Qiita
- [Rails] Facebook/Twitter/Googleでのユーザー登録をDevise & Omniauthを使って爆速で実装する - Qiita
OmniAuth Facebook - Facebookアカウントによるログイン
🐱 omniauth-facebook gemを使えばFacebookアカウントでログインできるようになるよ。詳しくは以下の記事を参考にしてね。
- GitHub - simi/omniauth-facebook: Facebook OAuth2 Strategy for OmniAuth
- [Devise How-To] OmniAuth: 概要(翻訳)|TechRacho(テックラッチョ)〜エンジニアの「?」を「!」に〜|BPS株式会社
- railsでomniauth-facebookを使ってFacebookログインを実装する方法 - Qiita
第3章 ビューをカスタマイズする
014 ビューをカスタマイズする
🐱 Deviseで利用されるビューファイルの優先順位は以下のようになってるよ。
- アプリ内のdeviseビュー(
devise/sessions/new.html.erb) - gem内のdeviseビュー(
devise/sessions/new.html.erb)
🐱 デフォルトではビューファイルはgemの中にあって、それを使うようになっているんだ。なのでビューをカスタマイズしたい場合は、gemの中のビューファイルを自分のアプリにコピーしてから、それを自分で修正していけばOKだよ。
🐱 まずは自分のアプリにビューファイルをコピーしてね。以下のコマンド打てばビューファイルがコピーされるよ。
$ rails g devise:views
      invoke  Devise::Generators::SharedViewsGenerator
       exist    app/views/devise/shared
      create    app/views/devise/shared/_error_messages.html.erb
      create    app/views/devise/shared/_links.html.erb
      invoke  form_for
       exist    app/views/devise/confirmations
      create    app/views/devise/confirmations/new.html.erb
       exist    app/views/devise/passwords
      create    app/views/devise/passwords/edit.html.erb
      create    app/views/devise/passwords/new.html.erb
       exist    app/views/devise/registrations
      create    app/views/devise/registrations/edit.html.erb
      create    app/views/devise/registrations/new.html.erb
       exist    app/views/devise/sessions
      create    app/views/devise/sessions/new.html.erb
       exist    app/views/devise/unlocks
      create    app/views/devise/unlocks/new.html.erb
      invoke  erb
       exist    app/views/devise/mailer
      create    app/views/devise/mailer/confirmation_instructions.html.erb
      create    app/views/devise/mailer/email_changed.html.erb
      create    app/views/devise/mailer/password_change.html.erb
      create    app/views/devise/mailer/reset_password_instructions.html.erb
      create    app/views/devise/mailer/unlock_instructions.html.erb
🐱 あとは作成されたビューを自分で修正していけばOKだよ。
🐱 ちなみに、UserとAdminのように複数モデルを利用するのでなければ、わざわざScope指定する必要はないよ。
# こんな感じでusers Scopeを指定して作成することも可能
# ただconfig.scoped_viewsを設定したりカスタムコントローラーが必須だったり色々面倒。
# 複数モデルを利用するのでなければ、わざわざScope指定する必要はないよ。
$ rails g devise:views users
      invoke  Devise::Generators::SharedViewsGenerator
      create    app/views/users/shared
      create    app/views/users/shared/_error_messages.html.erb
      create    app/views/users/shared/_links.html.erb
      invoke  form_for
      create    app/views/users/confirmations
      create    app/views/users/confirmations/new.html.erb
      create    app/views/users/passwords
      create    app/views/users/passwords/edit.html.erb
      create    app/views/users/passwords/new.html.erb
      create    app/views/users/registrations
      create    app/views/users/registrations/edit.html.erb
      create    app/views/users/registrations/new.html.erb
      create    app/views/users/sessions
      create    app/views/users/sessions/new.html.erb
      create    app/views/users/unlocks
      create    app/views/users/unlocks/new.html.erb
      invoke  erb
      create    app/views/users/mailer
      create    app/views/users/mailer/confirmation_instructions.html.erb
      create    app/views/users/mailer/email_changed.html.erb
      create    app/views/users/mailer/password_change.html.erb
      create    app/views/users/mailer/reset_password_instructions.html.erb
      create    app/views/users/mailer/unlock_instructions.html.erb
015 レイアウトテンプレートをカスタマイズする
Devise全体のレイアウトテンプレートを用意する場合
🐱 Deviseはデフォルトでは通常のビューと同じくレイアウトテンプレートにapplication.html.erbを利用するよ。Deviseのレイアウトテンプレートを変更したい場合はapp/views/layouts/devise.html.erbを用意すれば自動でそっちを使ってくれるので、app/views/layouts/devise.html.erbを用意すればOKだよ。
コントローラー毎・アクション毎にレイアウトテンプレートを用意する場合
🐱 コントローラー毎・アクション毎にレイアウトテンプレートを用意したい場合は、各コントローラーでlayoutメソッドを利用するよ。
🐱 まずジェネレーターを利用してカスタムコントローラーを作成してね。
$ rails g devise:controllers users
      create  app/controllers/users/confirmations_controller.rb
      create  app/controllers/users/passwords_controller.rb
      create  app/controllers/users/registrations_controller.rb
      create  app/controllers/users/sessions_controller.rb
      create  app/controllers/users/unlocks_controller.rb
      create  app/controllers/users/omniauth_callbacks_controller.rb
🐱 コントローラーでlayoutメソッドを使ってレイアウトテンプレートを指定してね。
# app/controllers/users/registerations_controller.rb

class User::RegistrationsController < Devise::RegistrationsController
  # RegistrationsControllerのeditアクションではyour_layoutファイルを使うようにする
  layout "your_layout", only: [:edit]
end
🐱 別の方法として、カスタムコントローラーを作成せずに設定ファイルで指定することも可能だよ。
# config/application.rb

config.to_prepare do
  # コントローラー毎にレイアウトファイルを指定できる
  Devise::SessionsController.layout "your_layout"
  Devise::RegistrationsController.layout "your_layout"
  Devise::ConfirmationsController.layout "your_layout"
  Devise::UnlocksController.layout "your_layout"
  Devise::PasswordsController.layout "your_layout"
end
016 バリデーションエラーの表示をカスタマイズする
🐱 Deviseではバリデーションエラーの表示もパーシャルとしてデフォルトで用意されているよ。
🐱 例えばサインアップ画面ではこんな感じでバリデーションエラー表示のパーシャルをrenderしているよ。
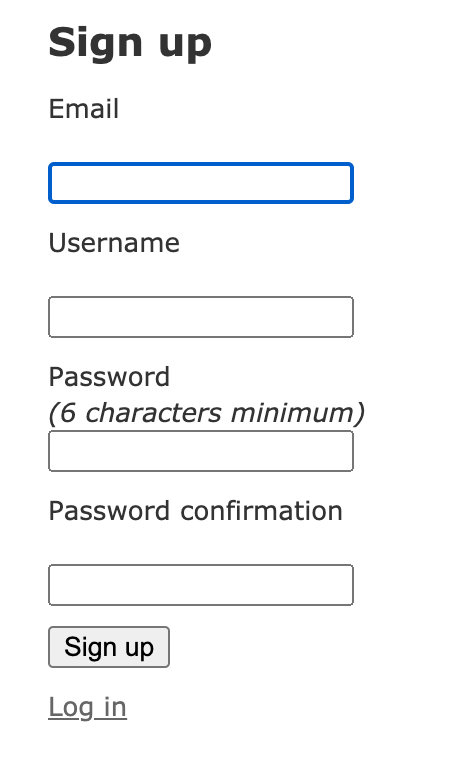
# app/views/devise/registrations/new.html.erb

<h2>Sign up</h2>

<%= form_for(resource, as: resource_name, url: registration_path(resource_name)) do |f| %>
  <!-- ここ -->
  <%= render "devise/shared/error_messages", resource: resource %>

  <div class="field">
    <%= f.label :email %><br />
    <%= f.email_field :email, autofocus: true, autocomplete: "email" %>
  </div>

  <div class="field">
    <%= f.label :password %>
    <% if @minimum_password_length %>
    <em>(<%= @minimum_password_length %> characters minimum)</em>
    <% end %><br />
    <%= f.password_field :password, autocomplete: "new-password" %>
  </div>

  <div class="field">
    <%= f.label :password_confirmation %><br />
    <%= f.password_field :password_confirmation, autocomplete: "new-password" %>
  </div>

  <div class="actions">
    <%= f.submit "Sign up" %>
  </div>
<% end %>

<%= render "devise/shared/links" %>
🐱 バリデーションエラー表示のパーシャルではresourceのエラーを表示しているよ。resourceはUserインスタンスだよ。
# app/views/devise/shared/_error_messages.html.erb

<!-- resource(Userインスタンス)にバリデーションエラーがあれば、エラー内容を表示 -->
<% if resource.errors.any? %>
  <div id="error_explanation">
    <h2>
      <%= I18n.t("errors.messages.not_saved",
                 count: resource.errors.count,
                 resource: resource.class.model_name.human.downcase)
       %>
    </h2>
    <ul>
      <% resource.errors.full_messages.each do |message| %>
        <li><%= message %></li>
      <% end %>
    </ul>
  </div>
<% end %>
🐱 バリデーションエラーの表示をカスタマイズしたい場合は、この_error_messages.html.erbをカスタマイズすればOKだよ。
🐱 ちなみに古いバージョンだと_error_messages.html.erbを利用せずに、devise_error_messages!というメソッドを利用している場合があるよ。その場合は_error_messages.html.erbを自分で用意するか、devise_error_messages!をオーバーライドすることでカスタマイズできるよ。詳しくはこちらを参考にしてね -> Override devise_error_messages! for views · heartcombo/devise Wiki · GitHub
参考
017 ビューをHamlにする
🐱 まずは自分のアプリにビューファイルをコピーしてね。
$ rails g devise:views
      invoke  Devise::Generators::SharedViewsGenerator
       exist    app/views/devise/shared
      create    app/views/devise/shared/_error_messages.html.erb
      create    app/views/devise/shared/_links.html.erb
      invoke  form_for
       exist    app/views/devise/confirmations
      create    app/views/devise/confirmations/new.html.erb
       exist    app/views/devise/passwords
      create    app/views/devise/passwords/edit.html.erb
      create    app/views/devise/passwords/new.html.erb
       exist    app/views/devise/registrations
      create    app/views/devise/registrations/edit.html.erb
      create    app/views/devise/registrations/new.html.erb
       exist    app/views/devise/sessions
      create    app/views/devise/sessions/new.html.erb
       exist    app/views/devise/unlocks
      create    app/views/devise/unlocks/new.html.erb
      invoke  erb
       exist    app/views/devise/mailer
      create    app/views/devise/mailer/confirmation_instructions.html.erb
      create    app/views/devise/mailer/email_changed.html.erb
      create    app/views/devise/mailer/password_change.html.erb
      create    app/views/devise/mailer/reset_password_instructions.html.erb
      create    app/views/devise/mailer/unlock_instructions.html.erb
🐱 ErbファイルをHamlファイルに変換するために、html2hamlというツールを利用するよ。html2hamlをインストールしてね。一度しか使わないのでgemコマンドでインストールしちゃってOKだよ。
$ gem install html2haml
🐱 全てのErbファイルをHamlに変換するよ。
# 全ErbファイルをHamlファイルに変換
$ find ./app/views/devise -name \*.erb -print | sed 'p;s/.erb$/.haml/' | xargs -n2 html2haml

# 全Erbファイルを削除
$ rm app/views/devise/**/*.erb
参考
018 ビューをSlimにする
🐱 まずは自分のアプリにビューファイルをコピーしてね。
$ rails g devise:views
      invoke  Devise::Generators::SharedViewsGenerator
       exist    app/views/devise/shared
      create    app/views/devise/shared/_error_messages.html.erb
      create    app/views/devise/shared/_links.html.erb
      invoke  form_for
       exist    app/views/devise/confirmations
      create    app/views/devise/confirmations/new.html.erb
       exist    app/views/devise/passwords
      create    app/views/devise/passwords/edit.html.erb
      create    app/views/devise/passwords/new.html.erb
       exist    app/views/devise/registrations
      create    app/views/devise/registrations/edit.html.erb
      create    app/views/devise/registrations/new.html.erb
       exist    app/views/devise/sessions
      create    app/views/devise/sessions/new.html.erb
       exist    app/views/devise/unlocks
      create    app/views/devise/unlocks/new.html.erb
      invoke  erb
       exist    app/views/devise/mailer
      create    app/views/devise/mailer/confirmation_instructions.html.erb
      create    app/views/devise/mailer/email_changed.html.erb
      create    app/views/devise/mailer/password_change.html.erb
      create    app/views/devise/mailer/reset_password_instructions.html.erb
      create    app/views/devise/mailer/unlock_instructions.html.erb
🐱 ErbファイルをSlimファイルに変換するために、html2slimというツールを利用するよ。html2slimをインストールしてね。一度しか使わないのでgemコマンドでインストールしちゃってOKだよ。
$ gem install html2slim
🐱 全てのErbファイルをSlimに変換するよ。
# 全ErbファイルをSlimファイルに変換
$ find ./app/views/devise -name \*.erb -print | sed 'p;s/.erb$/.slim/' | xargs -n2 html2slim

# 全Erbファイルを削除
$ rm app/views/devise/**/*.erb
019 Bootstrap4用のビューを利用する
🐱 devise-bootstrap-viewsというgemを使うとBootstrap用のビューをgenerateできるようになるよ。
🐱 日本語を使いたい場合は、devise-i18nというI18n対応のDeviseビューを作成するgemも一緒に入れるといいよ。
# Gemfile

gem 'devise-i18n'
gem 'devise-bootstrap-views'
$ bundle install
🐱 ビューのジェネレーターでBootstrapテンプレートを指定してね。
$ rails g devise:views:bootstrap_templates
      create  app/views/devise
      create  app/views/devise/confirmations/new.html.erb
      create  app/views/devise/passwords/edit.html.erb
      create  app/views/devise/passwords/new.html.erb
      create  app/views/devise/registrations/edit.html.erb
      create  app/views/devise/registrations/new.html.erb
      create  app/views/devise/sessions/new.html.erb
      create  app/views/devise/shared/_links.html.erb
      create  app/views/devise/unlocks/new.html.erb
🐱 こんな感じでBootstrapのクラスを利用したビューファイルが作成されるよ。
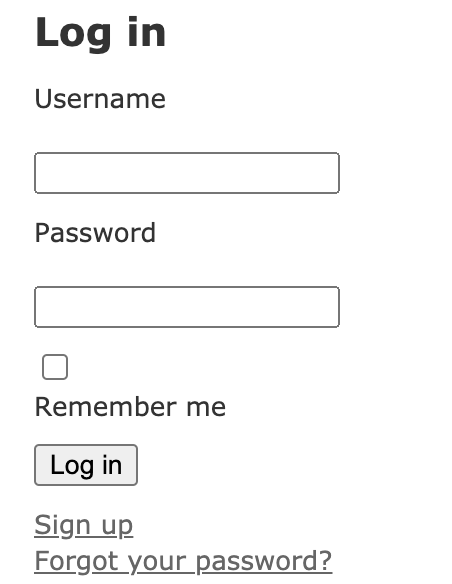
# app/views/devise/sessions/new.html.erb
<h1><%= t('.sign_in') %></h1>

<%= form_for(resource, as: resource_name, url: session_path(resource_name)) do |f| %>
  <!-- form-groupとかのBootstrap用のclassが付与されている。-->
  <div class="form-group">
    <%= f.label :email %>
    <%= f.email_field :email, autofocus: true, autocomplete: 'email', class: 'form-control' %>
  </div>

  <div class="form-group">
    <%= f.label :password %>
    <%= f.password_field :password, autocomplete: 'current-password', class: 'form-control' %>
  </div>

  <% if devise_mapping.rememberable? %>
    <div class="form-group form-check">
      <%= f.check_box :remember_me, class: 'form-check-input' %>
      <%= f.label :remember_me, class: 'form-check-label' do %>
        <%= resource.class.human_attribute_name('remember_me') %>
      <% end %>
    </div>
  <% end %>

  <div class="form-group">
    <%= f.submit  t('.sign_in'), class: 'btn btn-primary' %>
  </div>
<% end %>

<%= render 'devise/shared/links' %>
🐱 ログイン画面の見た目がBootstrapになってるよ。
🐱 devise-bootstrap-viewsはあくまでBootstrap4用のビューを用意してくれるだけだよ。Bootstrap4自体は自分でセットアップする必要があるので注意してね。
参考
第4章 コントローラーをカスタマイズする
020 コントローラーをカスタマイズする
🐱 コントローラーをカスタマイズするためには、ジェネレーターを利用してコントローラーを生成する必要があるよ。
$ rails g devise:controllers users
      create  app/controllers/users/confirmations_controller.rb
      create  app/controllers/users/passwords_controller.rb
      create  app/controllers/users/registrations_controller.rb
      create  app/controllers/users/sessions_controller.rb
      create  app/controllers/users/unlocks_controller.rb
      create  app/controllers/users/omniauth_callbacks_controller.rb
===============================================================================

Some setup you must do manually if you haven't yet:

  Ensure you have overridden routes for generated controllers in your routes.rb.
  For example:

    Rails.application.routes.draw do
      devise_for :users, controllers: {
        sessions: 'users/sessions'
      }
    end

===============================================================================
🐱 生成されたコントローラーはこんな感じだよ。Deviseのコントローラーのサブクラスになっているよ。ビューの生成ではgem内のビューをそのままコピーするのに対して、コントローラーの生成ではgem内のコントローラーを継承したクラスを生成するよ。ビューの生成とはちょっと違うので注意してね。
# app/controllers/users/sessions_controller.rb

# frozen_string_literal: true

class Users::SessionsController < Devise::SessionsController
  # before_action :configure_sign_in_params, only: [:create]

  # GET /resource/sign_in
  # def new
  #   super
  # end

  # POST /resource/sign_in
  # def create
  #   super
  # end

  # DELETE /resource/sign_out
  # def destroy
  #   super
  # end

  # protected

  # If you have extra params to permit, append them to the sanitizer.
  # def configure_sign_in_params
  #   devise_parameter_sanitizer.permit(:sign_in, keys: [:attribute])
  # end
end
🐱 ルーティングも変更する必要があるよ。デフォルトだとこんな感じでDevise gem内のdevise名前空間のコントローラーを利用するようになっているよ。
# config/routes.rb

devise_for :users
$ rails routes
                   Prefix Verb   URI Pattern                    Controller#Action
         new_user_session GET    /users/sign_in(.:format)       devise/sessions#new
             user_session POST   /users/sign_in(.:format)       devise/sessions#create
     destroy_user_session DELETE /users/sign_out(.:format)      devise/sessions#destroy
        new_user_password GET    /users/password/new(.:format)  devise/passwords#new
       edit_user_password GET    /users/password/edit(.:format) devise/passwords#edit
            user_password PATCH  /users/password(.:format)      devise/passwords#update
                          PUT    /users/password(.:format)      devise/passwords#update
                          POST   /users/password(.:format)      devise/passwords#create
 cancel_user_registration GET    /users/cancel(.:format)        devise/registrations#cancel
    new_user_registration GET    /users/sign_up(.:format)       devise/registrations#new
   edit_user_registration GET    /users/edit(.:format)          devise/registrations#edit
        user_registration PATCH  /users(.:format)               devise/registrations#update
                          PUT    /users(.:format)               devise/registrations#update
                          DELETE /users(.:format)               devise/registrations#destroy
                          POST   /users(.:format)               devise/registrations#create
🐱 さっき生成したアプリ内のusers名前空間のコントローラーを利用するように変更するよ。コントローラー毎に指定する必要があるので、カスタマイズしたいコントローラーだけ指定してね。
# config/routes.rb

# 利用するモジュールのコントローラーを指定する
# 今回はデフォルトで有効なpasswords、registrations、sessionsの3つを指定
devise_for :users, controllers: {
  passwords: 'users/passwords',
  registrations: 'users/registrations',
  sessions: 'users/sessions',
  # confirmations: 'users/confirmations',
  # unlocks: 'users/unlocks',
  # omniauth_callbacks: 'users/omniauth_callbacks',
}
$ rails routes
                   Prefix Verb   URI Pattern                    Controller#Action
         new_user_session GET    /users/sign_in(.:format)       users/sessions#new
             user_session POST   /users/sign_in(.:format)       users/sessions#create
     destroy_user_session DELETE /users/sign_out(.:format)      users/sessions#destroy
        new_user_password GET    /users/password/new(.:format)  users/passwords#new
       edit_user_password GET    /users/password/edit(.:format) users/passwords#edit
            user_password PATCH  /users/password(.:format)      users/passwords#update
                          PUT    /users/password(.:format)      users/passwords#update
                          POST   /users/password(.:format)      users/passwords#create
 cancel_user_registration GET    /users/cancel(.:format)        users/registrations#cancel
    new_user_registration GET    /users/sign_up(.:format)       users/registrations#new
   edit_user_registration GET    /users/edit(.:format)          users/registrations#edit
        user_registration PATCH  /users(.:format)               users/registrations#update
                          PUT    /users(.:format)               users/registrations#update
                          DELETE /users(.:format)               users/registrations#destroy
                          POST   /users(.:format)               users/registrations#create
🐱 あとは生成したコントローラーを好きなようにカスタマイズすればOKだよ。
# app/controllers/users/sessions_controller.rb

# frozen_string_literal: true

class Users::SessionsController < Devise::SessionsController
  # before_action :configure_sign_in_params, only: [:create]

  # GET /resource/sign_in
  def new
    # 自由にカスタマイズする
    # コメントアウトされたアクションについては、Devise::SessionsControllerのアクションがそのまま使われるので挙動は変わらないよ
    logger.debug params

    super
  end

  # POST /resource/sign_in
  # def create
  #   super
  # end

  # DELETE /resource/sign_out
  # def destroy
  #   super
  # end

  # protected

  # If you have extra params to permit, append them to the sanitizer.
  # def configure_sign_in_params
  #   devise_parameter_sanitizer.permit(:sign_in, keys: [:attribute])
  # end
end
🐱 superは親クラスであるDevise::SessionsControllerのメソッド呼び出しだよ。super部分の挙動を変えたい場合はDevise::SessionsControllerのコードを見ながら変更してね。Devise::SessionsControllerのコードを見るにはDevise本体のコードを見る必要があるよ。gem内のapp/controllers/devise/配下に置かれているから探してみてね。
# https://github.com/heartcombo/devise/blob/master/app/controllers/devise/sessions_controller.rb

# frozen_string_literal: true

class Devise::SessionsController < DeviseController
  prepend_before_action :require_no_authentication, only: [:new, :create]
  prepend_before_action :allow_params_authentication!, only: :create
  prepend_before_action :verify_signed_out_user, only: :destroy
  prepend_before_action(only: [:create, :destroy]) { request.env["devise.skip_timeout"] = true }

  # GET /resource/sign_in
  def new
    self.resource = resource_class.new(sign_in_params)
    clean_up_passwords(resource)
    yield resource if block_given?
    respond_with(resource, serialize_options(resource))
  end

  # POST /resource/sign_in
  def create
    self.resource = warden.authenticate!(auth_options)
    set_flash_message!(:notice, :signed_in)
    sign_in(resource_name, resource)
    yield resource if block_given?
    respond_with resource, location: after_sign_in_path_for(resource)
  end

  # DELETE /resource/sign_out
  def destroy
    signed_out = (Devise.sign_out_all_scopes ? sign_out : sign_out(resource_name))
    set_flash_message! :notice, :signed_out if signed_out
    yield if block_given?
    respond_to_on_destroy
  end

  protected

  def sign_in_params
    devise_parameter_sanitizer.sanitize(:sign_in)
  end

  def serialize_options(resource)
    methods = resource_class.authentication_keys.dup
    methods = methods.keys if methods.is_a?(Hash)
    methods << :password if resource.respond_to?(:password)
    { methods: methods, only: [:password] }
  end

  def auth_options
    { scope: resource_name, recall: "#{controller_path}#new" }
  end

  def translation_scope
    'devise.sessions'
  end

  private

  # Check if there is no signed in user before doing the sign out.
  #
  # If there is no signed in user, it will set the flash message and redirect
  # to the after_sign_out path.
  def verify_signed_out_user
    if all_signed_out?
      set_flash_message! :notice, :already_signed_out

      respond_to_on_destroy
    end
  end

  def all_signed_out?
    users = Devise.mappings.keys.map { |s| warden.user(scope: s, run_callbacks: false) }

    users.all?(&:blank?)
  end

  def respond_to_on_destroy
    # We actually need to hardcode this as Rails default responder doesn't
    # support returning empty response on GET request
    respond_to do |format|
      format.all { head :no_content }
      format.any(*navigational_formats) { redirect_to after_sign_out_path_for(resource_name) }
    end
  end
end
🐱 Devise::SessionsControllerのコードをコピペすればそのまま動くので、好きなようにカスタマイズしてね。
# app/controllers/users/sessions_controller.rb

# frozen_string_literal: true

class Users::SessionsController < Devise::SessionsController
  # before_action :configure_sign_in_params, only: [:create]

  # GET /resource/sign_in
  def new
    self.resource = resource_class.new(sign_in_params)
    clean_up_passwords(resource)

    # 自由にカスタマイズする
    logger.debug resource.attributes

    yield resource if block_given?
    respond_with(resource, serialize_options(resource))
  end


  # POST /resource/sign_in
  # def create
  #   super
  # end

  # DELETE /resource/sign_out
  # def destroy
  #   super
  # end

  # protected

  # If you have extra params to permit, append them to the sanitizer.
  # def configure_sign_in_params
  #   devise_parameter_sanitizer.permit(:sign_in, keys: [:attribute])
  # end
end
参考
021 Strong Parameterをカスタマイズする
🐱 ログインフォームやサインアップフォームにテキストフィールドを追加したい場合があるよね。でもDeviseではStrong Parameterで許可される属性がデフォルトで決まっているため、ビューだけでなくStrong Parameterも変更する必要があるんだ。
🐱 デフォルトで許可されている属性は以下の通りだよ。
| コントローラー#アクション | 識別子 | 概要 | 許可されている属性 |
|---|---|---|---|
| devise/sessions#create | :sign_in | ログイン | |
| devise/registrations#create | :sign_up | サインアップ | email, password, pasword_confirmation |
| devise/registrations#update | :account_update | ユーザー更新 | email, password_confirmation, current_password |
🐱 例えばサインアップ画面でemail、password、pasword_confirmationに加えて、usernameも入力させたいとする。そんな場合はStrong Parameterでusernameも追加で許可する必要がある。以下のようにdevise_parameter_sanitizer.permitを利用すればOKだよ。
# app/controllers/application_controller.rb

class ApplicationController < ActionController::Base
  # devise_controller?はDeviseコントローラーの場合だけtrueを返す
  # つまりconfigure_permitted_parametersはDeviseコントローラーの場合だけ実行される
  before_action :configure_permitted_parameters, if: :devise_controller?

  protected

  def configure_permitted_parameters
    # サインアップ時にusernameも追加で許可する
    devise_parameter_sanitizer.permit(:sign_up, keys: [:username])
  end
end
🐱 devise_parameter_sanitizerの使い方は以下の通りだよ。
# keysオプションを使うと、permitする属性を追加できる
# デフォルトでpermitされているpassword/password_confirmationに加えて、usernameもpermitする
devise_parameter_sanitizer.permit(:sign_up, keys: [:username])

# exceptオプションを使うと、permitしない属性を指定できる
# passwordだけpermitする
devise_parameter_sanitizer.permit(:sign_up, except: [:password_confirmation])

# ブロックを使うと完全にオーバーライドできる
# email, password, password_confirmationをpermitする
devise_parameter_sanitizer.permit(:sign_up) do |user|
  user.permit(:email, :password, :password_confirmation)
end

# accepts_nested_attributes_forを利用している場合は、xxxx_attributesを使うと関連先の属性もpermitできる
devise_parameter_sanitizer.permit(:sign_up, keys: [:first_name, :last_name, address_attributes: [:country, :state, :city, :area, :postal_code]])
🐱 サインアップとユーザー更新の2つの挙動を変更したい場合は、2回devise_parameter_sanitizer.permitを使ってね。
# app/controllers/application_controller.rb

class ApplicationController < ActionController::Base
  before_action :configure_permitted_parameters, if: :devise_controller?

  protected

  def configure_permitted_parameters
    # サインアップとユーザー更新の2つの挙動を変更
    devise_parameter_sanitizer.permit(:sign_up, keys: [:username]
    devise_parameter_sanitizer.permit(:account_update, keys: [:first_name, :last_name, :phone, :email, bank_attributes: [:bank_name, :bank_account]])
  end
end
参考
- GitHub - heartcombo/devise: Flexible authentication solution for Rails with Warden.
- devise/parameter_sanitizer.rb at master · heartcombo/devise · GitHub
- devise - How to specify devise_parameter_sanitizer for edit action? - Stack Overflow
022 リダイレクト先を変更する
🐱 デフォルトではログアウト時はroot_pathにリダイレクトされるようになっている。ApplicationControllerにafter_sign_out_path_forメソッドを定義してpathを返すようにすれば、リダイレクト先を変更できるよ。
# app/controllers/application_controller.rb

class ApplicationController < ActionController::Base
  private

  def after_sign_out_path_for(resource_or_scope)
    # デフォルトはroot_path
    new_user_session_path
  end
end
🐱 リダイレクト先の変更には以下のメソッドを利用できるよ。使い方はafter_sign_out_path_forと同じだよ。
| メソッド名 | 概要 |
|---|---|
| after_sign_out_path_for | ログアウト時のリダイレクト先 |
| after_sign_in_path_for | サインイン時のリダイレクト先 |
| after_sign_up_path_for | サインアップ時のリダイレクト先 |
| after_inactive_sign_up_path_for | サインアップ時のリダイレクト先(Confirmableモジュール利用時) |
| after_update_path_for | ユーザー更新時のリダイレクト先 |
| after_confirmation_path_for | メール確認時のリダイレクト先 |
| after_resending_confirmation_instructions_path_for | 確認メール再送信時のリダイレクト先 |
| after_omniauth_failure_path_for | Omniauth失敗時のリダイレクト先 |
| after_sending_reset_password_instructions_path_for | パスワードリセット時のリダイレクト先 |
🐱 複数モデル利用している場合は、引数のresource_or_scopeを使うとリダイレクト先を分岐させられるよ。
# app/controllers/application_controller.rb

class ApplicationController < ActionController::Base
  private

  def after_sign_out_path_for(resource_or_scope)
    if resource_or_scope == :user
      new_user_session_path
    elsif resource_or_scope == :admin
      new_admin_session_path
    else
      root_path
    end
  end
end
参考
- How To: Change the redirect path after destroying a session i.e. signing out · heartcombo/devise Wiki · GitHub
- devise/helpers.rb at master · heartcombo/devise · GitHub
- devise でアクションの完了後に移動するパスをカスタマイズしたい « yukku++
- Deviseでサインイン/サインアウト後のリダイレクト先を変更する - Qiita
- 【Devise】アカウント登録、ログイン/ ログアウト、アカウント編集後のリダイレクト先の変更 - Qiita
第5章 モデルをカスタマイズする
023 複数モデルを利用する
🐱 DeviseではUser以外の別のモデルも認証対象のモデルとして扱えるよ。今回はUserとAdminという2つのモデルを使ってみるね。この2つのモデルはコントローラー・ビュー・ルーティングも全て別物として扱われるよ。
🐱 設定ファイルを作成するところからやるよ。
$ rails g devise:install
🐱 設定ファイルを変更するよ。
# config/initializers/devise.rb

- # config.scoped_views = false
+ config.scoped_views = true
🐱 DeviseではScopeという機能を使ってUserとAdminという2つのモデルを使えるようにしているよ。(ActiveRecordのScopeとは別の機能。Scopeについて詳しく知りたい場合は 057 Warden を参照。)scoped_viewsをtrueに設定すると、Scope用のビューを優先的に使うようになって、User用のビューとAdmin用のビューを別個に使えるようになるよ。
scoped_viewsがfalseの場合のビューの優先順位(デフォルト)
- アプリ内のdeviseビュー(
devise/sessions/new.html.erb) - gem内のdeviseビュー(
devise/sessions/new.html.erb)
scoped_viewsがtrueの場合のビューの優先順位
- Scope用のビュー(
users/sessions/new.html.erb) # これを優先的に使うようにする - アプリ内のdeviseビュー(
devise/sessions/new.html.erb) - gem内のdeviseビュー(
devise/sessions/new.html.erb)
🐱 デフォルトでは高速化のためscoped_viewsはfalseに設定されてるよ。
🐱 次はUserモデルとAdminモデルを作成するよ。
$ rails g devise User
$ rails g devise Admin
🐱 UserとAdminのコントローラーを作成してね。
$ rails g devise:controllers users
$ rails g devise:controllers admins
🐱 UserとAdminのビューを作成してね。
$ rails g devise:views users
$ rails g devise:views admins
🐱 $ rails g devise:viewsではないので注意してね。Scope指定なしだとdeviseという名前空間でビューを作ってしまうよ。今回はconfig.scoped_views = trueに設定していて、UserとAdminにそれぞれ別のビューを用意するので、scopeまで指定してね。
🐱 ルーティングを設定するよ。まずは今のルーティングを確認してね。
# config/routes.rb

devise_for :users
devise_for :admins
$ rails routes
       new_admin_session GET    /admins/sign_in(.:format)       devise/sessions#new
           admin_session POST   /admins/sign_in(.:format)       devise/sessions#create
   destroy_admin_session DELETE /admins/sign_out(.:format)      devise/sessions#destroy
      new_admin_password GET    /admins/password/new(.:format)  devise/passwords#new
     edit_admin_password GET    /admins/password/edit(.:format) devise/passwords#edit
          admin_password PATCH  /admins/password(.:format)      devise/passwords#update
                         PUT    /admins/password(.:format)      devise/passwords#update
                         POST   /admins/password(.:format)      devise/passwords#create
ancel_admin_registration GET    /admins/cancel(.:format)        devise/registrations#cancel
  new_admin_registration GET    /admins/sign_up(.:format)       devise/registrations#new
 edit_admin_registration GET    /admins/edit(.:format)          devise/registrations#edit
      admin_registration PATCH  /admins(.:format)               devise/registrations#update
                         PUT    /admins(.:format)               devise/registrations#update
                         DELETE /admins(.:format)               devise/registrations#destroy
                         POST   /admins(.:format)               devise/registrations#create
        new_user_session GET    /users/sign_in(.:format)        devise/sessions#new
            user_session POST   /users/sign_in(.:format)        devise/sessions#create
    destroy_user_session DELETE /users/sign_out(.:format)       devise/sessions#destroy
       new_user_password GET    /users/password/new(.:format)   devise/passwords#new
      edit_user_password GET    /users/password/edit(.:format)  devise/passwords#edit
           user_password PATCH  /users/password(.:format)       devise/passwords#update
                         PUT    /users/password(.:format)       devise/passwords#update
                         POST   /users/password(.:format)       devise/passwords#create
cancel_user_registration GET    /users/cancel(.:format)         devise/registrations#cancel
   new_user_registration GET    /users/sign_up(.:format)        devise/registrations#new
  edit_user_registration GET    /users/edit(.:format)           devise/registrations#edit
       user_registration PATCH  /users(.:format)                devise/registrations#update
                         PUT    /users(.:format)                devise/registrations#update
                         DELETE /users(.:format)                devise/registrations#destroy
                         POST   /users(.:format)                devise/registrations#create
🐱 UserとAdminがどちらもdeviseという名前空間のコントローラーを使ってしまっているよ。コントローラーもそれぞれ用意したいので、UserとAdminがそれぞれのコントローラーを利用するように修正するよ。
# config/routes.rb

devise_for :users, controllers: {
  # UserのSessionsControllerには、Users::SessionsControllerを利用する。他のコントローラーも同じように修正する。
  sessions:      'users/sessions',
  passwords:     'users/passwords',
  registrations: 'users/registrations'
}
devise_for :admins, controllers: {
  # AdminのSessionsControllerには、Admins::SessionsControllerを利用する。他のコントローラーも同じように修正する。
  sessions:      'admins/sessions',
  passwords:     'admins/passwords',
  registrations: 'admins/registrations'
}
🐱 これでUserとAdminで別個のコントローラーを使えるよ。
$ rails routes
                  Prefix Verb   URI Pattern                     Controller#Action
        new_user_session GET    /users/sign_in(.:format)        users/sessions#new
            user_session POST   /users/sign_in(.:format)        users/sessions#create
    destroy_user_session DELETE /users/sign_out(.:format)       users/sessions#destroy
       new_user_password GET    /users/password/new(.:format)   users/passwords#new
      edit_user_password GET    /users/password/edit(.:format)  users/passwords#edit
           user_password PATCH  /users/password(.:format)       users/passwords#update
                         PUT    /users/password(.:format)       users/passwords#update
                         POST   /users/password(.:format)       users/passwords#create
cancel_user_registration GET    /users/cancel(.:format)         users/registrations#cancel
   new_user_registration GET    /users/sign_up(.:format)        users/registrations#new
  edit_user_registration GET    /users/edit(.:format)           users/registrations#edit
       user_registration PATCH  /users(.:format)                users/registrations#update
                         PUT    /users(.:format)                users/registrations#update
                         DELETE /users(.:format)                users/registrations#destroy
                         POST   /users(.:format)                users/registrations#create
       new_admin_session GET    /admins/sign_in(.:format)       admins/sessions#new
           admin_session POST   /admins/sign_in(.:format)       admins/sessions#create
   destroy_admin_session DELETE /admins/sign_out(.:format)      admins/sessions#destroy
      new_admin_password GET    /admins/password/new(.:format)  admins/passwords#new
     edit_admin_password GET    /admins/password/edit(.:format) admins/passwords#edit
          admin_password PATCH  /admins/password(.:format)      admins/passwords#update
                         PUT    /admins/password(.:format)      admins/passwords#update
                         POST   /admins/password(.:format)      admins/passwords#create
ancel_admin_registration GET    /admins/cancel(.:format)        admins/registrations#cancel
  new_admin_registration GET    /admins/sign_up(.:format)       admins/registrations#new
 edit_admin_registration GET    /admins/edit(.:format)          admins/registrations#edit
      admin_registration PATCH  /admins(.:format)               admins/registrations#update
                         PUT    /admins(.:format)               admins/registrations#update
                         DELETE /admins(.:format)               admins/registrations#destroy
                         POST   /admins(.:format)               admins/registrations#create
🐱 これで完了だよ。User用のサインアップページである /users/sign_up とは別に、Admin用の /admins/sign_up にアクセスできるようになるよ。
🐱 あと補足として、UserとAdminのsessionは別々に管理されるため、current_userとは別にAdmin用のcurrent_adminなどのメソッドが用意されるよ。
## User用
# ログイン中のuserを取得
current_user
# userを認証
authenticate_user!
# userがログイン済みならtrue
user_signed_in?
# userに紐づくsession
user_session

## Admin用
# ログイン中のadminを取得
current_admin
# adminを認証
authenticate_admin!
# adminがログイン済みならtrue
admin_signed_in?
# adminに紐づくsession
admin_session
🐱 またUserでのログイン状態とAdminでのログイン状態は別々に管理されるため、モデル毎にログイン/ログアウトが可能だよ。ただし以下の設定をすることでログアウト時に全モデルでログアウトさせるようにすることも可能だよ。
# config/initializers/devise.rb

# ログアウト時に全てのScopeでのログアウトとする。
# falseの場合は/users/sign_outでログアウトした場合、user Scopeだけでのログアウトになる。
config.sign_out_all_scopes = true
🐱 メッセージもモデル毎に指定可能だよ。
# config/locales/devise.en.yml

# 参照: https://github.com/heartcombo/devise/wiki/How-to-Setup-Multiple-Devise-User-Models#8-setting-custom-flash-messages-per-resource

en:
  devise:
    confirmations:
      # User用の文言
      confirmed: "Your email address has been successfully confirmed."
      # Admin用の文言
      admin_user:
        confirmed: "Your admin email address has been successfully confirmed."
参考
- How to Setup Multiple Devise User Models · heartcombo/devise Wiki · GitHub
- Railsでdeviseひとつで複数モデルを管理しよう - Qiita
024 emailの代わりにusernameでログインさせる
👦🏻 デフォルトではログインする際にはemailとpasswordを入力するよね。

👦🏻 emailの代わりにusernameを使ってログインしてもらうにはどうすればいいかな?
🐱 まずはusersテーブルにusernameカラムを追加してね。usernameカラムはemailの代わりに認証のキーになるので、uniqueインデックスを用意して一意になるようにしてね。(emailがそうだったように)
$ rails g migration add_username_to_users username:string:uniq
      invoke  active_record
      create    db/migrate/20201114030246_add_username_to_users.rb
🐱 マイグレーションファイルはこんな感じだよ。
# db/migrate/20201114030246_add_username_to_users.rb

class AddUsernameToUsers < ActiveRecord::Migration[6.0]
  def change
    add_column :users, :username, :string
    add_index :users, :username, unique: true
  end
end
$ rails db:migrate
🐱 usernameのバリデーションを設定してね。
# app/models/user.rb

validates :username, uniqueness: true, presence: true
🐱 設定ファイルで認証キーをemailからusernameに変更するよ。
# config/initializers/devise.rb

- # config.authentication_keys = [:email]
+ config.authentication_keys = [:username]
🐱 サインアップ画面でusernameも入力できるように修正するよ。
# app/views/devise/registrations/new.html.erb

<h2>Sign up</h2>

<%= form_for(resource, as: resource_name, url: registration_path(resource_name)) do |f| %>
  <%= render "devise/shared/error_messages", resource: resource %>

  <div class="field">
    <%= f.label :email %><br />
    <%= f.email_field :email, autofocus: true, autocomplete: "email" %>
  </div>

   <!-- usernameの入力欄を追加 -->
+  <div class="field">
+    <%= f.label :username %><br />
+    <%= f.text_field :username, autocomplete: "username" %>
+  </div>

  <div class="field">
    <%= f.label :password %>
    <% if @minimum_password_length %>
    <em>(<%= @minimum_password_length %> characters minimum)</em>
    <% end %><br />
    <%= f.password_field :password, autocomplete: "new-password" %>
  </div>

  <div class="field">
    <%= f.label :password_confirmation %><br />
    <%= f.password_field :password_confirmation, autocomplete: "new-password" %>
  </div>

  <div class="actions">
    <%= f.submit "Sign up" %>
  </div>
<% end %>

<%= render "devise/shared/links" %>
🐱 画面はこんな感じになるよ。
🐱 Strong Parameterを設定するよ。このままだと認証キーでないemail属性は許可されないので、許可するように修正するよ。Strong Parameterカスタマイズについて詳しく知りたい場合は 021 Strong Parameterをカスタマイズする を確認してね。
# app/controllers/application_controller.rb

class ApplicationController < ActionController::Base
  before_action :configure_permitted_parameters, if: :devise_controller?

  protected

  def configure_permitted_parameters
    # サインアップ時にemail属性を許可する
    devise_parameter_sanitizer.permit(:sign_up, keys: [:email])
  end
end
🐱 ここまででサインアップができるようになったよ。次はusernameでログインできるようにするために、ログイン画面でemailの代わりにusernameを使うように修正するよ。
# app/views/devise/sessions/new.html.erb

<h2>Log in</h2>

<%= form_for(resource, as: resource_name, url: session_path(resource_name)) do |f| %>
   <!-- emailの代わりにusernameを使う -->
-  <div class="field">
-    <%= f.label :email %><br />
-    <%= f.email_field :email, autofocus: true, autocomplete: "email" %>
-  </div>
+  <div class="field">
+    <%= f.label :username %><br />
+    <%= f.text_field :username, autofocus: true, autocomplete: "username" %>
+  </div>

  <div class="field">
    <%= f.label :password %><br />
    <%= f.password_field :password, autocomplete: "current-password" %>
  </div>

  <% if devise_mapping.rememberable? %>
    <div class="field">
      <%= f.check_box :remember_me %>
      <%= f.label :remember_me %>
    </div>
  <% end %>

  <div class="actions">
    <%= f.submit "Log in" %>
  </div>
<% end %>

<%= render "users/shared/links" %>
🐱 これでusernameでログインできるようになったよ。
参考
- How To: Allow users to sign in with something other than their email address · heartcombo/devise Wiki · GitHub
- [Rails]メールアドレス以外でサインインできるようにする[devise] | もふもふ技術部
第6章 ルーティングをカスタマイズする
025 deivse_forでルーティングを定義する
🐱 routes.rbでdevise_forメソッドを利用すると、モジュールに対応するルーティングが自動で定義されるよ。例えばDatabase Authenticatableモジュールだけを有効にした場合、Database Authenticatableモジュールのルーティングだけがdevise_forによって定義されるよ。
# app/models/user.rb

class User < ApplicationRecord
  devise :database_authenticatable
end
# config/routes.rb

Rails.application.routes.draw do
  devise_for :users
end
$ rails routes
              Prefix Verb   URI Pattern               Controller#Action
    new_user_session GET    /users/sign_in(.:format)  devise/sessions#new
        user_session POST   /users/sign_in(.:format)  devise/sessions#create
destroy_user_session DELETE /users/sign_out(.:format) devise/sessions#destroy
🐱 デフォルトで有効になっている5つのモジュールを使う場合は、コントローラーが存在するDatabase Authenticatableモジュール・Recoverableモジュール・Registerableモジュールに対応するルーティングがdevise_forによって定義されるよ。
# config/routes.rb

Rails.application.routes.draw do
  devise_for :users
end
# app/models/user.rb

class User < ApplicationRecord
  devise :database_authenticatable, :registerable,
         :recoverable, :rememberable, :validatable
end
$ rails routes
                  Prefix Verb   URI Pattern                     Controller#Action
        new_user_session GET    /users/sign_in(.:format)        devise/sessions#new
            user_session POST   /users/sign_in(.:format)        devise/sessions#create
    destroy_user_session DELETE /users/sign_out(.:format)       devise/sessions#destroy
       new_user_password GET    /users/password/new(.:format)   devise/passwords#new
      edit_user_password GET    /users/password/edit(.:format)  devise/passwords#edit
           user_password PATCH  /users/password(.:format)       devise/passwords#update
                         PUT    /users/password(.:format)       devise/passwords#update
                         POST   /users/password(.:format)       devise/passwords#create
cancel_user_registration GET    /users/cancel(.:format)         devise/registrations#cancel
   new_user_registration GET    /users/sign_up(.:format)        devise/registrations#new
  edit_user_registration GET    /users/edit(.:format)           devise/registrations#edit
       user_registration PATCH  /users(.:format)                devise/registrations#update
                         PUT    /users(.:format)                devise/registrations#update
                         DELETE /users(.:format)                devise/registrations#destroy
                         POST   /users(.:format)                devise/registrations#create
🐱 有効なモジュールによって自動でルーティングが変わるので注意してね。
026 devise_forをカスタマイズする
🐱 devise_forにはいろんなオプションが用意されてるよ。これらのオプションを指定することでルーティングをカスタマイズできるよ。
🐱 devise_forのオプションは以下の通りだよ。
| オプション | 概要 | 利用例 |
|---|---|---|
| controllers | コントローラー変更 カスタムコントローラーを利用する際に指定する |
# devise/sessions -> users/sessions devise_for :users, controllers: { sessions: "users/sessions" } |
| path | /users/sign_inのusers部分のpath変更 |
# /users/sign_in -> /accounts/sing_in devise_for :users, path: 'accounts' |
| path_names | /users/sign_inのsign_in部分のpath変更 |
# /users/sign_in -> /users/login # /users/sign_out -> /users/logout devise_for :users, path_names: { sign_in: "login", sign_out: "logout" } |
| sign_out_via | sign_out時のHTTPメソッド | # [:post, :delete]のみに変更 # デフォルト: :delete devise_for :users, sign_out_via: [:post, :delete] |
| only | 指定コントローラーだけ有効 | devise_for :users, only: :sessions |
| skip | 指定コントローラーは無効 | devise_for :users, skip: :sessions |
| class_name | モデル指定 | devise_for :users, class_name: 'Account' |
| singular | Userの単数形(ヘルパーに影響) | # この場合、current_adminはcurrent_managerになるdevise_for :admins, singular: :manager |
| skip_helpers | URLヘルパーを作らない 既存コードとのコンフリクトを避けたい場合に使う |
# デフォルト: false devise_for :users, skip: [:registrations, :confirmations], skip_helpers: true devise_for :users, skip_helpers: [:registrations, :confirmations] |
| format | (.:format)をつける |
# デフォルト: true devise_for :users, format: false |
| module | コントローラーの名前空間変更 | # デフォルト: "devise" # Devise::SessionsController -> Users::SessionsController devise_for :users, module: "users" |
| failure_app | 認証失敗時のRackアプリ(wardenのレシピ参照) | |
| constraints | ルーティング成約 | |
| defaults | パラメーターのデフォルト値 |
参考
027 名前空間を指定する
🐱 devise_forメソッドはnamespaceメソッドなどのRailsの既存のメソッドと組み合わせて使えるよ。namespaceを使うと名前空間を指定できるよ。
# config/routes.rb

namespace :hoge do
  devise_for :users
end
$ rails routes
                       Prefix Verb   URI Pattern                          Controller#Action
        new_hoge_user_session GET    /hoge/users/sign_in(.:format)        hoge/sessions#new
            hoge_user_session POST   /hoge/users/sign_in(.:format)        hoge/sessions#create
    destroy_hoge_user_session DELETE /hoge/users/sign_out(.:format)       hoge/sessions#destroy
       new_hoge_user_password GET    /hoge/users/password/new(.:format)   hoge/passwords#new
      edit_hoge_user_password GET    /hoge/users/password/edit(.:format)  hoge/passwords#edit
           hoge_user_password PATCH  /hoge/users/password(.:format)       hoge/passwords#update
                              PUT    /hoge/users/password(.:format)       hoge/passwords#update
                              POST   /hoge/users/password(.:format)       hoge/passwords#create
cancel_hoge_user_registration GET    /hoge/users/cancel(.:format)         hoge/registrations#cancel
   new_hoge_user_registration GET    /hoge/users/sign_up(.:format)        hoge/registrations#new
  edit_hoge_user_registration GET    /hoge/users/edit(.:format)           hoge/registrations#edit
       hoge_user_registration PATCH  /hoge/users(.:format)                hoge/registrations#update
                              PUT    /hoge/users(.:format)                hoge/registrations#update
                              DELETE /hoge/users(.:format)                hoge/registrations#destroy
                              POST   /hoge/users(.:format)                hoge/registrations#create
028 独自のルーティングを定義する
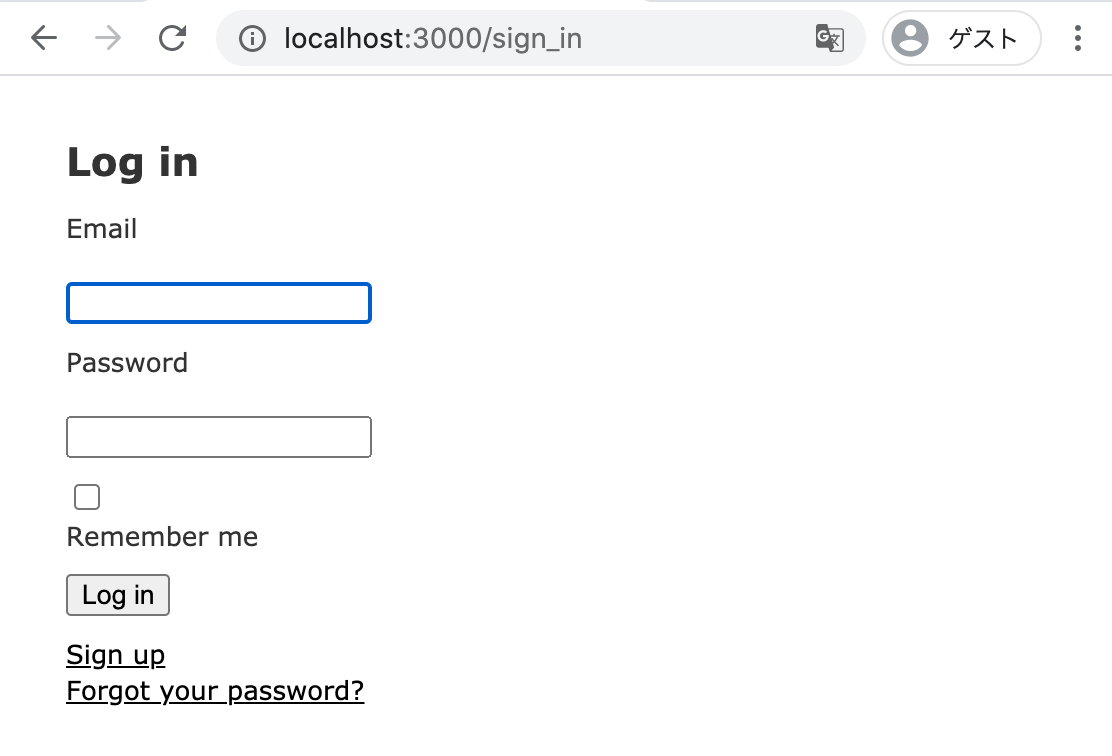
👦🏻 サインイン画面に/sign_inでアクセスしたくてこんなルーティングを定義したけどエラーになるよ。なんで?
# config/routes.rb

get "sign_in", to: "devise/sessions#new"
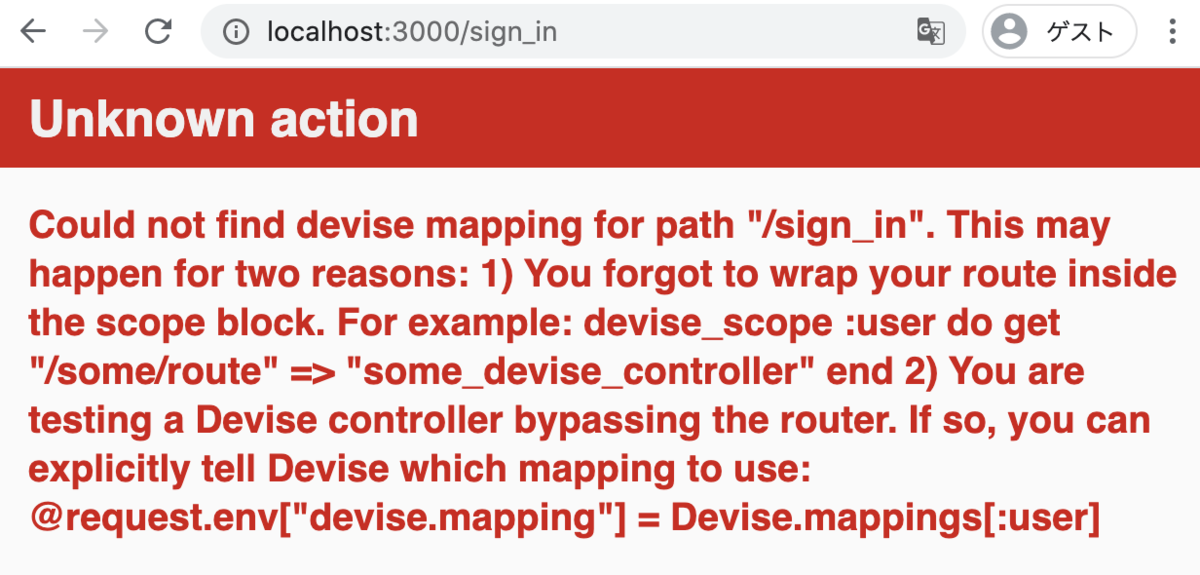
🐱 Deviseのコントローラーに対して素朴にルーティングを定義するとエラーになっちゃうよ。独自のルーティングを定義するには、devise_scopeというメソッドを使ってScopeを明示する必要があるんだ。
# config/routes.rb

# devise_scopeを使いuser Scopeに対するルーティングであることを明示する
# `users`ではなく`user`と単数形になるので注意
devise_scope :user do
  get "sign_in", to: "devise/sessions#new"
end
🐱 devise_forのpathオプションやpath_namesオプションがDeviseのルーティングを変更するのに対して、devise_scopeは新しくルーティングを追加する感じだよ。
🐱 ちなみにdevise_scopeにはasというaliasが存在するからそっちを使ってもOKだよ。
# config/routes.rb
as :user do
  get "sign_in", to: "devise/sessions#new"
end
参考
029 Deviseのルーティングを0から定義する
👦🏻 Deviseコントローラーに対してデフォルトのルーティングを全部なしにして、0から自分でルーティングを定義するにはどうすればいい?
🐱 devise_forでデフォルトのルーティングを全部skipして、devise_scopeで好きなようにルーティングを定義していけばOKだよ
# config/routes.rb

# デフォルトで定義されるルーティングは全部無効にする
# `:all`は全てのコントローラーを指す
devise_for :users, skip: :all

# あとはこの中に好きなようにルーティングを定義していけばOK
devise_scope :user do
  get "sign_in", to: "devise/sessions#new"
end
🐱 デフォルトのルーティングはなくなり、自分で定義したルーティングだけになるよ。
$ rails routes
   Prefix Verb   URI Pattern              Controller#Action
  sign_in GET    /sign_in(.:format)       devise/sessions#new
🐱 pathだけでなくuser_session_pathなどのURLヘルパーも変わるので注意してね。
参考
030 ログイン後とログイン前でrootのルーティングを分ける
🐱 ログイン後とログイン前でrootのルーティングを分けたい場合は、routes.rbでauthenticatedを使えばOKだよ。
# config/routes.rb

# ログイン後のroot。
# `authenticated`ブロック内はログイン後のユーザーに対してだけマッチする。
# どちらもURLヘルパーが`root_path`になるので、`as`オプションを使って変更してあげてね。じゃないとエラーになるよ。
# ルーティングは上から順に評価されるので、こちらを上にしてね。
authenticated do
  root to: 'dashboard#show', as: :authenticated_root
end

# ログイン前のroot。
root to: 'landing#show'
🐱 内部的にはRailsのconstraintsを利用しているので、コントローラーで分岐させるよりスマートになるよ。
🐱 Scopeを指定することも可能だよ。
# config/routes.rb

authenticated :admin do
  root to: 'admin/dashboard#show', as: :admin_root
end

root to: 'landing#show'
🐱 user.roleを指定することも可能だよ。
# config/routes.rb

authenticated :user, lambda {|user| user.role == "admin"} do
  root to: "admin/dashboard#show", as: :user_root
end

root to: 'landing#show'
031 ログイン後のみアクセスできるルーティングを定義する
🐱 ログイン後のみアクセスできるルーティングを定義するにはauthenticateメソッドを使ってね。
# config/routes.rb

# catsリソースにはログイン後でないとアクセスできない。
# ログイン前にアクセスするとroot_pathにリダイレクトされる。
authenticate do
  resources :cats
end
🐱 コントローラーでauthenticate_user!を使うのと同じ感じだよ。
# app/controllers/cats_controller.rb

class CatsController < ApplicationController
  before_action :authenticate_user!
end
🐱 authenticatedはログイン前だとルーティングにmatchしないのに対して、authenticateはログイン前だとmatchした上でroot_pathにリダイレクトするよ。少し違うので注意してね。
032 /users/sign_inを/users/loginに変更する
👦🏻 ログイン画面のpathを/users/sign_inから/users/loginに変えたいのだけど
🐱 そんな場合はdevise_forで自動で作成されるルーティングをスキップして、代わりに自分でルーティングを定義するといいよ。
# devise_forで自動作成される以下の3つのルーティングをスキップ
#   GET    /users/sign_in  devise/sessions#new
#   POST   /users/sign_in  devise/sessions#create
#   DELETE /users/sign_out devise/sessions#destroy
devise_for :users, skip: [:sessions]

# 代わりに以下の3つのルーティングを自分で定義する
#   GET    /users/login    devise/sessions#new
#   POST   /users/login    devise/sessions#create
#   DELETE /users/logout   devise/sessions#destroy
devise_scope :user do
  get 'login' => 'devise/sessions#new', as: :new_user_session
  post 'login' => 'devise/sessions#create', as: :user_session
  get 'logout' => 'devise/sessions#destroy', as: :destroy_user_session
end
🐱 別のやり方としては、devise_forのpath_namesオプションを使う方法もあるよ。
devise_for :users, path: '', path_names: { sign_in: 'login', sign_out: 'logout'}
参考
- How To: Change the default sign_in and sign_out routes · heartcombo/devise Wiki · GitHub
- devise でログインログアウトのパスを変更したいときの注意点 - おもしろwebサービス開発日記
第7章 メーラーをカスタマイズする
033 メール内容を変更する
🐱 メール内容をカスタマイズするにはメーラーのビューを変更すればOKだよ。 014 ビューをカスタマイズする とやり方は同じだよ。
🐱 まずは自分のアプリにビューファイルをコピーしてね。
$ rails g devise:views
      invoke  Devise::Generators::SharedViewsGenerator
       exist    app/views/devise/shared
      create    app/views/devise/shared/_error_messages.html.erb
      create    app/views/devise/shared/_links.html.erb
      invoke  form_for
       exist    app/views/devise/confirmations
      create    app/views/devise/confirmations/new.html.erb
       exist    app/views/devise/passwords
      create    app/views/devise/passwords/edit.html.erb
      create    app/views/devise/passwords/new.html.erb
       exist    app/views/devise/registrations
      create    app/views/devise/registrations/edit.html.erb
      create    app/views/devise/registrations/new.html.erb
       exist    app/views/devise/sessions
      create    app/views/devise/sessions/new.html.erb
       exist    app/views/devise/unlocks
      create    app/views/devise/unlocks/new.html.erb
      invoke  erb
       exist    app/views/devise/mailer
      create    app/views/devise/mailer/confirmation_instructions.html.erb
      create    app/views/devise/mailer/email_changed.html.erb
      create    app/views/devise/mailer/password_change.html.erb
      create    app/views/devise/mailer/reset_password_instructions.html.erb
      create    app/views/devise/mailer/unlock_instructions.html.erb
🐱 あとは作成されたメーラーのビューファイルを自分で修正していけばOKだよ。
🐱 メーラーのビューファイルは以下の5つだよ。
| ビューファイル | 概要 | モジュール |
|---|---|---|
| app/views/devise/mailer/confirmation_instructions.html.erb | confirmationの指示メール | Confirmable |
| app/views/devise/mailer/email_changed.html.erb | メールアドレス変更メール | Database Authenticatable |
| app/views/devise/mailer/password_change.html.erb | パスワード変更メール | Database Authenticatable |
| app/views/devise/mailer/reset_password_instructions.html.erb | パスワードリセットの指示メール | Recoverable |
| app/views/devise/mailer/unlock_instructions.html.erb | アンロックの指示メール | Lockable |
034 メールのfrom欄を変更する
🐱 Deviseで送信するメールのfrom欄を変更するにはconfig.mailer_senderを設定してね。
# config/initializers/devise.rb

- config.mailer_sender = 'please-change-me-at-config-initializers-devise@example.com'
+ config.mailer_sender = 'your-address@example.com'
035 メーラーをカスタマイズする
🐱 メーラー自体をカスタマイズしたい場合はDevise::Mailerを継承したメーラークラスを作成するよ。
# app/mailers/my_mailer.rb

class MyMailer < Devise::Mailer
  # application_helperのヘルパーを使えるようにする
  helper :application
  # URLヘルパーを使えるようにする
  include Devise::Controllers::UrlHelpers
  # my_mailerではなくdevise/mailerのビューを使うようにする
  default template_path: 'devise/mailer'
end
🐱 作成したメーラークラスをDeviseのメーラーとして設定するよ。全てのモジュールでこのメーラーが使われようになるよ。
# config/initializers/devise.rb

config.mailer = "MyMailer"
🐱 あとはこんな感じでカスタマイズしたいメールをオーバーライドしてね。
# app/mailers/my_mailer.rb

class MyMailer < Devise::Mailer
  # ...省略...

  # Confirmableモジュールのconfirmation指示のメール
  #
  # 引数
  #   record: user
  #   token: トークン
  #   opts: 追加オプション付きのhash
  def confirmation_instructions(record, token, opts={})
    # ヘッダー追加
    headers["Custom-header"] = "Bar"

    # 引数のoptsを利用するとfromなどのヘッダーをオーバーライドできる
    opts[:from] = 'my_custom_from@domain.com'
    opts[:reply_to] = 'my_custom_from@domain.com'

    # 元の処理をそのまま実行
    super
  end
end
🐱 Devise::Mailer自体は https://github.com/heartcombo/devise/blob/master/app/mailers/devise/mailer.rb に定義されてるよ。
# frozen_string_literal: true

if defined?(ActionMailer)
  class Devise::Mailer < Devise.parent_mailer.constantize
    include Devise::Mailers::Helpers

    def confirmation_instructions(record, token, opts = {})
      @token = token
      devise_mail(record, :confirmation_instructions, opts)
    end

    def reset_password_instructions(record, token, opts = {})
      @token = token
      devise_mail(record, :reset_password_instructions, opts)
    end

    def unlock_instructions(record, token, opts = {})
      @token = token
      devise_mail(record, :unlock_instructions, opts)
    end

    def email_changed(record, opts = {})
      devise_mail(record, :email_changed, opts)
    end

    def password_change(record, opts = {})
      devise_mail(record, :password_change, opts)
    end
  end
end
🐱 メーラーのメソッドは以下の通りだよ。
Database Authenticatable
| メーラー#メソッド | 概要 |
|---|---|
| Devise::Mailer#email_changed | Eメール変更完了メール。Eメール変更時に送信する。 |
| Devise::Mailer#password_change | パスワード変更完了メール。パスワード変更時に送信する。 |
Recoverable
| メーラー#メソッド | 概要 |
|---|---|
| Devise::Mailer#reset_password_instructions | パスワードリセットメール |
Confirmable
| メーラー#メソッド | 概要 |
|---|---|
| Devise::Mailer#confirmation_instructions | confirm指示メール |
Lockable
| メーラー#メソッド | 概要 |
|---|---|
| Devise::Mailer#unlock_instructions | アカウントアンロック指示メール |
参考
036 メール送信を非同期にする
🐱 ActiveJobを使っている場合、Deviseのメール送信もActiveJobを介して行うよ。デフォルトではDeviseのメール送信は同期送信になってるよ。
# https://github.com/heartcombo/devise/blob/45b831c4ea5a35914037bd27fe88b76d7b3683a4/lib/devise/models/authenticatable.rb#L200

def send_devise_notification(notification, *args)
  # mailを用意
  message = devise_mailer.send(notification, self, *args)

  # mailを同期送信
  # Remove once we move to Rails 4.2+ only.
  if message.respond_to?(:deliver_now)
    message.deliver_now
  else
    message.deliver
  end
end
🐱 メール送信を非同期にするには、Userモデルでsend_devise_notificationをオーバーライドしてあげればOKだよ。
# app/models/user.rb

def send_devise_notification(notification, *args)
  # deliver_laterを使って非同期送信するように修正
  devise_mailer.send(notification, self, *args).deliver_later
end
参考
- devise/authenticatable.rb at 45b831c4ea5a35914037bd27fe88b76d7b3683a4 · heartcombo/devise · GitHub
- Active Job with Rails 4 and Devise - Stack Overflow
第8章 I18nをカスタマイズする
037 メッセージを変更する
🐱 Deviseではflashメッセージ、バリデーションエラー、メールの件名にI18nを利用しているよ。devise.en.ymlの値を変更することで、対応するメッセージを変更できるよ。
🐱 devise.en.ymlはこんな感じだよ。
# config/locales/devise.en.yml

# Additional translations at https://github.com/heartcombo/devise/wiki/I18n

en:
  devise:
    confirmations:
      confirmed: "Your email address has been successfully confirmed."
      send_instructions: "You will receive an email with instructions for how to confirm your email address in a few minutes."
      send_paranoid_instructions: "If your email address exists in our database, you will receive an email with instructions for how to confirm your email address in a few minutes."
    failure:
      already_authenticated: "You are already signed in."
      inactive: "Your account is not activated yet."
      invalid: "Invalid %{authentication_keys} or password."
      locked: "Your account is locked."
      last_attempt: "You have one more attempt before your account is locked."
      not_found_in_database: "Invalid %{authentication_keys} or password."
      timeout: "Your session expired. Please sign in again to continue."
      unauthenticated: "You need to sign in or sign up before continuing."
      unconfirmed: "You have to confirm your email address before continuing."
    mailer:
      confirmation_instructions:
        subject: "Confirmation instructions"
      reset_password_instructions:
        subject: "Reset password instructions"
      unlock_instructions:
        subject: "Unlock instructions"
      email_changed:
        subject: "Email Changed"
      password_change:
        subject: "Password Changed"
    omniauth_callbacks:
      failure: "Could not authenticate you from %{kind} because \"%{reason}\"."
      success: "Successfully authenticated from %{kind} account."
    passwords:
      no_token: "You can't access this page without coming from a password reset email. If you do come from a password reset email, please make sure you used the full URL provided."
      send_instructions: "You will receive an email with instructions on how to reset your password in a few minutes."
      send_paranoid_instructions: "If your email address exists in our database, you will receive a password recovery link at your email address in a few minutes."
      updated: "Your password has been changed successfully. You are now signed in."
      updated_not_active: "Your password has been changed successfully."
    registrations:
      destroyed: "Bye! Your account has been successfully cancelled. We hope to see you again soon."
      signed_up: "Welcome! You have signed up successfully."
      signed_up_but_inactive: "You have signed up successfully. However, we could not sign you in because your account is not yet activated."
      signed_up_but_locked: "You have signed up successfully. However, we could not sign you in because your account is locked."
      signed_up_but_unconfirmed: "A message with a confirmation link has been sent to your email address. Please follow the link to activate your account."
      update_needs_confirmation: "You updated your account successfully, but we need to verify your new email address. Please check your email and follow the confirmation link to confirm your new email address."
      updated: "Your account has been updated successfully."
      updated_but_not_signed_in: "Your account has been updated successfully, but since your password was changed, you need to sign in again"
    sessions:
      signed_in: "Signed in successfully."
      signed_out: "Signed out successfully."
      already_signed_out: "Signed out successfully."
    unlocks:
      send_instructions: "You will receive an email with instructions for how to unlock your account in a few minutes."
      send_paranoid_instructions: "If your account exists, you will receive an email with instructions for how to unlock it in a few minutes."
      unlocked: "Your account has been unlocked successfully. Please sign in to continue."
  errors:
    messages:
      already_confirmed: "was already confirmed, please try signing in"
      confirmation_period_expired: "needs to be confirmed within %{period}, please request a new one"
      expired: "has expired, please request a new one"
      not_found: "not found"
      not_locked: "was not locked"
      not_saved:
        one: "1 error prohibited this %{resource} from being saved:"
        other: "%{count} errors prohibited this %{resource} from being saved:"
🐱 この値を変更することでDeviseのメッセージを変更できるよ。
038 メッセージを日本語化する
🐱 メッセージを日本語化するには、Railsのデフォルトロケールを:jaに変更して、jaロケールファイルを設置すればOKだよ。
🐱 まずデフォルトロケールを日本語に設定してね。
# config/application.rb

config.i18n.default_locale = :ja
🐱 次にjaロケールファイルを設置するよ。 https://github.com/heartcombo/devise/wiki/I18n#japanese-devisejayml に日本語化されたロケールファイルがあるので利用してね。
# config/locales/devise.ja.yml

# Additional translations at https://github.com/plataformatec/devise/wiki/I18n

ja:
  devise:
    confirmations:
      confirmed: "アカウントの確認が成功しました。"
      send_instructions: "アカウントの確認方法をメールでご連絡します。"
      send_paranoid_instructions: "あなたのメールアドレスが登録済みの場合、アカウントの確認方法をメールでご連絡します。"
    failure:
      already_authenticated: "既にログイン済みです。"
      inactive: 'アカウントが有効になっていません。'
      invalid: 'メールアドレスかパスワードが違います。'
      locked: "アカウントがロックされています。"
      last_attempt: "もう一回ログインに失敗したらアカウントがロックされます。"
      not_found_in_database: "メールアドレスまたはパスワードが無効です。"
      timeout: "一定時間が経過したため、再度ログインが必要です"
      unauthenticated: "続けるには、ログインまたは登録(サインアップ)が必要です。"
      unconfirmed: "続ける前に、アカウントの確認をお願いします。"
    mailer:
      confirmation_instructions:
        subject: "アカウントの登録方法"
      reset_password_instructions:
        subject: "パスワードの再設定"
      unlock_instructions:
        subject: "アカウントのロック解除"
    omniauth_callbacks:
      failure: "%{kind} から承認されませんでした。理由:%{reason}"
      success: "%{kind} から承認されました。"
    passwords:
      no_token: "パスワードリセットのメール以外からは、このページにアクセスする事ができません。もしパスワードリセットのメールから来ている場合は、正しいURLでアクセスしていることを確認して下さい。"
      send_instructions: "パスワードのリセット方法をメールでご連絡します。"
      send_paranoid_instructions: "メールアドレスが登録済みの場合、パスワード復旧用ページヘのリンクをメールでご連絡します。"
      updated: "パスワードを変更しました。ログイン済みです"
      updated_not_active: "パスワードを変更しました。"
    registrations:
      destroyed: "アカウントを削除しました。ぜひまたのご利用をお待ちしております!"
      signed_up: "ようこそ!アカウント登録を受け付けました。"
      signed_up_but_inactive: "アカウントは登録されていますが、有効になっていないため利用できません。"
      signed_up_but_locked: "アカウントは登録されていますが、ロックされているため利用できません。"
      signed_up_but_unconfirmed: "確認メールを、登録したメールアドレス宛に送信しました。メールに記載されたリンクを開いてアカウントを有効にして下さい。"
      update_needs_confirmation: "アカウント情報が更新されました。新しいメールアドレスの確認が必要です。更新確認のメールを新しいメールアドレス宛に送信しましたので、メールを確認し記載されたリンクを開き、新しいメールアドレスの確認をお願いします。"
      updated: "アカウントが更新されました。"
    sessions:
      signed_in: "ログインしました。"
      signed_out: "ログアウトしました。"
    unlocks:
      send_instructions: "アカウントのロックを解除する方法をメールでご連絡します。"
      send_paranoid_instructions: "アカウントが存在する場合、ロックを解除する方法をメールでご連絡します。"
      unlocked: "アカウントのロックが解除されました。続けるにはログインして下さい。"
  errors:
    messages:
      already_confirmed: "は既に登録済みです。ログインしてください"
      confirmation_period_expired: "%{period}以内に確認する必要がありますので、新しくリクエストしてください。"
      expired: "有効期限切れです。新しくリクエストしてください。"
      not_found: "は見つかりませんでした。"
      not_locked: "ロックされていません。"
      not_saved:
        one: "1つのエラーにより、%{resource} を保存できませんでした:"
        other: "%{count} 個のエラーに  せんでした:"
🐱 これでログイン時などに表示されるメッセージが日本語化されるよ。
🐱 ビューの文言はI18nを使わずに直接英語で書かれているため、日本語化されないよ。ビューも日本語化したい場合は 039 ビューを日本語化する を参照してね。
039 ビューを日本語化する
🐱 Deviseではflashメッセージ、バリデーションエラー、メールの件名にI18nを利用しているよ。ビューの文言はI18nを使わずに直接英語で書かれているため、 038 メッセージを日本語化する のやり方では日本語化されないんだ。
🐱 devise-i18nというgemを利用すれば、I18nに対応したビューを作成できるためビューの文言も日本語化できるよ。devise-i18nではメッセージも一緒に日本語化されるため、 038 メッセージを日本語化する の手順は不要だよ。それじゃあ日本語化していくね。
🐱 まずはdevise-i18nをインストールしてね。
# Gemfile
gem 'devise-i18n'
$ bundle install
🐱 デフォルトロケールを日本語に設定するよ。
# config/application.rb
config.i18n.default_locale = :ja
🐱 devise-i18nのジェネレーターを使って、I18n対応のビューを作成するよ。既に$ rails g devise:viewsでビューを作成している場合はコンフリクトするから事前に削除しておいてね。
$ rails g devise:i18n:views
      invoke  Devise::I18n::SharedViewsGenerator
      create    app/views/devise/shared
      create    app/views/devise/shared/_error_messages.html.erb
      create    app/views/devise/shared/_links.html.erb
      invoke  Devise::I18n::MailerViewsGenerator
      create    app/views/devise/mailer
      create    app/views/devise/mailer/confirmation_instructions.html.erb
      create    app/views/devise/mailer/email_changed.html.erb
      create    app/views/devise/mailer/password_change.html.erb
      create    app/views/devise/mailer/reset_password_instructions.html.erb
      create    app/views/devise/mailer/unlock_instructions.html.erb
      invoke  i18n:form_for
      create    app/views/devise/confirmations
      create    app/views/devise/confirmations/new.html.erb
      create    app/views/devise/passwords
      create    app/views/devise/passwords/edit.html.erb
      create    app/views/devise/passwords/new.html.erb
      create    app/views/devise/registrations
      create    app/views/devise/registrations/edit.html.erb
      create    app/views/devise/registrations/new.html.erb
      create    app/views/devise/sessions
      create    app/views/devise/sessions/new.html.erb
      create    app/views/devise/unlocks
      create    app/views/devise/unlocks/new.html.erb
🐱 Deviseのジェネレーターで作成したサインイン画面と、devise-i18nのジェネレーターで作成したサインイン画面のコードを比べてみよう。
🐱 こちらはDeviseのジェネレーターで作成したサインイン画面。
# app/views/devise/sessions/new.html.erb

<!-- 『Log in』などの文言が英語で直接書かれている -->
<h2>Log in</h2>

<%= form_for(resource, as: resource_name, url: session_path(resource_name)) do |f| %>
  <div class="field">
    <%= f.label :email %><br />
    <%= f.email_field :email, autofocus: true, autocomplete: "email" %>
  </div>

  <div class="field">
    <%= f.label :password %><br />
    <%= f.password_field :password, autocomplete: "current-password" %>
  </div>

  <% if devise_mapping.rememberable? %>
    <div class="field">
      <%= f.check_box :remember_me %>
      <%= f.label :remember_me %>
    </div>
  <% end %>

  <div class="actions">
    <%= f.submit "Log in" %>
  </div>
<% end %>

<%= render "devise/shared/links" %>
🐱 こちらはdevise-i18nのジェネレーターで作成したサインイン画面。『Log in』などの文言がtメソッドを利用して書かれているよ。
# app/views/devise/sessions/new.html.erb

<!-- 『Log in』などの文言が`t`メソッドを利用して書かれている -->
<h2><%= t('.sign_in') %></h2>

<%= form_for(resource, as: resource_name, url: session_path(resource_name)) do |f| %>
  <div class="field">
    <%= f.label :email %><br />
    <%= f.email_field :email, autofocus: true, autocomplete: "email" %>
  </div>

  <div class="field">
    <%= f.label :password %><br />
    <%= f.password_field :password, autocomplete: "current-password" %>
  </div>

  <% if devise_mapping.rememberable? %>
    <div class="field">
      <%= f.check_box :remember_me %>
      <%= f.label :remember_me %>
    </div>
  <% end %>

  <div class="actions">
    <%= f.submit t('.sign_in') %>
  </div>
<% end %>

<%= render "devise/shared/links" %>
🐱 最後にjaロケールファイルを作成するよ。
$ rails g devise:i18n:locale ja
      create  config/locales/devise.views.ja.yml
🐱 このロケールファイルはビューのI18nだけでなくメッセージのI18nにも対応しているよ。なのでDeviseのjaロケールファイルはこれだけあればOKだよ。
ja:
  activerecord:
    attributes:
      user:
        confirmation_sent_at: パスワード確認送信時刻
        confirmation_token: パスワード確認用トークン
        confirmed_at: パスワード確認時刻
        created_at: 作成日
        current_password: 現在のパスワード
        current_sign_in_at: 現在のログイン時刻
        current_sign_in_ip: 現在のログインIPアドレス
        email: Eメール
        encrypted_password: 暗号化パスワード
        failed_attempts: 失敗したログイン試行回数
        last_sign_in_at: 最終ログイン時刻
        last_sign_in_ip: 最終ログインIPアドレス
        locked_at: ロック時刻
        password: パスワード
        password_confirmation: パスワード(確認用)
        remember_created_at: ログイン記憶時刻
        remember_me: ログインを記憶する
        reset_password_sent_at: パスワードリセット送信時刻
        reset_password_token: パスワードリセット用トークン
        sign_in_count: ログイン回数
        unconfirmed_email: 未確認Eメール
        unlock_token: ロック解除用トークン
        updated_at: 更新日
    models:
      user: ユーザ
  devise:
    confirmations:
      confirmed: メールアドレスが確認できました。
      new:
        resend_confirmation_instructions: アカウント確認メール再送
      send_instructions: アカウントの有効化について数分以内にメールでご連絡します。
      send_paranoid_instructions: メールアドレスが登録済みの場合、本人確認用のメールが数分以内に送信されます。
    failure:
      already_authenticated: すでにログインしています。
      inactive: アカウントが有効化されていません。メールに記載された手順にしたがって、アカウントを有効化してください。
      invalid: "%{authentication_keys}またはパスワードが違います。"
      last_attempt: もう一回誤るとアカウントがロックされます。
      locked: アカウントは凍結されています。
      not_found_in_database: "%{authentication_keys}またはパスワードが違います。"
      timeout: セッションがタイムアウトしました。もう一度ログインしてください。
      unauthenticated: アカウント登録もしくはログインしてください。
      unconfirmed: メールアドレスの本人確認が必要です。
    mailer:
      confirmation_instructions:
        action: メールアドレスの確認
        greeting: "%{recipient}様"
        instruction: 以下のリンクをクリックし、メールアドレスの確認手続を完了させてください。
        subject: メールアドレス確認メール
      email_changed:
        greeting: こんにちは、%{recipient}様。
        message: あなたのメール変更(%{email})のお知らせいたします。
        subject: メール変更完了。
      password_change:
        greeting: "%{recipient}様"
        message: パスワードが再設定されたことを通知します。
        subject: パスワードの変更について
      reset_password_instructions:
        action: パスワード変更
        greeting: "%{recipient}様"
        instruction: パスワード再設定の依頼を受けたため、メールを送信しています。下のリンクからパスワードの再設定ができます。
        instruction_2: パスワード再設定の依頼をしていない場合、このメールを無視してください。
        instruction_3: パスワードの再設定は、上のリンクから新しいパスワードを登録するまで完了しません。
        subject: パスワードの再設定について
      unlock_instructions:
        action: アカウントのロック解除
        greeting: "%{recipient}様"
        instruction: アカウントのロックを解除するには下のリンクをクリックしてください。
        message: ログイン失敗が繰り返されたため、アカウントはロックされています。
        subject: アカウントの凍結解除について
    omniauth_callbacks:
      failure: "%{kind} アカウントによる認証に失敗しました。理由:(%{reason})"
      success: "%{kind} アカウントによる認証に成功しました。"
    passwords:
      edit:
        change_my_password: パスワードを変更する
        change_your_password: パスワードを変更
        confirm_new_password: 確認用新しいパスワード
        new_password: 新しいパスワード
      new:
        forgot_your_password: パスワードを忘れましたか?
        send_me_reset_password_instructions: パスワードの再設定方法を送信する
      no_token: このページにはアクセスできません。パスワード再設定メールのリンクからアクセスされた場合には、URL をご確認ください。
      send_instructions: パスワードの再設定について数分以内にメールでご連絡いたします。
      send_paranoid_instructions: メールアドレスが登録済みの場合、パスワード再設定用のメールが数分以内に送信されます。
      updated: パスワードが正しく変更されました。
      updated_not_active: パスワードが正しく変更されました。
    registrations:
      destroyed: アカウントを削除しました。またのご利用をお待ちしております。
      edit:
        are_you_sure: 本当によろしいですか?
        cancel_my_account: アカウント削除
        currently_waiting_confirmation_for_email: "%{email} の確認待ち"
        leave_blank_if_you_don_t_want_to_change_it: 空欄のままなら変更しません
        title: "%{resource}編集"
        unhappy: 気に入りません
        update: 更新
        we_need_your_current_password_to_confirm_your_changes: 変更を反映するには現在のパスワードを入力してください
      new:
        sign_up: アカウント登録
      signed_up: アカウント登録が完了しました。
      signed_up_but_inactive: ログインするためには、アカウントを有効化してください。
      signed_up_but_locked: アカウントが凍結されているためログインできません。
      signed_up_but_unconfirmed: 本人確認用のメールを送信しました。メール内のリンクからアカウントを有効化させてください。
      update_needs_confirmation: アカウント情報を変更しました。変更されたメールアドレスの本人確認のため、本人確認用メールより確認処理をおこなってください。
      updated: アカウント情報を変更しました。
      updated_but_not_signed_in: あなたのアカウントは正常に更新されましたが、パスワードが変更されたため、再度ログインしてください。
    sessions:
      already_signed_out: 既にログアウト済みです。
      new:
        sign_in: ログイン
      signed_in: ログインしました。
      signed_out: ログアウトしました。
    shared:
      links:
        back: 戻る
        didn_t_receive_confirmation_instructions: アカウント確認のメールを受け取っていませんか?
        didn_t_receive_unlock_instructions: アカウントの凍結解除方法のメールを受け取っていませんか?
        forgot_your_password: パスワードを忘れましたか?
        sign_in: ログイン
        sign_in_with_provider: "%{provider}でログイン"
        sign_up: アカウント登録
      minimum_password_length: "(%{count}字以上)"
    unlocks:
      new:
        resend_unlock_instructions: アカウントの凍結解除方法を再送する
      send_instructions: アカウントの凍結解除方法を数分以内にメールでご連絡します。
      send_paranoid_instructions: アカウントが見つかった場合、アカウントの凍結解除方法を数分以内にメールでご連絡します。
      unlocked: アカウントを凍結解除しました。
  errors:
    messages:
      already_confirmed: は既に登録済みです。ログインしてください。
      confirmation_period_expired: の期限が切れました。%{period} までに確認する必要があります。 新しくリクエストしてください。
      expired: の有効期限が切れました。新しくリクエストしてください。
      not_found: は見つかりませんでした。
      not_locked: は凍結されていません。
      not_saved:
        one: エラーが発生したため %{resource} は保存されませんでした。
        other: "%{count} 件のエラーが発生したため %{resource} は保存されませんでした。"
🐱 これでビューとメッセージを日本語化できたよ。
🐱 ちなみに複数モデルを利用していてScope対応のビュー(usersとかadminとかのやつ)が必要な場合は、Scopeを指定すればOKだよ。
$ rails g devise:i18n:views users
$ rails g devise:i18n:views admins
第9章 設定をカスタマイズする
040 設定を変更する
🐱 Deviseの設定はconfig/initializers/devise.rbで変更可能だよ。
🐱 各設定項目は日本語で説明すると以下のような感じだよ。ちなみにコメントアウトされている値が(基本的には)デフォルト値になるよ。
# config/initializers/devise.rb

# frozen_string_literal: true

Devise.setup do |config|
  # Deviseが使用する秘密鍵。
  # Deviseはこのキーを利用してtokenを作成する(confirmation_token、reset_password_token、unlock_token)。
  # このキーを変更すると全てのtokenが無効になる。
  # デフォルトではsecret_key_baseをsecret_keyとして利用する。
  # config.secret_key = '48bf747d05636bd17b63751533ac6879106a058e94253754a0bfe552d60ab822ad52c25b322c93b90d7479a91fe28da84ac038f8b295d523a4c2a18c08ed9c42'

  # ==> Controllerの設定
  # Devise::SessionsControllerなどのDeviseの各コントローラーの親クラス。
  # config.parent_controller = 'DeviseController'

  # ==> Mailerの設定
  # Mailerのfrom。
  config.mailer_sender = 'please-change-me-at-config-initializers-devise@example.com'

  # Mailerクラス
  # カスタムMailerを利用する場合はここを変更する。
  # 詳細は『035 メーラーをカスタマイズする』を参照。
  # config.mailer = 'Devise::Mailer'

  # Devise::Mailerの親クラス。
  # config.parent_mailer = 'ActionMailer::Base'

  # ==> ORMの設定
  # ORMをロードする。
  # ActiveRcordとMongoidをサポートしている。
  require 'devise/orm/active_record'

  # ==> 認証全般の設定
  # 認証キー(ユーザーを認証する際に利用するキー)。
  # email以外のキーを利用したい場合に変更する。
  # 詳細は『024 emailの代わりにusernameでログインさせる』を参照。
  # config.authentication_keys = [:email]

  # 認証に使用するリクエストオブジェクトのパラメータ。
  # config.request_keys = []

  # 大文字小文字を区別しない認証キー。
  # Userの作成/修正/認証/検索時に大文字小文字を区別しない 。
  config.case_insensitive_keys = [:email]

  # 空白を削除する認証キー。
  # Userの作成/修正/認証/検索時に空白を削除する。
  config.strip_whitespace_keys = [:email]

  # request.paramsによる認証を有効にする。
  # `config.params_authenticatable = [:database]`とすればDB認証(メール + パスワード)認証のみを有効にする。
  # config.params_authenticatable = true

  # HTTP Authによる認証を有効にする。
  # `config.http_authenticatable = [:database]` とすればDB認証のみを有効にする。
  # config.http_authenticatable = false

  # Ajaxリクエストに対して401を返す。
  # config.http_authenticatable_on_xhr = true

  # Basic認証で利用されるrealm。
  # config.http_authentication_realm = 'Application'

  # paranoidモード。
  # メールアドレスが登録されているかどうかを確認するのを防ぐ。
  # 詳細は https://github.com/heartcombo/devise/wiki/How-To:-Using-paranoid-mode,-avoid-user-enumeration-on-registerable
  # config.paranoid = true

  # userをsessionに保存する処理をスキップする箇所。
  config.skip_session_storage = [:http_auth]

  # セキュリティーのため認証時にCSRFトークンをsessionから削除する。
  # trueだとサインインやサインアップでAjaxを使用する場合、サーバーから新しいCSRFトークンを取得する必要がある。
  # config.clean_up_csrf_token_on_authentication = true

  # eager load時にルーティングをリロードする。
  # before_eager_loadフックを利用。
  # falseにするとアプリ起動が高速になるが、Deviseのマッピングをロードする必要がある場合は正常に起動できない。
  # config.reload_routes = true

  # ==> Database Authenticatableモジュールの設定
  # ハッシュ化のレベル。
  # ハッシュ化には結構時間がかかる。
  # bcrypt(デフォルトのアルゴリズム)の場合、レベルに応じて指数関数的に遅くなり、例えばレベル20では60秒程度かかる。
  # テストの時はレベル1にして速度を上げる。
  # 本番ではレベル10以下は利用すべきでない。
  config.stretches = Rails.env.test? ? 1 : 12

  # ハッシュ化する際のpepper。
  # pepperはsaltみたいなやつ。
  # 詳細は https://stackoverflow.com/questions/6831796/whats-the-most-secure-possible-devise-configuration
  # config.pepper = '9a11b4eaf0250fec05630de0b518c3f63086fa403a8309d74408b3223d57a2312cef3ef746152f43c508da74b11cf21f982d9573ef552a186e36d83818129029'

  # email変更時にemail変更完了メールを送信する。
  # config.send_email_changed_notification = false

  # password変更時にpassword変更完了メールを送信する。
  # config.send_password_change_notification = false

  # ==> Confirmableモジュールの設定
  # confirmなしでログインできる期間。
  # これを設定すると一定期間はconfirm前でもログインできるようになる。
  # nilに設定すると無期限にログインできるようになる。
  # デフォルトは 0.days。(confirmなしにはログインできない。)
  # config.allow_unconfirmed_access_for = 2.days

  # confirmation_tokenの有効期限。
  # ユーザーはこの期限内にconfirm指示メールのリンクをクリックしないといけない。
  # デフォルトは nil。(制限なし。)
  # config.confirm_within = 3.days

  # サインアップ時だけでなく、email変更時にもConfirmメールを送信する。
  # unconfirmed_emailカラムが必要。
  config.reconfirmable = true

  # confirmのキー。
  # config.confirmation_keys = [:email]

  # ==> Rememberableモジュールの設定
  # Sessionが切れるまでの時間。
  # デフォルトは2.weeks。
  # config.remember_for = 2.weeks

  # ログアウト時にremember_tokenを期限切れにする。
  config.expire_all_remember_me_on_sign_out = true

  # cookie利用時に期間を伸ばす。
  # config.extend_remember_period = false

  # cookieにセットするオプション。
  # config.rememberable_options = {}

  # ==> Validatableモジュールの設定
  # passwordの長さ。
  # Rangeで指定。この場合は6文字から128文字。
  config.password_length = 6..128

  # emailバリデーションで利用する正規表現
  config.email_regexp = /\A[^@\s]+@[^@\s]+\z/

  # ==> Timeoutableモジュールの設定
  # タイムアウト時間
  # config.timeout_in = 30.minutes

  # ==> lockableモジュールの設定
  # ロック方法
  #   - failed_attempts: 指定回数間違えたらロック
  #   - none: 自動ロックはなしで、サーバ管理者が手動でロック
  # config.lock_strategy = :failed_attempts

  # アンロックのキー
  # config.unlock_keys = [:email]

  # アンロック方法
  #   - email: メールでアンロックのリンクを送信
  #   - time: 数時間後にアンロック(config.unlock_inと一緒に使う)
  #   - both: emailとtimeの両方
  #   - none: 自動アンロックはなしで、サーバ管理者が手動でアンロック
  # config.unlock_strategy = :both

  # ロックまでの回数
  # config.maximum_attempts = 20

  # アンロックまでの時間(`config.unlock_strategy = :time`の場合)
  # config.unlock_in = 1.hour

  # ロック前に警告する
  # config.last_attempt_warning = true

  # ==> Recoverableモジュールの設定
  #
  # パスワードリセット時にキーになるカラム。
  # config.reset_password_keys = [:email]

  # パスワードリセットの有効期限。
  config.reset_password_within = 6.hours

  # パスワードリセット後に自動ログイン。
  # config.sign_in_after_reset_password = true

  # ==> devise-encryptable gemの設定
  # bcrypt以外のハッシュ化アルゴリズム。
  # devise-encryptable gemのインストールが必要。
  # bcrypt以外のアルゴリズムは:sha1、:sha512、:clearance_sha1、:authlogic_sha512、:sha1など。
  # config.encryptor = :sha512

  # ==> Scopeの設定
  # Scope用のビューを優先的に使うようになる。
  # trueにすると`devise`名前空間のビューではなく、`users`などのScope対応のビューを利用する。
  # デフォルトは高速化のため`false`に設定されている。
  # 詳細は『023 複数モデルを利用する』を参照。
  # config.scoped_views = false

  # デフォルトのScope。
  # 通常であればuserになる。
  # config.default_scope = :user

  # ログアウト時に全てのScopeでのログアウトとする。
  # falseの場合は/users/sign_outでログアウトした場合、user Scopeだけログアウトになる。
  # config.sign_out_all_scopes = true

  # ==> Navigationの設定
  # ナビゲーションとして扱われるフォーマットのリスト。
  # config.navigational_formats = ['*/*', :html]

  # ログアウト時のHTTPメソッド
  config.sign_out_via = :delete

  # ==> OmniAuthの設定
  # OmniAuthの設定。
  # config.omniauth :github, 'APP_ID', 'APP_SECRET', scope: 'user,public_repo'

  # ==> Wardenの設定
  # Wardenの設定。
  # strategy追加したりfailure_app変更したり。
  #
  # config.warden do |manager|
  #   manager.intercept_401 = false
  #   manager.default_strategies(scope: :user).unshift :some_external_strategy
  # end

  # ==> Mountable Engineの設定
  # Mountable Engineで使う際のrouter名。
  # config.router_name = :my_engine
  #
  # OmniAuthのpath。
  # OmniAuthを利用する場合に設定する。
  # config.omniauth_path_prefix = '/my_engine/users/auth'

  # ==> Turbolinksの設定
  # Turbolinksを利用している場合、リダイレクトを正しく動作させるためにTurbolinks::Controllerをincludeする。
  #
  # ActiveSupport.on_load(:devise_failure_app) do
  #   include Turbolinks::Controller
  # end

  # ==> Registerableモジュールの設定
  # パスワード変更後に自動的にサインインさせる。
  # config.sign_in_after_change_password = true
end
参考
第10章 その他のカスタマイズ(Wikiまとめ)
🐱 DeviseのWiki( https://github.com/heartcombo/devise/wiki )にはいろんなカスタマイズのやり方が書かれているよ。Wikiの中から、知っておくと役立ちそうなカスタマイズをまとめておくね。
041 パスワード変更時にログアウトさせない
🐱 Deviseの仕様で、ログイン中にユーザーがパスワードを変更すると自動的にログアウト状態になってしまうよ。ログイン状態を維持するためにはbypass_sign_in(user)を利用すればOKだよ。sign_in(user, :bypass => true)を使う方法はdeprecatedなので注意してね。詳しくは以下の記事を参考にしてね。
- How To: Allow users to edit their password · heartcombo/devise Wiki · GitHub
- ruby on rails - Devise logging out automatically after password change - Stack Overflow
- Deviseでパスワード変更時にログアウトしない方法 - ワシはワシが育てる
- Deviseでパスワード変更した場合のログアウトを防ぐ | 自転車で通勤しましょ♪ブログ
042 Deviseに独自の認証方法(Strategy)を追加する
🐱 DeviseはWardenを利用しているため、独自のStrategyクラスを定義することで、独自の認証方法を追加できるよ。詳しくは以下の記事を参考にしてね。あと057 Wardenも参考になるよ。
- How To: Authenticate via LDAP · heartcombo/devise Wiki · GitHub
- Rails/Deviseを利用した認証を Amazon Cognito 認証に委譲する - stmn tech blog
- deviseの独自ストラテジーの作り方 - Adwaysエンジニアブログ
- Deviseに独自のstrategyを入れる - あすたぴのブログ
043 ゲストユーザー機能を実装する
🐱 ゲストユーザー機能はサインアップ無しでアプリケーションを利用できるようになる機能だよ。ユーザーは個人情報を提供せずにアプリケーションを試せるようになるよ。詳しくは以下の記事を参考にしてね。
- How To: Create a guest user · heartcombo/devise Wiki · GitHub
- #393 Guest User Record - RailsCasts
- 簡単ログイン・ゲストログイン機能の実装方法(ポートフォリオ用) - Qiita
- [Rails] devise を利用 ゲストユーザー機能( ポートフォリオ 用) - Qiita
044 アカウント削除を論理削除にする
🐱 アカウント削除をすると、デフォルトではusersレコードを物理削除するよ。これを論理削除に変更して、usersレコードは残したままログインできないようにするよ。詳しくは以下の記事を参考にしてね。
- How to: Soft delete a user when user deletes account · heartcombo/devise Wiki · GitHub
- 【翻訳】deviseで論理削除を実装する方法 - Qiita
- [Rails]paranoiaを使わずに退会機能を実装する(ユーザーを論理削除する) - Qiita
045 管理者権限を用意する
🐱 Deviseで管理者を用意するには、Userモデル以外にAdminモデルを用意する方法があるよね(023 複数モデルを利用する)。別のやり方として、モデルはUser1つだけにして、roleのようなカラムで管理者権限を利用する方法があるよ。Deviseが認証のgemであるのに対して、この権限の管理には認可のgemを利用するんだ。認可のgemとしてはCanCanCanとPunditの2つが有名だよ。この2つはできることはほとんど同じなので、どちらか好きな方を利用すればOKだよ。CanCanCanがロール起点で権限を定義するのに対して、Punditはリソース起点で権限を定義するよ。詳しくは以下の記事を参考にしてね。
CanCanCan
- GitHub - CanCanCommunity/cancancan: The authorization Gem for Ruby on Rails.
- How to use CanCan / CanCanCan - Qiita
Pundit
- GitHub - varvet/pundit: Minimal authorization through OO design and pure Ruby classes
- Pundit + Railsで認可の仕組みをシンプルに作る - Qiita
046 emailとusernameどちらでもログインできるようにする
🐱 通常だとemailでログインするけど、これがemailとusernameどちらでもログインできるようになったら嬉しいよね。Userモデルにemail属性とusername属性の2役をこなすloginという仮想属性を用意すれば実現できるよ。詳しくは以下の記事を参考にしてね。
- How To: Allow users to sign in using their username or email address · heartcombo/devise Wiki · GitHub
- Rails deviseによるユーザー認証 メールによる認証、emailとusernameのどちらでもログイン可能にするまで - Qiita
- Rails4.1でdeviseのログインIDをemailとusernameのどちらでも可能にする - Qiita
047 パスワード入力なしでアカウント情報を変更する
🐱 アカウント編集画面(/users/edit)で自分のアカウント情報を変更するためには、現在のパスワードの入力が必須だよ。これをパスワードなしで変更できるようにするよ。詳しくは以下の記事を参考にしてね。
- How To: Allow users to edit their account without providing a password · heartcombo/devise Wiki · GitHub
- Devise でユーザーがパスワードなしでアカウント情報を変更するのを許可 | EasyRamble
048 パスワードをbcrypt以外の方法でハッシュ化する
🐱 Deviseではデフォルトでbcryptを使いパスワードをハッシュ化するよ。devise-encryptablegemを使うことで別の方法でハッシュ化できるようになるよ。詳しくは以下の記事を参考にしてね。
- How To: Create a custom encryptor · heartcombo/devise Wiki · GitHub
- GitHub - heartcombo/devise-encryptable: Devise encryptable behavior since v2.1
- deviseの暗号化アルゴリズムの変更方法 - aik's blog
049 メールアドレス変更時にもConfirm指示メールを送信する
🐱 Confirmableモジュールはデフォルトではメールアドレス変更時にはConfirm指示メールを送信しないよ。これを修正するにはconfig.reconfirmable = true
という設定をする必要があるよ。詳しくは以下の記事を参考にしてね。
第11章 Tips
050 userをserializeする
👦🏻 RailsコンソールでUserインスタンスを見るとencrypted_passwordなどの属性が表示されないよ?なんで?
irb(main):009:0> User.first
=> #<User id: 2, email: "shita@example.com", created_at: "2020-11-06 06:06:36", updated_at: "2020-11-06 06:06:36">
🐱 Deviseではセキュリティー上の都合で、必要なカラムだけをシリアライズするようになってるんだ。usersテーブルにencrypted_password(ハッシュ化されたパスワード)やcurrent_sign_in_ip(サインイン時のIPアドレス)カラムなどのセンシティブな情報を持たせることになるでしょ?Userインスタンスを丸ごとシリアライズしてしまうと、場合によってはそれらの情報が漏れてしまう可能性があるんだ。だからDeviseではserializable_hashをオーバーライドしてセンシティブな情報はシリアライズされないようにしているんだよ。RailsコンソールではUserインスタンスの状態がinspectを使って表示されるけど、inspectもserializable_hashを利用するようにオーバーライドされているため、Railsコンソールではencrypted_passwordなどのカラム情報が表示されないようになっているよ。
irb(main):016:0> User.first.serializable_hash
=> {"id"=>2, "email"=>"shita@example.com", "created_at"=>Fri, 06 Nov 2020 06:06:36 UTC +00:00, "updated_at"=>Fri, 06 Nov 2020 06:06:36 UTC +00:00}
🐱 具体的には以下の属性はシリアライズされないよ。
encrypted_password
reset_password_token
reset_password_sent_at
remember_created_at
sign_in_count
current_sign_in_at
last_sign_in_at
current_sign_in_ip
last_sign_in_ip
password_salt
confirmation_token
confirmed_at
confirmation_sent_at
remember_token
unconfirmed_email
failed_attempts
unlock_token
locked_at
🐱 serializable_hash(force_except: true)を使ったりattributesを使えばencrypted_passwordfなどの情報にもアクセスできるよ。
irb(main):017:0> User.first.serializable_hash(force_except: true)
=> {"id"=>2, "email"=>"shita@example.com", "encrypted_password"=>"$2a$12$9Fiz99wL33TIw8JeDP2Vb..y99m5i0JrMY8pjeekmumXNOwM1ncbS", "reset_password_token"=>nil, "reset_password_sent_at"=>nil, "remember_created_at"=>nil, "created_at"=>Fri, 06 Nov 2020 06:06:36 UTC +00:00, "updated_at"=>Fri, 06 Nov 2020 06:06:36 UTC +00:00}
irb(main):018:0> User.first.attributes
=> {"id"=>2, "email"=>"shita@example.com", "encrypted_password"=>"$2a$12$9Fiz99wL33TIw8JeDP2Vb..y99m5i0JrMY8pjeekmumXNOwM1ncbS", "reset_password_token"=>nil, "reset_password_sent_at"=>nil, "remember_created_at"=>nil, "created_at"=>Fri, 06 Nov 2020 06:06:36 UTC +00:00, "updated_at"=>Fri, 06 Nov 2020 06:06:36 UTC +00:00}
参考
- devise/authenticatable.rb at master · heartcombo/devise · GitHub
- パーフェクトRails著者が解説するdeviseの現代的なユーザー認証のモデル構成について - joker1007’s diary
051 モデルからcurrent_userにアクセスする
👦🏻 モデルからcurrent_userにアクセスしたいのだけど、どうすればいい?
🐱 ActiveSupport::CurrentAttributesを利用すれば可能だよ。ActiveSupport::CurrentAttributesを継承したクラスはリクエスト毎に属性がリセットされるため、リクエスト毎に独立した状態を持てるようになるんだ。
🐱 まずActiveSupport::CurrentAttributesを継承したCurrentクラスを定義するよ。
class Current < ActiveSupport::CurrentAttributes
  # この属性がcurrent_userになる
  # この属性はリクエスト毎にリセットされる
  attribute :user
end
🐱 application_controller.rbのbefore_actionでCurrent.userにcurrent_userをセットするよ。
# app/controllers/application_controller.rb
class ApplicationController < ActionController::Base
  before_action :set_current_user

  def set_current_user
    Current.user = current_user
  end
end
🐱 これでモデルからcurrent_uesrにアクセスできるようになるよ。
# モデル
class Article < ApplicationRecord
  scope :current, -> { where(user: Current.user) }
end
Article.current #=> current_userのarticles
🐱 ただしActiveSupport::CurrentAttributesの利用は基本的にはアンチパターンだと思うので、できれば避けるべきかな〜と思うよ。ActiveSupport::CurrentAttributesはグローバル変数のようなものでどこからでもアクセスできてしまうから、MVCが壊れてコードがカオスになっちゃうんだ。あとRailsコンソールでの利用とか、リクエストがない状態だとエラーになっちゃうしね。モデルでcurrent_userが必要になる場合は、current_userを引数として渡すか、current_user.articlesのように関連を使うかしたほうがいいよ。
参考
052 テスト
🐱 Deviseの機能をテストで使うにはヘルパーモジュールをincludeすればOKだよ。
# コントローラーテストの場合
class PostsControllerTest < ActionController::TestCase
  include Devise::Test::ControllerHelpers
end

# Integrationテストの場合
class PostsTests < ActionDispatch::IntegrationTest
  include Devise::Test::IntegrationHelpers
end
🐱 RSpecの場合は設定ファイルでincludeしてね。
RSpec.configure do |config|
  # コントローラーテストの場合
  config.include Devise::Test::ControllerHelpers, type: :controller

  # Integrationテストの場合
  config.include Devise::Test::IntegrationHelpers, type: :request
end
🐱 これでテストでヘルパーメソッドとしてsign_inとsign_outが使えるようになるよ。
# テスト

# ログイン
sign_in user

# ログイン(スコープ指定)
sign_in user, scope: :admin

# ログアウト
sign_out user

# ログアウト(Scope指定)
sign_out :admin
第12章 Deviseのエコシステム
🐱 DeviseはRailsの認証gemの中では一番人気があるので、Devise関係の便利なgemがたくさん存在するよ。ここではそんなgemの中でもとりわけ便利なgemを紹介していくよ。
053 AnyLogin - ログインユーザーを切り替える
🐱 開発環境でログインユーザーを切り替えるのって面倒だよね?いちいちログインし直さなきゃいけなかったり、ユーザーのパスワードを覚えておかなきゃいけなかったり。AnyLoginを使うとログインユーザーをドロップダウンから選択できるようになるよ。
AnyLoginを使ってみよう
🐱 まずはAnyLoginをインストールしてね。
# Gemfile

gem 'any_login'
$ bundle install
🐱 application.html.erbに以下のコードを追加してね。
# app/views/layouts/application.html.erb

<!DOCTYPE html>
<html>
  <head>
    <title>DemoApp</title>
    <%= csrf_meta_tags %>
    <%= csp_meta_tag %>

    <%= stylesheet_link_tag 'application', media: 'all', 'data-turbolinks-track': 'reload' %>
    <%= javascript_pack_tag 'application', 'data-turbolinks-track': 'reload' %>
  </head>

  <body>
    <%= yield %>
    <!-- この行を追加 -->
    <%= any_login_here if defined?(AnyLogin) %>
  </body>
</html>
🐱 これで画面の左下からログインユーザーを選択できるようになるよ。
設定を変更する
🐱 ジェネレータを使って設定ファイルを作成してね。
$ rails g any_login initializer
      create  config/initializers/any_login.rb
🐱 設定ファイルの設定項目はこんな感じだよ。
AnyLogin.setup do |config|
  # provider (:devise, :authlogic, sorcery, clearance)を指定する。Gemfileから自動的に判定されるのでnilのままでOKだよ。
  config.provider = nil

  # 有効にするかどうか。基本的には'development'だけ有効にすればOKだよ。
  config.enabled = Rails.env.to_s == 'development'

  # 認証対象のモデルクラス名。たいていはUserでOK
  config.klass_name = 'User'

  # Userのコレクションを返すメソッドを指定。デフォはUser.all
  config.collection_method = :all

  # セレクトボックスのフォーマット
  config.name_method = proc { |e| [e.email, e.id] }

  # ログインユーザー選択後のリダイレクト先
  config.redirect_path_after_login = :root_path

  # ログイン発火イベント(change, click, both)
  config.login_on = :both

  # 表示位置(top_left, top_right, bottom_left, bottom_right)
  config.position = :bottom_left

  # ログインボタンのラベル
  config.login_button_label = 'Login'

  # セレクトボックスのプロンプト
  config.select_prompt = "Select #{AnyLogin.klass_name}"

  # デフォルトでログインユーザー選択formを展開する
  config.auto_show = false

  # limit(数値 or :none)
  config.limit = 10

  # ベーシック認証ON
  config.http_basic_authentication_enabled = false

  # ベーシック認証(ユーザー名)
  config.http_basic_authentication_user_name = 'any_login'

  # ベーシック認証(パスワード)
  config.http_basic_authentication_password = 'password'

  # controllerを使った表示ON/OFF条件
  config.verify_access_proc = proc { |controller| true }
end
参考
054 devise-i18n - ビューを日本語化する
🐱 devise-i18nというgemを使うとビューを日本語化できるよ。詳しくは039 ビューを日本語化するを参照してね。
055 DeviseInvitable - 招待機能を追加する
DeviseInvitableを使ってみよう
🐱 DeviseInvitableは招待機能をDeviseに追加するgemだよ。Invitableモジュールを利用することで、指定されたメールアドレスに招待状を送信できるようになるよ。
🐱 まずはDeviseInvitableをインストールするよ。
# Gemfile

gem 'devise_invitable'
$ bundle install
🐱 ジェネレーターを実行して、必要なファイルを作成してね。
$ rails g devise_invitable:install
      insert  config/initializers/devise.rb
      create  config/locales/devise_invitable.en.yml
🐱 config/initializers/devise.rb にDeviseInvitable用の設定が追加されるよ。
# config/initializers/devise.rb

  # 追加部分のみ

  # ==> Configuration for :invitable
  # The period the generated invitation token is valid.
  # After this period, the invited resource won't be able to accept the invitation.
  # When invite_for is 0 (the default), the invitation won't expire.
  # config.invite_for = 2.weeks

  # Number of invitations users can send.
  # - If invitation_limit is nil, there is no limit for invitations, users can
  # send unlimited invitations, invitation_limit column is not used.
  # - If invitation_limit is 0, users can't send invitations by default.
  # - If invitation_limit n > 0, users can send n invitations.
  # You can change invitation_limit column for some users so they can send more
  # or less invitations, even with global invitation_limit = 0
  # Default: nil
  # config.invitation_limit = 5

  # The key to be used to check existing users when sending an invitation
  # and the regexp used to test it when validate_on_invite is not set.
  # config.invite_key = { email: /\A[^@]+@[^@]+\z/ }
  # config.invite_key = { email: /\A[^@]+@[^@]+\z/, username: nil }

  # Ensure that invited record is valid.
  # The invitation won't be sent if this check fails.
  # Default: false
  # config.validate_on_invite = true

  # Resend invitation if user with invited status is invited again
  # Default: true
  # config.resend_invitation = false

  # The class name of the inviting model. If this is nil,
  # the #invited_by association is declared to be polymorphic.
  # Default: nil
  # config.invited_by_class_name = 'User'

  # The foreign key to the inviting model (if invited_by_class_name is set)
  # Default: :invited_by_id
  # config.invited_by_foreign_key = :invited_by_id

  # The column name used for counter_cache column. If this is nil,
  # the #invited_by association is declared without counter_cache.
  # Default: nil
  # config.invited_by_counter_cache = :invitations_count

  # Auto-login after the user accepts the invite. If this is false,
  # the user will need to manually log in after accepting the invite.
  # Default: true
  # config.allow_insecure_sign_in_after_accept = false
🐱 devise_invitable.en.ymlというDeviseInvitable用のロケールファイルが作成されるよ。
en:
  devise:
    failure:
      invited: "You have a pending invitation, accept it to finish creating your account."
    invitations:
      send_instructions: "An invitation email has been sent to %{email}."
      invitation_token_invalid: "The invitation token provided is not valid!"
      updated: "Your password was set successfully. You are now signed in."
      updated_not_active: "Your password was set successfully."
      no_invitations_remaining: "No invitations remaining"
      invitation_removed: "Your invitation was removed."
      new:
        header: "Send invitation"
        submit_button: "Send an invitation"
      edit:
        header: "Set your password"
        submit_button: "Set my password"
    mailer:
      invitation_instructions:
        subject: "Invitation instructions"
        hello: "Hello %{email}"
        someone_invited_you: "Someone has invited you to %{url}, you can accept it through the link below."
        accept: "Accept invitation"
        accept_until: "This invitation will be due in %{due_date}."
        ignore: "If you don't want to accept the invitation, please ignore this email. Your account won't be created until you access the link above and set your password."
  time:
    formats:
      devise:
        mailer:
          invitation_instructions:
            accept_until_format: "%B %d, %Y %I:%M %p"
🐱 ジェネレーターを使ってInvitableモジュールで必要となるコードを追加するよ。Userモデルに:invitableが追加されて、Invitableモジュール用のマイグレーションファイルが作成されるよ。
$ rails g devise_invitable User
      insert  app/models/user.rb
      invoke  active_record
      create    db/migrate/20201110133651_devise_invitable_add_to_users.rb
# app/models/user.rb

class User < ApplicationRecord
  # invitableモジュールが追加されてるよ
  devise :invitable, :database_authenticatable, :registerable,
         :recoverable, :rememberable, :validatable
end
# db/migrate/20201110133651_devise_invitable_add_to_users.rb

class DeviseInvitableAddToUsers < ActiveRecord::Migration[6.0]
  def up
    change_table :users do |t|
      t.string     :invitation_token
      t.datetime   :invitation_created_at
      t.datetime   :invitation_sent_at
      t.datetime   :invitation_accepted_at
      t.integer    :invitation_limit
      t.references :invited_by, polymorphic: true
      t.integer    :invitations_count, default: 0

      t.index      :invitations_count
      t.index      :invitation_token, unique: true # for invitable
      t.index      :invited_by_id
    end
  end

  def down
    change_table :users do |t|
      t.remove_references :invited_by, polymorphic: true
      t.remove :invitations_count, :invitation_limit, :invitation_sent_at, :invitation_accepted_at, :invitation_token, :invitation_created_at
    end
  end
end
🐱 マイグレーションを実行してね。
$ rails db:migrate
🐱 ビューに招待メール送信画面(/users/invitation/new)へのリンクを置いてね。
<%= link_to "招待メール送信画面", new_user_invitation_path %>
🐱 これで招待機能が使えるようになったよ。
🐱 試しにリンクを踏んでみてね。リンクを踏むと招待メール送信画面(/users/invitation/new)に遷移するよ。
🐱 ここでメールアドレスを入力してsubmitすると、入力されたメールアドレスに招待メールが送信されるよ。
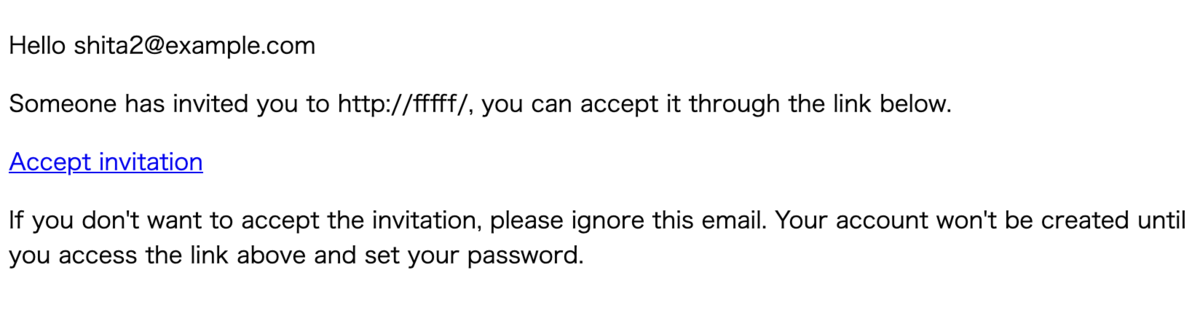
🐱 ちなみにこの時点で招待されたユーザーのusersレコードは作成されているよ。まだ正式なユーザー登録はされていないのでログインはできないけどね。
🐱 メールを受け取った人(招待された人)はメール内の『Accept invitation』リンクを踏むと、accept画面(/users/invitation/accept)に遷移するよ。
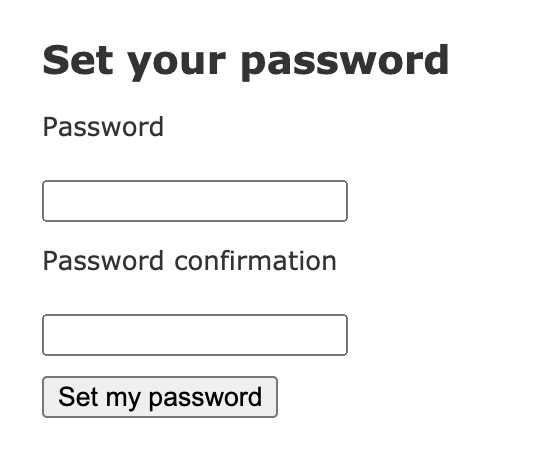
🐱 パスワードを入力してsubmitすると、正式なユーザー登録になるよ。
Invitableモジュールのコントローラーとルーティング
🐱 InvitableモジュールではDevise::InvitationsControllerというコントローラーが用意されるよ。
| HTTPメソッド | path | コントローラー#アクション | 目的 |
|---|---|---|---|
| GET | /users/invitation/accept | devise/invitations#edit | accept画面(パスワード設定画面) |
| GET | /users/invitation/new | devise/invitations#new | 招待メール送信画面 |
| PATCH/PUT | /users/invitation | devise/invitations#update | accept |
| POST | /users/invitation | devise/invitations#create | 招待メール送信 |
| GET | /users/invitation/remove | devise/invitations#destroy | 招待取り消し |
Invitableモジュールのメソッド
🐱 Invitableモジュールを使うと、いくつか便利なメソッドがUserに追加されるよ。招待状の送信は通常であれば用意されたコントローラーから行うので、これらのメソッドを直接使うことは少ないけど、手動で操作したい場合にはこれらのメソッドを使うことになるよ。
# 招待状を送る
# ユーザーを作成し、招待メールを送信する
# この場合はnew_user@example.comにメールを送信する
User.invite!(email: 'new_user@example.com', name: 'John Doe')

# ユーザーを作成し、招待メールは送信しない(ブロックで指定)
User.invite!(email: 'new_user@example.com', name: 'John Doe') do |u|
  u.skip_invitation = true
end

# ユーザーを作成し、招待メールは送信しない(オプションで指定)
User.invite!(email: 'new_user@example.com', name: 'John Doe', skip_invitation: true)

# ユーザー作成後に招待メールを送信する
# current_userはinvited_by
User.find(42).invite!(current_user)

# invitation_tokenで検索する
User.find_by_invitation_token(params[:invitation_token], true)

# invitation_tokenを使い、招待を受け入れる
User.accept_invitation!(invitation_token: params[:invitation_token], password: 'ad97nwj3o2', name: 'John Doe')

# invitation_accepted_atがnilのUser
User.invitation_not_accepted

# invitation_accepted_atがnilでないUser
User.invitation_accepted

# 招待で作られたユーザー
User.created_by_invite
Invitableモジュールの設定
🐱 設定を変更したい場合は設定ファイルで変更してね。
# config/initializers/devise.rb

config.invite_for = 2.weeks
🐱 あるいはUserモデルのオプションとして指定することもできるよ。
# app/models/user.rb

devise :database_authenticatable, :confirmable, :invitable, invite_for: 2.weeks
🐱 設定項目はこんな感じだよ。
# config/initializers/devise.rb

  # invitation_tokenの有効期限
  # 有効期限を過ぎた場合は招待が無効になる
  # 0に設定すると有効期限なしになる
  # デフォルト: 0
  # config.invite_for = 2.weeks

  # ユーザーが送信できる招待メールの上限数
  # nilの場合は無制限になり、invitation_limitは利用されない
  # 0の場合は送信できなくなるが、手動でカラムの値を変更すれば送信可能
  # デフォルト: nil
  # config.invitation_limit = 5

  # 招待メールを送信する際に既存ユーザーをチェックするためのキー
  # デフォルト: emailに対してDevise.email_regexpでチェックする
  # config.invite_key = { email: /\A[^@]+@[^@]+\z/ }
  # config.invite_key = { email: /\A[^@]+@[^@]+\z/, username: nil }

  # 招待ユーザーを強制的にvalidにする
  # デフォルト: false
  # config.validate_on_invite = true

  # 招待済みのユーザーが再びinvited状態になった場合に、招待メールを再送信する
  # デフォルト: true
  # config.resend_invitation = false

  # 招待するモデルのクラス名
  # nilの場合はポリモーフィック関連が使われる
  # デフォルト: nil
  # config.invited_by_class_name = 'User'

  # 招待するモデルへの外部キー
  # デフォルト: :invited_by_id
  # config.invited_by_foreign_key = :invited_by_id

  # カウンターキャッシュのカラム名
  # デフォルト: nil
  # config.invited_by_counter_cache = :invitations_count

  # 招待後自動的にログイン状態になる
  # デフォルト: true
  # config.allow_insecure_sign_in_after_accept = false
ビューをカスタマイズする
🐱 全てのビューはDeviseInvitable gem内にパッケージ化されているよ。ビューをカスタマイズする場合は、ジェネレーターを利用してgem内のビューをアプリ内にコピーしてね。
$ rails g devise_invitable:views
      invoke  DeviseInvitable::Generators::MailerViewsGenerator
       exist    app/views/devise/mailer
      create    app/views/devise/mailer/invitation_instructions.html.erb
      create    app/views/devise/mailer/invitation_instructions.text.erb
      invoke  form_for
      create    app/views/devise/invitations
      create    app/views/devise/invitations/edit.html.erb
      create    app/views/devise/invitations/new.html.erb
🐱 ちなみに複数モデルを利用する場合はScopeを指定することも可能だよ。
$ rails g devise_invitable:views users
      create    app/views/users/mailer
      create    app/views/users/mailer/invitation_instructions.html.erb
      create    app/views/users/mailer/invitation_instructions.text.erb
      invoke  form_for
      create    app/views/users/invitations
      create    app/views/users/invitations/edit.html.erb
      create    app/views/users/invitations/new.html.erb
コントローラーをカスタマイズする
🐱 コントローラーはDeviseInvitable gem内にパッケージ化されているよ。Devise::InvitationsControllerというコントローラーだよ。
# https://github.com/scambra/devise_invitable/blob/master/app/controllers/devise/invitations_controller.rb

class Devise::InvitationsController < DeviseController
  prepend_before_action :authenticate_inviter!, only: [:new, :create]
  prepend_before_action :has_invitations_left?, only: [:create]
  prepend_before_action :require_no_authentication, only: [:edit, :update, :destroy]
  prepend_before_action :resource_from_invitation_token, only: [:edit, :destroy]

  if respond_to? :helper_method
    helper_method :after_sign_in_path_for
  end

  # GET /resource/invitation/new
  def new
    self.resource = resource_class.new
    render :new
  end

  # POST /resource/invitation
  def create
    self.resource = invite_resource
    resource_invited = resource.errors.empty?

    yield resource if block_given?

    if resource_invited
      if is_flashing_format? && self.resource.invitation_sent_at
        set_flash_message :notice, :send_instructions, email: self.resource.email
      end
      if self.method(:after_invite_path_for).arity == 1
        respond_with resource, location: after_invite_path_for(current_inviter)
      else
        respond_with resource, location: after_invite_path_for(current_inviter, resource)
      end
    else
      respond_with_navigational(resource) { render :new }
    end
  end

  # GET /resource/invitation/accept?invitation_token=abcdef
  def edit
    set_minimum_password_length
    resource.invitation_token = params[:invitation_token]
    render :edit
  end

  # PUT /resource/invitation
  def update
    raw_invitation_token = update_resource_params[:invitation_token]
    self.resource = accept_resource
    invitation_accepted = resource.errors.empty?

    yield resource if block_given?

    if invitation_accepted
      if resource.class.allow_insecure_sign_in_after_accept
        flash_message = resource.active_for_authentication? ? :updated : :updated_not_active
        set_flash_message :notice, flash_message if is_flashing_format?
        resource.after_database_authentication
        sign_in(resource_name, resource)
        respond_with resource, location: after_accept_path_for(resource)
      else
        set_flash_message :notice, :updated_not_active if is_flashing_format?
        respond_with resource, location: new_session_path(resource_name)
      end
    else
      resource.invitation_token = raw_invitation_token
      respond_with_navigational(resource) { render :edit }
    end
  end

  # GET /resource/invitation/remove?invitation_token=abcdef
  def destroy
    resource.destroy
    set_flash_message :notice, :invitation_removed if is_flashing_format?
    redirect_to after_sign_out_path_for(resource_name)
  end

  protected

    def invite_resource(&block)
      resource_class.invite!(invite_params, current_inviter, &block)
    end

    def accept_resource
      resource_class.accept_invitation!(update_resource_params)
    end

    def current_inviter
      authenticate_inviter!
    end

    def has_invitations_left?
      unless current_inviter.nil? || current_inviter.has_invitations_left?
        self.resource = resource_class.new
        set_flash_message :alert, :no_invitations_remaining if is_flashing_format?
        respond_with_navigational(resource) { render :new }
      end
    end

    def resource_from_invitation_token
      unless params[:invitation_token] && self.resource = resource_class.find_by_invitation_token(params[:invitation_token], true)
        set_flash_message(:alert, :invitation_token_invalid) if is_flashing_format?
        redirect_to after_sign_out_path_for(resource_name)
      end
    end

    def invite_params
      devise_parameter_sanitizer.sanitize(:invite)
    end

    def update_resource_params
      devise_parameter_sanitizer.sanitize(:accept_invitation)
    end

    def translation_scope
      'devise.invitations'
    end
end
🐱 Deviseと違いコントローラーのgeneratorは存在しないので、カスタマイズする際は自分でDevise::InvitationsControllerを継承するコントローラーを作成してね。
class Users::InvitationsController < Devise::InvitationsController
  def update
    # カスタマイズ
  end
end
🐱 自前のコントローラーを利用する場合は、ルーティングも変更する必要があるよ。
# config/routes.rb

# invitationsコントローラーにはusers/invitationsを使う
devise_for :users, controllers: { invitations: 'users/invitations' }
🐱 あとはDeviseと同じように、Devise::InvitationsControllerのコードを見ながら自由にカスタマイズしてね。
Strong Parameterをカスタマイズする
🐱 ビューをカスタマイズする際にフォームにinput要素を追加したい場合があるよね。でもDeviseInvitableではStrong Parameterで許可される属性がデフォルトで決まっているため、ビューだけでなくStrong Parameterも変更する必要があるんだ。
🐱 デフォルトで許可されている属性は以下の通りだよ。
| コントローラー#アクション | 識別子 | 概要 | 許可されている属性 |
|---|---|---|---|
| devise/invitations#create | :invite | 招待メール送信 | |
| devise/invitations#update | :accept_invitation | accept | invitation_token, password, password_confirmation |
🐱 許可する属性を追加したい場合はdevise_parameter_sanitizer.permitを使ってね。
before_action :configure_permitted_parameters, if: :devise_controller?

protected

def configure_permitted_parameters
  devise_parameter_sanitizer.permit(:accept_invitation, keys: [:first_name, :last_name, :phone])
end
🐱 より詳しく知りたい場合はDeviseの 021 Strong Parameterをカスタマイズする を参照してね。
I18nをカスタマイズする
🐱 InvitableモジュールはflashメッセージでI18nを利用しているよ。そのため日本語のロケールファイルを用意することでflashメッセージを日本語化できるよ。
🐱 日本語のロケールファイルは Japanese locale file for DeviseInvitable · GitHub にあるよ。このファイルをダウンロードしてlocales/locales/devise_invitable.ja.ymlにおいてね。
# locales/locales/devise_invitable.ja.yml

ja:
  devise:
    failure:
      invited: 'アカウントを作成するには、保留中の招待を承認してください。'
    invitations:
      send_instructions: '招待メールが%{email}に送信されました。'
      invitation_token_invalid: '招待コードが不正です。'
      updated: 'パスワードが設定されました。お使いのアカウントでログインできます。'
      updated_not_active: 'パスワードが設定されました。'
      no_invitations_remaining: 'これ以上招待できません。'
      invitation_removed: '招待を取り消しました。'
      new:
        header: '招待する'
        submit_button: '招待メールを送る'
      edit:
        header: 'パスワードを設定する'
        submit_button: 'パスワードを設定する'
    mailer:
      invitation_instructions:
        subject: '招待を承認するには'
        hello: 'こんにちは、%{email}さん'
        someone_invited_you: '%{url}に招待されました。以下のリンクから承認できます。'
        accept: 'Accept invitation'
        accept: '招待を承認する'
        accept_until: 'この招待は%{due_date}まで有効です。'
        ignore: '招待を承認しない場合は、このメールを無視してください。<br />あなたのアカウントは上記のリンク先にアクセスしパスワードを設定するまでは作成されません。'
  time:
    formats:
      devise:
        mailer:
          invitation_instructions:
            accept_until_format: '%Y年%m月%d日%H時%M分'
参考
056 Devise Security - エンタープライズなセキュリティー機能を追加する
🐱 Devise SecurityはDeviseにエンタープライズなセキュリティー機能を追加するよ。秘密の質問だったり、パスワードに有効期限を設けたり、標準のDeviseではまかなえないセキュリティー要件にも対応できるようになるよ。
🐱 ちなみにこのgemの元になったDevise Security Extension(devise_security_extension)というgemはもうメンテナンスされていないので、こちらのDevise Securityを利用してね。
7つのモジュール
🐱 Devise Securityは追加のセキュリティー機能を以下の7つのモジュールとして提供するよ。
| モジュール | 概要 |
|---|---|
| :password_expirable | 一定期間経過するとパスワードが期限切れになり、ユーザーは再度パスワードを設定しないとログインできなくなる。 |
| :password_archivable | パスワード履歴を保存して、同じパスワードを使うようにする。 パスワード履歴は old_passwordsテーブルに保存する。:password_expirableとの併用が推奨されている。 |
| :security_questionable | 秘密の質問機能。 |
| :secure_validatable | email/passwordに対して、Validatableモジュールより強力なバリデーションを提供する。 |
| :expirable | 指定期間非アクティブ状態が続くと、ユーザーアカウントを期限切れにする。 |
| :session_limitable | 多重ログイン禁止。 1アカウントで1セッションしか利用できなくなる。 |
| :paranoid_verification | 識別コードの発行機能。 |
Devise Securityを使ってみよう
🐱 実際に使ってみよう。今回はPassword Expirableモジュールを利用して、一定期間経過するとパスワードが期限切れになるようにするよ。
🐱 まずはgemをinstallするよ。
# Gemfile

gem 'devise-security'
$ bundle install
🐱 ジェネレーターを実行して、設定ファイルとロケールファイルを作成するよ。
$ rails g devise_security:install
      create  config/initializers/devise-security.rb
      create  config/locales/devise.security_extension.en.yml
      create  config/locales/devise.security_extension.es.yml
      create  config/locales/devise.security_extension.de.yml
      create  config/locales/devise.security_extension.fr.yml
      create  config/locales/devise.security_extension.it.yml
      create  config/locales/devise.security_extension.ja.yml
      create  config/locales/devise.security_extension.tr.yml
🐱 設定ファイルはこんな感じだよ。
# config/initializers/devise-security.rb

# frozen_string_literal: true

Devise.setup do |config|
  # ==> Security Extension
  # Configure security extension for devise

  # Should the password expire (e.g 3.months)
  # config.expire_password_after = false

  # Need 1 char of A-Z, a-z and 0-9
  # config.password_complexity = { digit: 1, lower: 1, symbol: 1, upper: 1 }

  # How many passwords to keep in archive
  # config.password_archiving_count = 5

  # Deny old passwords (true, false, number_of_old_passwords_to_check)
  # Examples:
  # config.deny_old_passwords = false # allow old passwords
  # config.deny_old_passwords = true # will deny all the old passwords
  # config.deny_old_passwords = 3 # will deny new passwords that matches with the last 3 passwords
  # config.deny_old_passwords = true

  # enable email validation for :secure_validatable. (true, false, validation_options)
  # dependency: see https://github.com/devise-security/devise-security/blob/master/README.md#e-mail-validation
  # config.email_validation = true

  # captcha integration for recover form
  # config.captcha_for_recover = true

  # captcha integration for sign up form
  # config.captcha_for_sign_up = true

  # captcha integration for sign in form
  # config.captcha_for_sign_in = true

  # captcha integration for unlock form
  # config.captcha_for_unlock = true

  # captcha integration for confirmation form
  # config.captcha_for_confirmation = true

  # Time period for account expiry from last_activity_at
  # config.expire_after = 90.days
end
🐱 有効にしたいモジュールをdeviseメソッドで指定するよ。今回はPassword Expirableモジュールを有効にするよ。
# app/models/user.rb

class User < ApplicationRecord
  # :password_expirableを追加
  devise :database_authenticatable, :registerable,
         :recoverable, :rememberable, :validatable,
         :password_expirable
end
🐱 Password Expirableモジュールで必要になるカラムを追加するよ。
# マイグレーションファイル

class AddPasswordExpirableColumnsToUsers < ActiveRecord::Migration[6.0]
  def change
    change_table :users do |t|
      t.datetime :password_changed_at
    end

    add_index :users, :password_changed_at
  end
end
$ rails db:migrate
🐱 パスワードの有効期限を設定するよ。今回は動作確認のために10秒に設定するね。
# config/initializers/devise-security.rb

- # config.expire_password_after = false
+ config.expire_password_after = 10.seconds
🐱 これで完了だよ。設定を反映させるためにサーバーを再起動してね。
🐱 10秒待ってからログインしてみてね。するとログインエラーになって、こんな感じの『パスワードが期限切れになりました。パスワードを更新してください。』的なメッセージが表示されるよ。

🐱 ユーザーはこの画面で新しいパスワードを設定するまでログインできなくなるよ。
🐱 これで一定期間経過でパスワードが無効になることを確認できたね。
参考
- GitHub - devise-security/devise-security: A security extension for devise, meeting industrial standard security demands for web applications.
- devise-securityを使って、よりセキュアなRailsアプリを構築する - Qiita
第13章 Devise内部を知る
057 Warden
🐱 WardenはRackミドルウェアを介して認証を行う仕組みを提供するgemだよ。Wardenを使うとMountable Engineみたいな他のRackアプリから認証にアクセスできたり、コントローラー層だけでなくルーティング層からも認証できたりするんだ。
🐱 Deviseは内部的にWardenを利用しているよ。例えばDeviseにはUserとかAdminとか複数のモデルを使うためのScopeという機能があるでしょ?実はこれ、Wardenが提供する機能なんだよね。なのでWardenを理解することで、Deviseに対する理解がさらに深まるよ。
Wardenを使ってみよう
🐱 まずはDeviseを使わずにWardenを使い認証機能を実装することで、Wardenがどんなふうに使われるかを見ていこう。
🐱 まずはWardenをインストールするよ。
gem 'warden'
$ bundle install
🐱 Strategyクラスを定義するよ。Strategyは認証のロジックを置く場所で、ここに実際の認証を行うためのコードを書くよ。今回はemailとpasswordでの認証を実装するよ。(WardenのStrategyはOmniauthのStrategyとは別物なので注意)
# lib/strategies/password_strategy.rb

class PasswordStrategy < ::Warden::Strategies::Base
  # 実際の認証を行うロジックはここに定義する
  # 認証成功時はsuccess!を、認証失敗時はfail!を呼び出す
  def authenticate!
    # Strategyではparamsにアクセスできる
    user = User.find_by_email(params['email'])

    if user && user.authenticate(params['password'])
      # 認証成功
      # 引数のuserにはコントローラーからenv['warden'].userでアクセスできる(これがDeviseでいうcurrent_userになる)
      success! user
    else
      # 認証失敗
      # 引数のメッセージにはコントローラーからenv['warden'].messageでアクセスできる
      fail! "Invalid email or password"
    end
  end
end


# PasswordStrategyクラスをwardenのstrategyに追加する
Warden::Strategies.add(:password, PasswordStrategy)
🐱 WardenをRackミドルウェアに追加するよ。
# config/application.rb

config.middleware.insert_after ActionDispatch::Flash, Warden::Manager do |manager|
  # 先程定義したStrategyをデフォルトのStrategyとする
  manager.default_strategies :password
end
🐱 これでコントローラーからwardenにアクセスできるようになるよ。
# request.envを介してwardenを取得できる
warden = request.env['warden']

# Strategyを実行して認証する
warden.authenticate!

# 認証済みならtrue
warden.authenticated? #=> true

# current_userを取得
warden.user #=> user

# ログアウトする
warden.logout
🐱 Wardenは一度認証が成功すると、sessionにユーザー情報を保存してくれるよ。そのため再度認証する際には、Strategyを呼び出す前にsessionに既にユーザーが保存されているかどうかを確認して、ユーザーがあればそちらを利用してくれるよ。
🐱 コントローラーに限らずRack環境ならどこでもenv['warden']でwardenにアクセスできるというのがポイントだよ。
参考
Strategyとは?
🐱 Strategyは実際の認証ロジックを置く場所だよ。こんな感じで定義するよ。
# lib/strategies/password_strategy.rb

class PasswordStrategy < ::Warden::Strategies::Base
  # 具体的な認証ロジックを定義する
  # 認証成功時はsuccess!を、認証失敗時はfail!を呼び出す
  def authenticate!
    # Strategyではparamsにアクセスできる
    user = User.find_by_email(params['email'])

    if user && user.authenticate(params['password'])
      # 認証成功
      # 引数のuserにはコントローラーからenv['warden'].userでアクセスできる(これがcurrent_userになる)
      success! user
    else
      # 認証失敗
      # 引数のメッセージにはコントローラーからenv['warden'].messageでアクセスできる
      fail! "Invalid email or password"
    end
  end
end
🐱 Strategyでは以下のメソッドが利用できるよ。
| メソッド | 概要 |
|---|---|
| success! | 認証成功。引数にはuserを渡す |
| fail! | 認証失敗。引数にはエラーメッセージを渡す |
| halt! | 後続のStrategyを実行せずに、ここで認証処理を停止する |
| redirect! | 別のURLにリダイレクトして、認証処理を停止する |
🐱 authenticate!以外にvalid?というメソッドを定義することもできるよ。valid?はガードとしての役割を持っていて、trueを返す場合だけauthenticate!が実行されるよ。
# lib/strategies/password_strategy.rb

class PasswordStrategy < ::Warden::Strategies::Base

  # ガードとしての役割
  # trueを返す場合だけ`authenticate!`が実行される
  # 何も定義しないとtrueになり、常に実行される
  def valid?
    params['email'] || params['password']
  end

  def authenticate!
    user = User.find_by_email(params['email'])

    if user && user.authenticate(params['password'])
      success! user
    else
      fail "Invalid email or password"
    end
  end
end
🐱 Strategyは複数定義することができて、順番に実行していくことが可能だよ。その中の1つでも成功するか、全ての戦略を通るか、戦略がfail!するまで呼ばれるよ。
# PasswordStorategyとBasicStrategyを順に実行する
env['warden'].authenticate(:password, :basic)
🐱 以上がStrategyの説明になるよ。それじゃあDeviseにどんなStrategyが存在するか見ていくね。
🐱 Deviseには2つのStrategyが存在するよ。
| クラス名 | 概要 |
|---|---|
| Devise::Strategies::DatabaseAuthenticatable | emailとpasswordで認証。 Database Authenticatableモジュールで利用。 |
| Devise::Strategies::Rememberable | cookieに保存したtokenで認証。 Rememberableモジュールで利用。 |
🐱 Devise::Strategies::DatabaseAuthenticatableはこんな感じだよ。コードを読むとemailとpasswordで認証してることがわかるよ。
# lib/devise/strategies/database_authenticatable.rb

# frozen_string_literal: true

require 'devise/strategies/authenticatable'

module Devise
  module Strategies
    # Default strategy for signing in a user, based on their email and password in the database.
    class DatabaseAuthenticatable < Authenticatable
      def authenticate!
        resource  = password.present? && mapping.to.find_for_database_authentication(authentication_hash)
        hashed = false

        if validate(resource){ hashed = true; resource.valid_password?(password) }
          remember_me(resource)
          resource.after_database_authentication
          success!(resource)
        end

        # In paranoid mode, hash the password even when a resource doesn't exist for the given authentication key.
        # This is necessary to prevent enumeration attacks - e.g. the request is faster when a resource doesn't
        # exist in the database if the password hashing algorithm is not called.
        mapping.to.new.password = password if !hashed && Devise.paranoid
        unless resource
          Devise.paranoid ? fail(:invalid) : fail(:not_found_in_database)
        end
      end
    end
  end
end

Warden::Strategies.add(:database_authenticatable, Devise::Strategies::DatabaseAuthenticatable)
🐱 Devise::Strategies::Rememberableはこんな感じだよ。Cookieのremember_tokenからuserをデシリアライズして認証してるね。Cookieにremember_tokenが存在する場合だけ認証が実行されるよ。
# lib/devise/strategies/rememberable.rb

# frozen_string_literal: true

require 'devise/strategies/authenticatable'

module Devise
  module Strategies
    # Remember the user through the remember token. This strategy is responsible
    # to verify whether there is a cookie with the remember token, and to
    # recreate the user from this cookie if it exists. Must be called *before*
    # authenticatable.
    class Rememberable < Authenticatable
      # A valid strategy for rememberable needs a remember token in the cookies.
      def valid?
        @remember_cookie = nil
        remember_cookie.present?
      end

      # To authenticate a user we deserialize the cookie and attempt finding
      # the record in the database. If the attempt fails, we pass to another
      # strategy handle the authentication.
      def authenticate!
        resource = mapping.to.serialize_from_cookie(*remember_cookie)

        unless resource
          cookies.delete(remember_key)
          return pass
        end

        if validate(resource)
          remember_me(resource) if extend_remember_me?(resource)
          resource.after_remembered
          success!(resource)
        end
      end

      # No need to clean up the CSRF when using rememberable.
      # In fact, cleaning it up here would be a bug because
      # rememberable is triggered on GET requests which means
      # we would render a page on first access with all csrf
      # tokens expired.
      def clean_up_csrf?
        false
      end

    private

      def extend_remember_me?(resource)
        resource.respond_to?(:extend_remember_period) && resource.extend_remember_period
      end

      def remember_me?
        true
      end

      def remember_key
        mapping.to.rememberable_options.fetch(:key, "remember_#{scope}_token")
      end

      def remember_cookie
        @remember_cookie ||= cookies.signed[remember_key]
      end

    end
  end
end

Warden::Strategies.add(:rememberable, Devise::Strategies::Rememberable)
🐱 この2つのStrategyは同時に使うことができるよ。RememberableモジュールとDatabase Authenticatableモジュールが有効な場合、まずDevise::Strategies::Rememberableの認証が実行されて、次にDevise::Strategies::DatabaseAuthenticatableの認証が実行されるよ。
参考
Scopeとは?
🐱 Scopeを使うとUserやAdminなど、複数の認証ユーザーを利用できるようになるよ。Scope毎にSessionを分けて管理でき、適用するStrategyも分けることができるんだ。(認証ユーザーという語がちょっと紛らわしいけど、DeviseでいうとUserやAdminのような認証対象のモデルのイメージだよ。)
🐱 デフォルトのScopeは:defaultで、Scopeが指定されていない場合は常に:defaultになるよ。
🐱 Scopeはこんな感じで利用できるよ。
認証
# default Scope
env['warden'].authenticated?

# user Scope
env['warden'].authenticated?(:user)

# user Scope + password strategy
env['warden'].authenticate(:password, scope: :user)
ユーザー取得
# defaultユーザー
env['warden'].user

# userユーザー
env['warden'].user(:user)

# adminユーザー
env['warden'].user(:admin)
ログアウト
# 全ユーザーのsessionを削除
env['warden'].logout

# defaultユーザーのsessionを削除
env['warden'].logout(:default)

# userユーザーのsessionを削除
env['warden'].logout(:user)
🐱 Scopeの設定はこんな感じだよ。
use Warden::Manager do |manater|
  # userをデフォルトScopeにする
  manater.default_scope = :user

  # 各Scopeにstrategyを指定する
  manater.scope_defaults :user, :strategies => [:password]
  manater.scope_defaults :api,  :store => false,  :strategies => [:api_token], :action => "unauthenticated_api"
end
🐱 DeviseではScopeは複数モデルを利用する際なんかに利用されるよ。詳しくは 023 複数モデルを利用する を参照してね。
参考
- Scopes · wardencommunity/warden Wiki · GitHub
- Authenticated session data · wardencommunity/warden Wiki · GitHub
参考
- Home · wardencommunity/warden Wiki · GitHub
- devise を知るにはまず warden を知るが良い - vimtaku blog
- Warden を使った認証のサンプル
- warden のコードリーディング - ogidowの日記
058 Rails Engine
👦🏻 Deviseってコントローラーやビューを作成してない状態でもログイン機能とか使えるよね?これってなんで?
🐱 それはDeviseがRails Engine(以下Engine)という仕組みを使ってるからだよ。Engineを使うとホストとなるRailsアプリケーションに対して、gem形式で別のRailsアプリケーションを丸ごと提供できるんだ。Deviseではコントローラー・ビュー・ヘルパー・メーラーをEngineを使って提供しているよ。
🐱 ホストアプリケーション(自前のRailsアプリケーション)ではRails::Applicationを継承したクラスを定義しているよね。config/application.rbに定義されていて、そこで定義されているクラスがホストアプリケーション本体になるよ。
# conig/application.rb

module DemoApp
  class Application < Rails::Application
    # ...省略...
  end
end
🐱 コレに対してEngineではRails::Engineを継承したクラスを定義するよ。以下はDeviseの例だよ。
# lib/devise/rails.rb

module Devise
  class Engine < ::Rails::Engine
    # ...省略...
  end
end
🐱 この2つの構造は似ているよね。実際ApplicationとEngineは小さな違いを除けばほとんど同じものだよ。つまりDevise gemの中に、別のRailsアプリケーションがあって、それをホストアプリケーションから利用する感じになるんだね。
2つのEngine
🐱 Engineは2つのタイプが存在するよ。isolate_namespaceメソッドを使っているものと、使っていないもの。前者はmountMountable Engine、後者はFull Engineと呼ばれることもあるよ。
isolate_namespaceありのEngine
🐱 isolate_namespaceを使うとEngineの名前空間をホストから切り分けることができ、ホストと疎なEngineにする事ができるよ。コントローラー名・モデル名・テーブル名に名前空間があるため、ホストアプリケーションと名前が衝突することがなくなるんだ。例えばEngine1というアプリケーションのArticleモデルはEngine1::Articleとなるよ。
🐱 isolate_namespaceを使って作られたEngineはRackアプリとしてmount可能だよ。こんな感じでホスト側からmountメソッドを使うことで、Engineにアクセスできるようになるよ。
# config/routes.rb

# http://localhost:3000/engine1 でEngineにアクセス可能になる
mount Engine1::Engine, at: "/engine1"
🐱 ホスト側のアプリケーションと分けて管理したい場合、例えば管理画面を作成する場合なんかに利用されるよ。
🐱 isolate_namespaceありのEngineを作るには以下のコマンドを実行すればOKだよ。
$ rails plugin new engine1 --mountable
      create
      create  README.md
      create  Rakefile
      create  engine1.gemspec
      create  MIT-LICENSE
      create  .gitignore
      create  Gemfile
      create  app
      create  app/controllers/engine1/application_controller.rb
      create  app/helpers/engine1/application_helper.rb
      create  app/jobs/engine1/application_job.rb
      create  app/mailers/engine1/application_mailer.rb
      create  app/models/engine1/application_record.rb
      create  app/views/layouts/engine1/application.html.erb
      create  app/assets/images/engine1
      create  app/assets/images/engine1/.keep
      create  config/routes.rb
      create  lib/engine1.rb
      create  lib/tasks/engine1_tasks.rake
      create  lib/engine1/version.rb
      create  lib/engine1/engine.rb
      create  app/assets/config/engine1_manifest.js
      create  app/assets/stylesheets/engine1/application.css
      create  bin/rails
      create  test/test_helper.rb
      create  test/engine1_test.rb
      append  Rakefile
      create  test/integration/navigation_test.rb
  vendor_app  test/dummy
🐱 こんな感じでisolate_namespaceを利用したEngineが作成されるよ。
# engine1/lib/engine1/engine.rb

module Engine1
  class Engine < ::Rails::Engine
    isolate_namespace Engine1
  end
end
🐱 代表的なgemとしては、rails_adminがisolate_namespaceありのEngineを使っているよ。
# ...省略...

module RailsAdmin
  class Engine < Rails::Engine
    isolate_namespace RailsAdmin

    # ...省略...
  end
end
参考
isolate_namespaceなしのEngine
🐱 isolate_namespaceを使わない場合は名前空間なしになるよ。そのためホスト側と名前が衝突する可能性があるので命名には注意してね。
🐱 ルーティングに関してもわざわざホスト側でmountする必要はなくて、gemをinstallすればそのままホストアプリケーションからEngineにアクセスできるよ。
🐱 isolate_namespaceありのEngineを作るには以下のコマンドを実行すればOKだよ。
$ rails plugin new engine2 --full
      create
      create  README.md
      create  Rakefile
      create  engine2.gemspec
      create  MIT-LICENSE
      create  .gitignore
      create  Gemfile
      create  app/models
      create  app/models/.keep
      create  app/controllers
      create  app/controllers/.keep
      create  app/mailers
      create  app/mailers/.keep
      create  app/assets/images/engine2
      create  app/assets/images/engine2/.keep
      create  app/helpers
      create  app/helpers/.keep
      create  app/views
      create  app/views/.keep
      create  config/routes.rb
      create  lib/engine2.rb
      create  lib/tasks/engine2_tasks.rake
      create  lib/engine2/version.rb
      create  lib/engine2/engine.rb
      create  app/assets/config/engine2_manifest.js
      create  app/assets/stylesheets/engine2
      create  app/assets/stylesheets/engine2/.keep
      create  bin/rails
      create  test/test_helper.rb
      create  test/engine2_test.rb
      append  Rakefile
      create  test/integration/navigation_test.rb
  vendor_app  test/dummy
🐱 isolate_namespaceなしのEngineが用意されるよ。
# engine2/lib/engine2/engine.rb

module Engine2
  class Engine < ::Rails::Engine
  end
end
🐱 Deviseはisolate_namespaceなしのEngineだよ。(ただしコントローラーに名前空間が用意されていたり、ルーティングをdevise_forメソッドで制御したりと、Mountable Engine的な動作をする)
DeviseのEngine
🐱 Deviseでどんな感じでEngineが利用されているか、実際のDeviseのコードを見ながら解説していくね。Deviseのコードは https://github.com/heartcombo/devise から見ることができるよ。
🐱 Devise gemのプロジェクトルートはこんな感じになっているよ。
app/
bin/
config/
gemfiles/
guides/
lib/
test/
Gemfile.lock
ISSUE_TEMPLATE.md
MIT-LICENSE
README.md
Rakefile
devise.png
devise.gemspec
CODE_OF_CONDUCT.md
CONTRIBUTING.md
Gemfile
CHANGELOG.md
.git/
.gitignore
.travis.yml
.yardopts
🐱 一般的なgemのディレクトリ構成とそんなに変わらないね。でも1点だけ大きな違いがあるよ。gemの中にappディレクトリが存在するんだ。appディレクトリの中を見ていくよ。
appディレクトリ
🐱 Railsアプリケーションのappディレクトリと同じように、Deviseのappディレクトリの中にはコントローラーやビューが置かれているよ。
controllers/ helpers/ mailers/ views/
🐱 controllersディレクトリを見るよ。
devise/ devise_controller.rb
🐱 devise_controller.rbとdeivseディレクトリがあるね。devise_controller.rbのDeviseControllerはDeviseの全コントローラーの親になるクラスだよ。
# app/controllers/devise_controller.rb class DeviseController < Devise.parent_controller.constantize # ...省略... end
🐱 deviseディレクトリの中には、僕たちがホストアプリから実際に利用するコントローラー6つが置かれているよ。
confirmations_controller.rb omniauth_callbacks_controller.rb passwords_controller.rb registrations_controller.rb sessions_controller.rb unlocks_controller.rb
🐱 confirmations_controller.rb を見てみるよ。
# app/controllers/devise/confirmations_controller.rb class Devise::ConfirmationsController < DeviseController # GET /resource/confirmation/new def new self.resource = resource_class.new end # POST /resource/confirmation def create self.resource = resource_class.send_confirmation_instructions(resource_params) yield resource if block_given? if successfully_sent?(resource) respond_with({}, location: after_resending_confirmation_instructions_path_for(resource_name)) else respond_with(resource) end end # GET /resource/confirmation?confirmation_token=abcdef def show self.resource = resource_class.confirm_by_token(params[:confirmation_token]) yield resource if block_given? if resource.errors.empty? set_flash_message!(:notice, :confirmed) respond_with_navigational(resource){ redirect_to after_confirmation_path_for(resource_name, resource) } else respond_with_navigational(resource.errors, status: :unprocessable_entity){ render :new } end end protected # The path used after resending confirmation instructions. def after_resending_confirmation_instructions_path_for(resource_name) is_navigational_format? ? new_session_path(resource_name) : '/' end # The path used after confirmation. def after_confirmation_path_for(resource_name, resource) if signed_in?(resource_name) signed_in_root_path(resource) else new_session_path(resource_name) end end def translation_scope 'devise.confirmations' end end
🐱 DeviseControllerを継承したDevise::ConfirmationsControllerが定義されているね。このDevise::ConfirmationsControllerはConfirmableモジュールで利用するコントローラーで、各アクションはこんな感じだよ。
| HTTPメソッド | path | コントローラー#アクション | 目的 |
|---|---|---|---|
| GET | /users/confirmation | devise/confirmations#show | confirm。メールのリンク先はここ。クエリパラメーターのconfirmation_tokenが一致しないとアクセスできない。 |
| GET | /users/confirmation/new | devise/confirmations#new | confirm指示メール再送信画面。 |
| POST | /users/confirmation | devise/confirmations#create | confirm指示メール送信。 |
🐱 controllersディレクトリと同じように、viewsディレクトリ、helpersディレクトリ、mailersディレクトリにもこのEngineで利用するコードが置かれているよ。Engineの仕組みを使って、ホストアプリケーションからこのappディレクトリを利用することになるんだね。
Engineクラス
🐱 Engineを用いたgemは、appディレクトリ以外にもう1つ、一般的なgemと違う点があるよ。Rails::Engineクラスを継承したEngineクラスが定義されているんだ。Rails::Engineを継承したクラスでは、ホストアプリケーションにアクセスしたり、Engineの初期化を行ったりできるよ。
🐱 Deviseではlib/devise/rails.rbで定義されているよ。ここではcurrent_userなどのヘルパーメソッドの追加も行っているよ。
# lib/devise/rails.rb # frozen_string_literal: true require 'devise/rails/routes' require 'devise/rails/warden_compat' module Devise # Rails::Engineを継承した、Devise::Engineを定義 # Rails::Engineを継承すると、EngineがあることがgemからApplicationに通知される # ここではホストアプリケーションにアクセスしたり、Engineの初期化を行ったりできる class Engine < ::Rails::Engine config.devise = Devise # Warden::Managerをミドルウェアに追加 config.app_middleware.use Warden::Manager do |config| Devise.warden_config = config end # eager_load前にホストアプリケーションのルーティングをリロード config.before_eager_load do |app| app.reload_routes! if Devise.reload_routes end # current_userなどのヘルパーメソッドを追加 initializer "devise.url_helpers" do Devise.include_helpers(Devise::Controllers) end # Omniauthの設定 initializer "devise.omniauth", after: :load_config_initializers, before: :build_middleware_stack do |app| Devise.omniauth_configs.each do |provider, config| app.middleware.use config.strategy_class, *config.args do |strategy| config.strategy = strategy end end if Devise.omniauth_configs.any? Devise.include_helpers(Devise::OmniAuth) end end # secret_keyの設定 initializer "devise.secret_key" do |app| Devise.secret_key ||= Devise::SecretKeyFinder.new(app).find Devise.token_generator ||= if secret_key = Devise.secret_key Devise::TokenGenerator.new( ActiveSupport::CachingKeyGenerator.new(ActiveSupport::KeyGenerator.new(secret_key)) ) end end end end
参考
059 Deviseコードリーディング
🐱 Deviseはレールに乗っている場合は結構簡単にカスタマイズできるよ。でもレールから外れる場合、例えばコントローラーをカスタマイズしたい場合などには、Deviseのソースコードを読む必要がでてくるんだ。なのでDeviseがどんなディレクトリ構成になっていて、どんなコードが置かれているかを簡単にでも理解しておくと、カスタマイズの助けになるよ。
🐱 Deviseのプロジェクトルートはこんな感じだよ。
app/ bin/ config/ gemfiles/ guides/ lib/ test/ Gemfile.lock ISSUE_TEMPLATE.md MIT-LICENSE README.md Rakefile devise.png devise.gemspec CODE_OF_CONDUCT.md CONTRIBUTING.md Gemfile CHANGELOG.md .git/ .gitignore .travis.yml .yardopts
🐱 この中でもとりわけ大事なのがapp/とlib/だよ。順に説明していくね。
app/
🐱 appディレクトリにはコントローラーやビューが置かれていて、これらはRails Engineとして独立したアプリケーションであるかのように機能するよ。
controllers/ helpers/ mailers/ views/
app/controllers/
🐱 controllersディレクトリ配下はこんな感じだよ。
$ tree app/controllers app/controllers ├── devise │ ├── confirmations_controller.rb # Confirmableモジュール用のコントローラー │ ├── omniauth_callbacks_controller.rb # Omniauthableモジュール用のコントローラー │ ├── passwords_controller.rb # Recoverableモジュール用のコントローラー │ ├── registrations_controller.rb # Registerableモジュール用のコントローラー │ ├── sessions_controller.rb # Database Authenticatableモジュール用のコントローラー │ └── unlocks_controller.rb # Lockableモジュール用のコントローラー └── devise_controller.rb # 親コントローラー 1 directory, 7 files
🐱 devise_controller.rbのDeviseControllerはDeviseの各コントローラーの親となるクラスで、コントローラーに共通の処理はここに置かれているよ。
# app/controllers/ # frozen_string_literal: true # All Devise controllers are inherited from here. class DeviseController < Devise.parent_controller.constantize include Devise::Controllers::ScopedViews if respond_to?(:helper) helper DeviseHelper end if respond_to?(:helper_method) helpers = %w(resource scope_name resource_name signed_in_resource resource_class resource_params devise_mapping) helper_method(*helpers) end prepend_before_action :assert_is_devise_resource! respond_to :html if mimes_for_respond_to.empty? # Override prefixes to consider the scoped view. # Notice we need to check for the request due to a bug in # Action Controller tests that forces _prefixes to be # loaded before even having a request object. # # This method should be public as it is in ActionPack # itself. Changing its visibility may break other gems. def _prefixes #:nodoc: @_prefixes ||= if self.class.scoped_views? && request && devise_mapping ["#{devise_mapping.scoped_path}/#{controller_name}"] + super else super end end protected # Gets the actual resource stored in the instance variable def resource instance_variable_get(:"@#{resource_name}") end # Proxy to devise map name def resource_name devise_mapping.name end alias :scope_name :resource_name # Proxy to devise map class def resource_class devise_mapping.to end # Returns a signed in resource from session (if one exists) def signed_in_resource warden.authenticate(scope: resource_name) end # Attempt to find the mapped route for devise based on request path def devise_mapping @devise_mapping ||= request.env["devise.mapping"] end # Checks whether it's a devise mapped resource or not. def assert_is_devise_resource! #:nodoc: unknown_action! <<-MESSAGE unless devise_mapping Could not find devise mapping for path #{request.fullpath.inspect}. This may happen for two reasons: 1) You forgot to wrap your route inside the scope block. For example: devise_scope :user do get "/some/route" => "some_devise_controller" end 2) You are testing a Devise controller bypassing the router. If so, you can explicitly tell Devise which mapping to use: @request.env["devise.mapping"] = Devise.mappings[:user] MESSAGE end # Returns real navigational formats which are supported by Rails def navigational_formats @navigational_formats ||= Devise.navigational_formats.select { |format| Mime::EXTENSION_LOOKUP[format.to_s] } end def unknown_action!(msg) logger.debug "[Devise] #{msg}" if logger raise AbstractController::ActionNotFound, msg end # Sets the resource creating an instance variable def resource=(new_resource) instance_variable_set(:"@#{resource_name}", new_resource) end # Helper for use in before_actions where no authentication is required. # # Example: # before_action :require_no_authentication, only: :new def require_no_authentication assert_is_devise_resource! return unless is_navigational_format? no_input = devise_mapping.no_input_strategies authenticated = if no_input.present? args = no_input.dup.push scope: resource_name warden.authenticate?(*args) else warden.authenticated?(resource_name) end if authenticated && resource = warden.user(resource_name) set_flash_message(:alert, 'already_authenticated', scope: 'devise.failure') redirect_to after_sign_in_path_for(resource) end end # Helper for use after calling send_*_instructions methods on a resource. # If we are in paranoid mode, we always act as if the resource was valid # and instructions were sent. def successfully_sent?(resource) notice = if Devise.paranoid resource.errors.clear :send_paranoid_instructions elsif resource.errors.empty? :send_instructions end if notice set_flash_message! :notice, notice true end end # Sets the flash message with :key, using I18n. By default you are able # to set up your messages using specific resource scope, and if no message is # found we look to the default scope. Set the "now" options key to a true # value to populate the flash.now hash in lieu of the default flash hash (so # the flash message will be available to the current action instead of the # next action). # Example (i18n locale file): # # en: # devise: # passwords: # #default_scope_messages - only if resource_scope is not found # user: # #resource_scope_messages # # Please refer to README or en.yml locale file to check what messages are # available. def set_flash_message(key, kind, options = {}) message = find_message(kind, options) if options[:now] flash.now[key] = message if message.present? else flash[key] = message if message.present? end end # Sets flash message if is_flashing_format? equals true def set_flash_message!(key, kind, options = {}) if is_flashing_format? set_flash_message(key, kind, options) end end # Sets minimum password length to show to user def set_minimum_password_length if devise_mapping.validatable? @minimum_password_length = resource_class.password_length.min end end def devise_i18n_options(options) options end # Get message for given def find_message(kind, options = {}) options[:scope] ||= translation_scope options[:default] = Array(options[:default]).unshift(kind.to_sym) options[:resource_name] = resource_name options = devise_i18n_options(options) I18n.t("#{options[:resource_name]}.#{kind}", **options) end # Controllers inheriting DeviseController are advised to override this # method so that other controllers inheriting from them would use # existing translations. def translation_scope "devise.#{controller_name}" end def clean_up_passwords(object) object.clean_up_passwords if object.respond_to?(:clean_up_passwords) end def respond_with_navigational(*args, &block) respond_with(*args) do |format| format.any(*navigational_formats, &block) end end def resource_params params.fetch(resource_name, {}) end ActiveSupport.run_load_hooks(:devise_controller, self) end
🐱 deviseディレクトリ配下に実際に利用するコントローラーが置かれているよ。例えばsessions_controller.rbのDevise::SessionsControllerはDatabase Authenticableモジュールで利用するコントローラーで、ログイン/ログアウトのアクションが定義されているよ。ログイン/ログアウトのアクションをカスタマイズしたい場合なんかはこのコントローラーを参考にしながら、カスタムコントローラーを修正していくことになるよ。詳しくは 020 コントローラーをカスタマイズする を参照してね。
# app/controllers/sessions_controller.rb # frozen_string_literal: true class Devise::SessionsController < DeviseController prepend_before_action :require_no_authentication, only: [:new, :create] prepend_before_action :allow_params_authentication!, only: :create prepend_before_action :verify_signed_out_user, only: :destroy prepend_before_action(only: [:create, :destroy]) { request.env["devise.skip_timeout"] = true } # GET /resource/sign_in def new self.resource = resource_class.new(sign_in_params) clean_up_passwords(resource) yield resource if block_given? respond_with(resource, serialize_options(resource)) end # POST /resource/sign_in def create self.resource = warden.authenticate!(auth_options) set_flash_message!(:notice, :signed_in) sign_in(resource_name, resource) yield resource if block_given? respond_with resource, location: after_sign_in_path_for(resource) end # DELETE /resource/sign_out def destroy signed_out = (Devise.sign_out_all_scopes ? sign_out : sign_out(resource_name)) set_flash_message! :notice, :signed_out if signed_out yield if block_given? respond_to_on_destroy end protected def sign_in_params devise_parameter_sanitizer.sanitize(:sign_in) end def serialize_options(resource) methods = resource_class.authentication_keys.dup methods = methods.keys if methods.is_a?(Hash) methods << :password if resource.respond_to?(:password) { methods: methods, only: [:password] } end def auth_options { scope: resource_name, recall: "#{controller_path}#new" } end def translation_scope 'devise.sessions' end private # Check if there is no signed in user before doing the sign out. # # If there is no signed in user, it will set the flash message and redirect # to the after_sign_out path. def verify_signed_out_user if all_signed_out? set_flash_message! :notice, :already_signed_out respond_to_on_destroy end end def all_signed_out? users = Devise.mappings.keys.map { |s| warden.user(scope: s, run_callbacks: false) } users.all?(&:blank?) end def respond_to_on_destroy # We actually need to hardcode this as Rails default responder doesn't # support returning empty response on GET request respond_to do |format| format.all { head :no_content } format.any(*navigational_formats) { redirect_to after_sign_out_path_for(resource_name) } end end end
app/mailers/
🐱 mailersディレクトリにはmailer.rbがあるだけだよ。
$ tree app/mailers
app/mailers
└── devise
└── mailer.rb
1 directory, 1 file
🐱 ここではDeivseのメーラーであるDevise::Mailerクラスが定義されているよ。こちらはコントローラーとは違い、モジュール毎に分かれているわけではなく、5つのメールが全てこのクラスに定義されているよ。各メールはtokenを用意するかどうかが違うくらいで、あとは共通の処理になっているね。
# app/mailers/devise/mailer.rb # frozen_string_literal: true if defined?(ActionMailer) class Devise::Mailer < Devise.parent_mailer.constantize include Devise::Mailers::Helpers def confirmation_instructions(record, token, opts = {}) @token = token devise_mail(record, :confirmation_instructions, opts) end def reset_password_instructions(record, token, opts = {}) @token = token devise_mail(record, :reset_password_instructions, opts) end def unlock_instructions(record, token, opts = {}) @token = token devise_mail(record, :unlock_instructions, opts) end def email_changed(record, opts = {}) devise_mail(record, :email_changed, opts) end def password_change(record, opts = {}) devise_mail(record, :password_change, opts) end end end
app/views/
🐱 viewsディレクトリはこんな感じだよ。コントローラーとメーラーのビューが置かれているよ。
$ tree app/views
app/views
└── devise
├── confirmations
│ └── new.html.erb
├── mailer
│ ├── confirmation_instructions.html.erb
│ ├── email_changed.html.erb
│ ├── password_change.html.erb
│ ├── reset_password_instructions.html.erb
│ └── unlock_instructions.html.erb
├── passwords
│ ├── edit.html.erb
│ └── new.html.erb
├── registrations
│ ├── edit.html.erb
│ └── new.html.erb
├── sessions
│ └── new.html.erb
├── shared
│ ├── _error_messages.html.erb
│ └── _links.html.erb
└── unlocks
└── new.html.erb
8 directories, 14 files
🐱 このビューは$ rails g devise:viewsコマンドでコピーするビューと同じものだよ。ビューをアプリ内にコピーした場合はアプリ内のビューを使い、コピーしない場合はこちらのgem内のビューを利用することになるよ。
🐱 sharedディレクトリにはパーシャルが置かれているよ。_error_messages.html.erbはバリデーションエラーの表示だよ。
# devise/app/views/devise/shared/_error_messages.html.erb <% if resource.errors.any? %> <div id="error_explanation"> <h2> <%= I18n.t("errors.messages.not_saved", count: resource.errors.count, resource: resource.class.model_name.human.downcase) %> </h2> <ul> <% resource.errors.full_messages.each do |message| %> <li><%= message %></li> <% end %> </ul> </div> <% end %>
🐱 _links.html.erbはサインアップやログインなどのリンクを集めたものだよ。現在のpathや有効なモジュールによって表示するリンク変えているよ。
# devise/app/views/devise/shared/_links.html.erb <%- if controller_name != 'sessions' %> <%= link_to "Log in", new_session_path(resource_name) %><br /> <% end %> <%- if devise_mapping.registerable? && controller_name != 'registrations' %> <%= link_to "Sign up", new_registration_path(resource_name) %><br /> <% end %> <%- if devise_mapping.recoverable? && controller_name != 'passwords' && controller_name != 'registrations' %> <%= link_to "Forgot your password?", new_password_path(resource_name) %><br /> <% end %> <%- if devise_mapping.confirmable? && controller_name != 'confirmations' %> <%= link_to "Didn't receive confirmation instructions?", new_confirmation_path(resource_name) %><br /> <% end %> <%- if devise_mapping.lockable? && resource_class.unlock_strategy_enabled?(:email) && controller_name != 'unlocks' %> <%= link_to "Didn't receive unlock instructions?", new_unlock_path(resource_name) %><br /> <% end %> <%- if devise_mapping.omniauthable? %> <%- resource_class.omniauth_providers.each do |provider| %> <%= link_to "Sign in with #{OmniAuth::Utils.camelize(provider)}", omniauth_authorize_path(resource_name, provider) %><br /> <% end %> <% end %>
app/helpers/
🐱 helpersディレクトリにはdevise_helper.rbがあり、ここにはビューヘルパーが置かれているよ。devise_error_messages!はバリデーションエラーを表示するヘルパーなのだけど、現在はバリデーションエラー表示のパーシャルを直接レンダリングするように変更されていて、後方互換性を維持するために残されているよ。
# app/helpers/devise_helper.rb module DeviseHelper # Retain this method for backwards compatibility, deprecated in favor of modifying the # devise/shared/error_messages partial. def devise_error_messages! ActiveSupport::Deprecation.warn <<-DEPRECATION.strip_heredoc [Devise] `DeviseHelper#devise_error_messages!` is deprecated and will be removed in the next major version. Devise now uses a partial under "devise/shared/error_messages" to display error messages by default, and make them easier to customize. Update your views changing calls from: <%= devise_error_messages! %> to: <%= render "devise/shared/error_messages", resource: resource %> To start customizing how errors are displayed, you can copy the partial from devise to your `app/views` folder. Alternatively, you can run `rails g devise:views` which will copy all of them again to your app. DEPRECATION return "" if resource.errors.empty? render "devise/shared/error_messages", resource: resource end end
🐱 appディレクトリはこんな感じだね。
lib/
🐱 lib配下はとても大きくて全部は説明できないので、知っておくと役に立ちそうな箇所をピックアップしていくね。
lib/devise/
🐱 基本的にコアとなるコードはlib/devise/配下に置かれているよ。
lib/devise/controllers/
🐱 コントローラーで利用するヘルパーが定義されているよ。
rememberable.rb scoped_views.rb sign_in_out.rb store_location.rb url_helpers.rb helpers.rb
🐱 例としてsign_in_out.rbを見てみるよ。sign_inやsign_outなどの、ログイン/ログアウトに関するコントローラーヘルパーが定義されているよ。
# lib/devise/controllers/sign_in_out.rb # frozen_string_literal: true module Devise module Controllers # Provide sign in and sign out functionality. # Included by default in all controllers. module SignInOut # Return true if the given scope is signed in session. If no scope given, return # true if any scope is signed in. This will run authentication hooks, which may # cause exceptions to be thrown from this method; if you simply want to check # if a scope has already previously been authenticated without running # authentication hooks, you can directly call `warden.authenticated?(scope: scope)` def signed_in?(scope = nil) [scope || Devise.mappings.keys].flatten.any? do |_scope| warden.authenticate?(scope: _scope) end end # Sign in a user that already was authenticated. This helper is useful for logging # users in after sign up. All options given to sign_in is passed forward # to the set_user method in warden. # If you are using a custom warden strategy and the timeoutable module, you have to # set `env["devise.skip_timeout"] = true` in the request to use this method, like we do # in the sessions controller: https://github.com/heartcombo/devise/blob/master/app/controllers/devise/sessions_controller.rb#L7 # # Examples: # # sign_in :user, @user # sign_in(scope, resource) # sign_in @user # sign_in(resource) # sign_in @user, event: :authentication # sign_in(resource, options) # sign_in @user, store: false # sign_in(resource, options) # def sign_in(resource_or_scope, *args) options = args.extract_options! scope = Devise::Mapping.find_scope!(resource_or_scope) resource = args.last || resource_or_scope expire_data_after_sign_in! if options[:bypass] ActiveSupport::Deprecation.warn(<<-DEPRECATION.strip_heredoc, caller) [Devise] bypass option is deprecated and it will be removed in future version of Devise. Please use bypass_sign_in method instead. Example: bypass_sign_in(user) DEPRECATION warden.session_serializer.store(resource, scope) elsif warden.user(scope) == resource && !options.delete(:force) # Do nothing. User already signed in and we are not forcing it. true else warden.set_user(resource, options.merge!(scope: scope)) end end # Sign in a user bypassing the warden callbacks and stores the user straight in session. This option is useful in cases the user is already signed in, but we want to refresh the credentials in session. # # Examples: # # bypass_sign_in @user, scope: :user # bypass_sign_in @user def bypass_sign_in(resource, scope: nil) scope ||= Devise::Mapping.find_scope!(resource) expire_data_after_sign_in! warden.session_serializer.store(resource, scope) end # Sign out a given user or scope. This helper is useful for signing out a user # after deleting accounts. Returns true if there was a logout and false if there # is no user logged in on the referred scope # # Examples: # # sign_out :user # sign_out(scope) # sign_out @user # sign_out(resource) # def sign_out(resource_or_scope = nil) return sign_out_all_scopes unless resource_or_scope scope = Devise::Mapping.find_scope!(resource_or_scope) user = warden.user(scope: scope, run_callbacks: false) # If there is no user warden.logout(scope) warden.clear_strategies_cache!(scope: scope) instance_variable_set(:"@current_#{scope}", nil) !!user end # Sign out all active users or scopes. This helper is useful for signing out all roles # in one click. This signs out ALL scopes in warden. Returns true if there was at least one logout # and false if there was no user logged in on all scopes. def sign_out_all_scopes(lock = true) users = Devise.mappings.keys.map { |s| warden.user(scope: s, run_callbacks: false) } warden.logout expire_data_after_sign_out! warden.clear_strategies_cache! warden.lock! if lock users.any? end private def expire_data_after_sign_in! # session.keys will return an empty array if the session is not yet loaded. # This is a bug in both Rack and Rails. # A call to #empty? forces the session to be loaded. session.empty? session.keys.grep(/^devise\./).each { |k| session.delete(k) } end alias :expire_data_after_sign_out! :expire_data_after_sign_in! end end end
lib/devise/models/
🐱 Userモデルに追加されるメソッドがモジュール毎に定義されているよ。
confirmable.rb database_authenticatable.rb lockable.rb omniauthable.rb recoverable.rb registerable.rb rememberable.rb timeoutable.rb trackable.rb validatable.rb authenticatable.rb
🐱 例としてtrackable.rbを見てみるよ。IPアドレス・ログイン時刻・ログイン回数を更新するメソッドが定義されているよ。ここで定義されているメソッドはuser.update_tracked_fields!(request)のようにして利用できるよ。
# lib/devise/models/trackable.rb # frozen_string_literal: true require 'devise/hooks/trackable' module Devise module Models # Track information about your user sign in. It tracks the following columns: # # * sign_in_count - Increased every time a sign in is made (by form, openid, oauth) # * current_sign_in_at - A timestamp updated when the user signs in # * last_sign_in_at - Holds the timestamp of the previous sign in # * current_sign_in_ip - The remote ip updated when the user sign in # * last_sign_in_ip - Holds the remote ip of the previous sign in # module Trackable def self.required_fields(klass) [:current_sign_in_at, :current_sign_in_ip, :last_sign_in_at, :last_sign_in_ip, :sign_in_count] end def update_tracked_fields(request) old_current, new_current = self.current_sign_in_at, Time.now.utc self.last_sign_in_at = old_current || new_current self.current_sign_in_at = new_current old_current, new_current = self.current_sign_in_ip, extract_ip_from(request) self.last_sign_in_ip = old_current || new_current self.current_sign_in_ip = new_current self.sign_in_count ||= 0 self.sign_in_count += 1 end def update_tracked_fields!(request) # We have to check if the user is already persisted before running # `save` here because invalid users can be saved if we don't. # See https://github.com/heartcombo/devise/issues/4673 for more details. return if new_record? update_tracked_fields(request) save(validate: false) end protected def extract_ip_from(request) request.remote_ip end end end end
lib/devise/strategies/
🐱 WardenのStrategyを利用した認証が定義されているよ。
authenticatable.rb base.rb database_authenticatable.rb rememberable.rb
🐱 例としてdatabase_authenticatable.rbを見てみるね。ここではDatabase Authenticatableモジュール用のStrategyが定義されているよ。authenticate!メソッドを見ると、emailとpasswordを利用して認証していることがわかるよ。
# lib/devise/strategies/database_authenticatable.rb # frozen_string_literal: true require 'devise/strategies/authenticatable' module Devise module Strategies # Default strategy for signing in a user, based on their email and password in the database. class DatabaseAuthenticatable < Authenticatable def authenticate! resource = password.present? && mapping.to.find_for_database_authentication(authentication_hash) hashed = false if validate(resource){ hashed = true; resource.valid_password?(password) } remember_me(resource) resource.after_database_authentication success!(resource) end # In paranoid mode, hash the password even when a resource doesn't exist for the given authentication key. # This is necessary to prevent enumeration attacks - e.g. the request is faster when a resource doesn't # exist in the database if the password hashing algorithm is not called. mapping.to.new.password = password if !hashed && Devise.paranoid unless resource Devise.paranoid ? fail(:invalid) : fail(:not_found_in_database) end end end end end Warden::Strategies.add(:database_authenticatable, Devise::Strategies::DatabaseAuthenticatable)
lib/devise/hooks/
🐱 WardenのCallback機能を利用したhook処理が定義されているよ。WardenのCallback機能については Callbacks · wardencommunity/warden Wiki · GitHub を参照してね。
csrf_cleaner.rb forgetable.rb lockable.rb proxy.rb rememberable.rb timeoutable.rb trackable.rb activatable.rb
🐱 例としてtrackable.rbを見てみるよ。Trackableモジュールが有効な場合、ログイン時(after_set_user時)にIPアドレス・ログイン時刻・ログイン回数を更新していることがわかるね。
# lib/devise/hooks/trackable.rb # frozen_string_literal: true # After each sign in, update sign in time, sign in count and sign in IP. # This is only triggered when the user is explicitly set (with set_user) # and on authentication. Retrieving the user from session (:fetch) does # not trigger it. Warden::Manager.after_set_user except: :fetch do |record, warden, options| if record.respond_to?(:update_tracked_fields!) && warden.authenticated?(options[:scope]) && !warden.request.env['devise.skip_trackable'] record.update_tracked_fields!(warden.request) end end
lib/devise/test/
🐱 テストで利用するヘルパーが定義されているよ。
controller_helpers.rb integration_helpers.rb
🐱 例としてintegration_helpers.rbを見てみるね。ここにはIntegrationテストに対してヘルパーを提供するDevise::Test::IntegrationHelpersモジュールが定義されているよ。このモジュールをincludeすることでテストでsign_inとsign_outが利用できるようになるよ。
# lib/devise/test/integration_helpers.rb # frozen_string_literal: true module Devise # Devise::Test::IntegrationHelpers is a helper module for facilitating # authentication on Rails integration tests to bypass the required steps for # signin in or signin out a record. # # Examples # # class PostsTest < ActionDispatch::IntegrationTest # include Devise::Test::IntegrationHelpers # # test 'authenticated users can see posts' do # sign_in users(:bob) # # get '/posts' # assert_response :success # end # end module Test module IntegrationHelpers def self.included(base) base.class_eval do include Warden::Test::Helpers setup :setup_integration_for_devise teardown :teardown_integration_for_devise end end # Signs in a specific resource, mimicking a successful sign in # operation through +Devise::SessionsController#create+. # # * +resource+ - The resource that should be authenticated # * +scope+ - An optional +Symbol+ with the scope where the resource # should be signed in with. def sign_in(resource, scope: nil) scope ||= Devise::Mapping.find_scope!(resource) login_as(resource, scope: scope) end # Signs out a specific scope from the session. # # * +resource_or_scope+ - The resource or scope that should be signed out. def sign_out(resource_or_scope) scope = Devise::Mapping.find_scope!(resource_or_scope) logout scope end protected def setup_integration_for_devise Warden.test_mode! end def teardown_integration_for_devise Warden.test_reset! end end end end
lib/devise/rails.rb
🐱 DeviseのRails Engineが定義されているよ。
# lib/devise/rails.rb # frozen_string_literal: true require 'devise/rails/routes' require 'devise/rails/warden_compat' module Devise class Engine < ::Rails::Engine config.devise = Devise # Initialize Warden and copy its configurations. config.app_middleware.use Warden::Manager do |config| Devise.warden_config = config end # Force routes to be loaded if we are doing any eager load. config.before_eager_load do |app| app.reload_routes! if Devise.reload_routes end initializer "devise.url_helpers" do Devise.include_helpers(Devise::Controllers) end initializer "devise.omniauth", after: :load_config_initializers, before: :build_middleware_stack do |app| Devise.omniauth_configs.each do |provider, config| app.middleware.use config.strategy_class, *config.args do |strategy| config.strategy = strategy end end if Devise.omniauth_configs.any? Devise.include_helpers(Devise::OmniAuth) end end initializer "devise.secret_key" do |app| Devise.secret_key ||= Devise::SecretKeyFinder.new(app).find Devise.token_generator ||= if secret_key = Devise.secret_key Devise::TokenGenerator.new( ActiveSupport::CachingKeyGenerator.new(ActiveSupport::KeyGenerator.new(secret_key)) ) end end end end
lib/devise/rails/routes.rb
🐱 devise_forやdevise_scopeなどのルーティングで利用するメソッドが定義されているよ。
# lib/devise/rails/routes.rb # ...省略... def devise_for(*resources) @devise_finalized = false raise_no_secret_key unless Devise.secret_key options = resources.extract_options! options[:as] ||= @scope[:as] if @scope[:as].present? options[:module] ||= @scope[:module] if @scope[:module].present? options[:path_prefix] ||= @scope[:path] if @scope[:path].present? options[:path_names] = (@scope[:path_names] || {}).merge(options[:path_names] || {}) options[:constraints] = (@scope[:constraints] || {}).merge(options[:constraints] || {}) options[:defaults] = (@scope[:defaults] || {}).merge(options[:defaults] || {}) options[:options] = @scope[:options] || {} options[:options][:format] = false if options[:format] == false resources.map!(&:to_sym) resources.each do |resource| mapping = Devise.add_mapping(resource, options) begin raise_no_devise_method_error!(mapping.class_name) unless mapping.to.respond_to?(:devise) rescue NameError => e raise unless mapping.class_name == resource.to_s.classify warn "[WARNING] You provided devise_for #{resource.inspect} but there is " \ "no model #{mapping.class_name} defined in your application" next rescue NoMethodError => e raise unless e.message.include?("undefined method `devise'") raise_no_devise_method_error!(mapping.class_name) end if options[:controllers] && options[:controllers][:omniauth_callbacks] unless mapping.omniauthable? raise ArgumentError, "Mapping omniauth_callbacks on a resource that is not omniauthable\n" \ "Please add `devise :omniauthable` to the `#{mapping.class_name}` model" end end routes = mapping.used_routes devise_scope mapping.name do with_devise_exclusive_scope mapping.fullpath, mapping.name, options do routes.each { |mod| send("devise_#{mod}", mapping, mapping.controllers) } end end end end # Allow you to add authentication request from the router. # Takes an optional scope and block to provide constraints # on the model instance itself. # # authenticate do # resources :post # end # # authenticate(:admin) do # resources :users # end # # authenticate :user, lambda {|u| u.role == "admin"} do # root to: "admin/dashboard#show", as: :user_root # end # def authenticate(scope = nil, block = nil) constraints_for(:authenticate!, scope, block) do yield end end # Allow you to route based on whether a scope is authenticated. You # can optionally specify which scope and a block. The block accepts # a model and allows extra constraints to be done on the instance. # # authenticated :admin do # root to: 'admin/dashboard#show', as: :admin_root # end # # authenticated do # root to: 'dashboard#show', as: :authenticated_root # end # # authenticated :user, lambda {|u| u.role == "admin"} do # root to: "admin/dashboard#show", as: :user_root # end # # root to: 'landing#show' # def authenticated(scope = nil, block = nil) constraints_for(:authenticate?, scope, block) do yield end end # Allow you to route based on whether a scope is *not* authenticated. # You can optionally specify which scope. # # unauthenticated do # as :user do # root to: 'devise/registrations#new' # end # end # # root to: 'dashboard#show' # def unauthenticated(scope = nil) constraint = lambda do |request| not request.env["warden"].authenticate? scope: scope end constraints(constraint) do yield end end # Sets the devise scope to be used in the controller. If you have custom routes, # you are required to call this method (also aliased as :as) in order to specify # to which controller it is targeted. # # as :user do # get "sign_in", to: "devise/sessions#new" # end # # Notice you cannot have two scopes mapping to the same URL. And remember, if # you try to access a devise controller without specifying a scope, it will # raise ActionNotFound error. # # Also be aware of that 'devise_scope' and 'as' use the singular form of the # noun where other devise route commands expect the plural form. This would be a # good and working example. # # devise_scope :user do # get "/some/route" => "some_devise_controller" # end # devise_for :users # # Notice and be aware of the differences above between :user and :users def devise_scope(scope) constraint = lambda do |request| request.env["devise.mapping"] = Devise.mappings[scope] true end constraints(constraint) do yield end end # ...省略...
lib/generators/
🐱 コントローラーやビューなどを作成するためのジェネレーターが置かれているよ。
lib/devies.rb
🐱 Deviseモジュールが定義されていて、モジュールのautoloadを行っているよ。
# lib/devies.rb # frozen_string_literal: true require 'rails' require 'active_support/core_ext/numeric/time' require 'active_support/dependencies' require 'orm_adapter' require 'set' require 'securerandom' require 'responders' module Devise autoload :Delegator, 'devise/delegator' autoload :Encryptor, 'devise/encryptor' autoload :FailureApp, 'devise/failure_app' autoload :OmniAuth, 'devise/omniauth' autoload :ParameterFilter, 'devise/parameter_filter' autoload :ParameterSanitizer, 'devise/parameter_sanitizer' autoload :TestHelpers, 'devise/test_helpers' autoload :TimeInflector, 'devise/time_inflector' autoload :TokenGenerator, 'devise/token_generator' autoload :SecretKeyFinder, 'devise/secret_key_finder' module Controllers autoload :Helpers, 'devise/controllers/helpers' autoload :Rememberable, 'devise/controllers/rememberable' autoload :ScopedViews, 'devise/controllers/scoped_views' autoload :SignInOut, 'devise/controllers/sign_in_out' autoload :StoreLocation, 'devise/controllers/store_location' autoload :UrlHelpers, 'devise/controllers/url_helpers' end module Hooks autoload :Proxy, 'devise/hooks/proxy' end module Mailers autoload :Helpers, 'devise/mailers/helpers' end module Strategies autoload :Base, 'devise/strategies/base' autoload :Authenticatable, 'devise/strategies/authenticatable' end module Test autoload :ControllerHelpers, 'devise/test/controller_helpers' autoload :IntegrationHelpers, 'devise/test/integration_helpers' end # ...省略... end
🐱 あと各設定のデフォルト値もここでセットされているよ。
# lib/devies.rb # ...省略... # Secret key used by the key generator mattr_accessor :secret_key @@secret_key = nil # Custom domain or key for cookies. Not set by default mattr_accessor :rememberable_options @@rememberable_options = {} # The number of times to hash the password. mattr_accessor :stretches @@stretches = 12 # The default key used when authenticating over http auth. mattr_accessor :http_authentication_key @@http_authentication_key = nil # Keys used when authenticating a user. mattr_accessor :authentication_keys @@authentication_keys = [:email] # Request keys used when authenticating a user. mattr_accessor :request_keys @@request_keys = [] # Keys that should be case-insensitive. mattr_accessor :case_insensitive_keys @@case_insensitive_keys = [:email] # Keys that should have whitespace stripped. mattr_accessor :strip_whitespace_keys @@strip_whitespace_keys = [:email] # If http authentication is enabled by default. mattr_accessor :http_authenticatable @@http_authenticatable = false # If http headers should be returned for ajax requests. True by default. mattr_accessor :http_authenticatable_on_xhr @@http_authenticatable_on_xhr = true # If params authenticatable is enabled by default. mattr_accessor :params_authenticatable @@params_authenticatable = true # The realm used in Http Basic Authentication. mattr_accessor :http_authentication_realm @@http_authentication_realm = "Application" # Email regex used to validate email formats. It asserts that there are no # @ symbols or whitespaces in either the localpart or the domain, and that # there is a single @ symbol separating the localpart and the domain. mattr_accessor :email_regexp @@email_regexp = /\A[^@\s]+@[^@\s]+\z/ # Range validation for password length mattr_accessor :password_length @@password_length = 6..128 # The time the user will be remembered without asking for credentials again. mattr_accessor :remember_for @@remember_for = 2.weeks # If true, extends the user's remember period when remembered via cookie. mattr_accessor :extend_remember_period @@extend_remember_period = false # If true, all the remember me tokens are going to be invalidated when the user signs out. mattr_accessor :expire_all_remember_me_on_sign_out @@expire_all_remember_me_on_sign_out = true # Time interval you can access your account before confirming your account. # nil - allows unconfirmed access for unlimited time mattr_accessor :allow_unconfirmed_access_for @@allow_unconfirmed_access_for = 0.days # Time interval the confirmation token is valid. nil = unlimited mattr_accessor :confirm_within @@confirm_within = nil # Defines which key will be used when confirming an account. mattr_accessor :confirmation_keys @@confirmation_keys = [:email] # Defines if email should be reconfirmable. mattr_accessor :reconfirmable @@reconfirmable = true # Time interval to timeout the user session without activity. mattr_accessor :timeout_in @@timeout_in = 30.minutes # Used to hash the password. Please generate one with rails secret. mattr_accessor :pepper @@pepper = nil # Used to send notification to the original user email when their email is changed. mattr_accessor :send_email_changed_notification @@send_email_changed_notification = false # Used to enable sending notification to user when their password is changed. mattr_accessor :send_password_change_notification @@send_password_change_notification = false # Scoped views. Since it relies on fallbacks to render default views, it's # turned off by default. mattr_accessor :scoped_views @@scoped_views = false # Defines which strategy can be used to lock an account. # Values: :failed_attempts, :none mattr_accessor :lock_strategy @@lock_strategy = :failed_attempts # Defines which key will be used when locking and unlocking an account mattr_accessor :unlock_keys @@unlock_keys = [:email] # Defines which strategy can be used to unlock an account. # Values: :email, :time, :both mattr_accessor :unlock_strategy @@unlock_strategy = :both # Number of authentication tries before locking an account mattr_accessor :maximum_attempts @@maximum_attempts = 20 # Time interval to unlock the account if :time is defined as unlock_strategy. mattr_accessor :unlock_in @@unlock_in = 1.hour # Defines which key will be used when recovering the password for an account mattr_accessor :reset_password_keys @@reset_password_keys = [:email] # Time interval you can reset your password with a reset password key mattr_accessor :reset_password_within @@reset_password_within = 6.hours # When set to false, resetting a password does not automatically sign in a user mattr_accessor :sign_in_after_reset_password @@sign_in_after_reset_password = true # The default scope which is used by warden. mattr_accessor :default_scope @@default_scope = nil # Address which sends Devise e-mails. mattr_accessor :mailer_sender @@mailer_sender = nil # Skip session storage for the following strategies mattr_accessor :skip_session_storage @@skip_session_storage = [:http_auth] # Which formats should be treated as navigational. mattr_accessor :navigational_formats @@navigational_formats = ["*/*", :html] # When set to true, signing out a user signs out all other scopes. mattr_accessor :sign_out_all_scopes @@sign_out_all_scopes = true # The default method used while signing out mattr_accessor :sign_out_via @@sign_out_via = :delete # The parent controller all Devise controllers inherits from. # Defaults to ApplicationController. This should be set early # in the initialization process and should be set to a string. mattr_accessor :parent_controller @@parent_controller = "ApplicationController" # The parent mailer all Devise mailers inherit from. # Defaults to ActionMailer::Base. This should be set early # in the initialization process and should be set to a string. mattr_accessor :parent_mailer @@parent_mailer = "ActionMailer::Base" # The router Devise should use to generate routes. Defaults # to :main_app. Should be overridden by engines in order # to provide custom routes. mattr_accessor :router_name @@router_name = nil # Set the OmniAuth path prefix so it can be overridden when # Devise is used in a mountable engine mattr_accessor :omniauth_path_prefix @@omniauth_path_prefix = nil # Set if we should clean up the CSRF Token on authentication mattr_accessor :clean_up_csrf_token_on_authentication @@clean_up_csrf_token_on_authentication = true # When false, Devise will not attempt to reload routes on eager load. # This can reduce the time taken to boot the app but if your application # requires the Devise mappings to be loaded during boot time the application # won't boot properly. mattr_accessor :reload_routes @@reload_routes = true # PRIVATE CONFIGURATION # Store scopes mappings. mattr_reader :mappings @@mappings = {} # OmniAuth configurations. mattr_reader :omniauth_configs @@omniauth_configs = {} # Define a set of modules that are called when a mapping is added. mattr_reader :helpers @@helpers = Set.new @@helpers << Devise::Controllers::Helpers # Private methods to interface with Warden. mattr_accessor :warden_config @@warden_config = nil @@warden_config_blocks = [] # When true, enter in paranoid mode to avoid user enumeration. mattr_accessor :paranoid @@paranoid = false # When true, warn user if they just used next-to-last attempt of authentication mattr_accessor :last_attempt_warning @@last_attempt_warning = true # Stores the token generator mattr_accessor :token_generator @@token_generator = nil # When set to false, changing a password does not automatically sign in a user mattr_accessor :sign_in_after_change_password @@sign_in_after_change_password = true # ...省略...
第14章 認証gemの比較
時間切れでした。気が向いたら書きます🙇♂️
*以下追記
ちょっと気が向かなそうなので、簡単にですがDeviseに対する感想まとめておきます🙇♂️
Deviseの良いところ
- モジュールを追加するだけで一通りの認証機能が使えるので、コードを書く量を抑えられる
- だいたい皆使ったことがあるので、新規の学習コストを抑えられる
- エコシステムが発達しているので、モジュールを追加するだけでコードを書かずに便利機能を追加できる(Devise Securityを使ってエンタープライズなセキュリティー機能を追加したり)
Deviseの悪いところ
- テーブル設計がつらい(usersテーブルに全てのカラムを詰め込んでいるのでUserがfatになりやすい and nullableなカラムがたくさんできてしまう)
- カスタマイズがつらい(レールから外れたカスタマイズをする際にDevise gemのコードを読む必要がある and コードベースが大きい上にWardenで抽象化されていてコード読むのがつらい)
Deviseは結構なつらみがあります。開発の最初の頃はモジュールを追加するだけでいろんな機能が使えてほくほくなのですが、開発が進みサービスが大きくなるにつれてどんどんつらみが増してきます。良いところもたくさんあるのですが、ほとんどの場合においてつらみが勝るんじゃないかなと思ってます。なので個人的にはDeviseは使わずにSorceryとかを使うことをおすすめします。
Deviseが向いているサービスは、カスタマイズはビューだけであとは全部Deviseの機能でまかなえるような小規模なサービスです。個人開発とか。ただ、その場合でもあえてDeviseを使う必要があるかと言われると......うーん。
ということでDeviseの記事を書いておいてDeviseはできれば使わないほうがいいという悲しい結論になってしまいました。
あ、あとnoteの件でセキュリティ的に危険なんじゃないかという話が出たりしましたが、デフォルトではIPアドレス等のカラムはシリアライズしないように対策されているので、それはちょっと別の話かなと思ったりします。Deviseは危険なので認証を自作しようみたいな話をネットで見ましたが、自作の認証よりDeviseのがよっぽど安全なので自作するくらいならDeviseをおすすめします。
060 Devise
061 Sorcery
062 Clearance
063 Authlogic
064 認証gemの比較まとめ
Deviseの情報源
日本語の情報源
🐱 DeviseのReadMeの翻訳だよ。
DeviseのREADMEを翻訳してみた - Qiita
Railsの第4世代認証エンジンDeviseのREADMEを翻訳してみた - babie, you're my home
🐱 Deviseの基本的な使い方が詳しく書かれているよ。
[Rails] deviseの使い方(rails6版) - Qiita
#209 Introducing Devise - RailsCasts
#210 Customizing Devise - RailsCasts
🐱 TechRachoさんのDeviseのWikiのまとめだよ。DeviseのWikiはページ数が多いので、目当てのページを探す際に役立つよ。
[Rails] Devise Wiki日本語もくじ1「ワークフローのカスタマイズ」(概要・用途付き)|TechRacho(テックラッチョ)〜エンジニアの「?」を「!」に〜|BPS株式会社
[Rails] Devise Wiki日本語もくじ2「認証方法のカスタマイズ」「OmniAuth」(概要・用途付き)|TechRacho(テックラッチョ)〜エンジニアの「?」を「!」に〜|BPS株式会社
[Rails] Devise Wiki日本語もくじ3「ビュー/コンテンツのカスタマイズ」「特権/認証」|TechRacho(テックラッチョ)〜エンジニアの「?」を「!」に〜|BPS株式会社
[Rails] Devise Wiki日本語もくじ4「テスト」「特殊な設定」|TechRacho(テックラッチョ)〜エンジニアの「?」を「!」に〜|BPS株式会社
[Rails] Devise Wiki日本語もくじ5「アプリでのその他の設定」「JavaScript」|TechRacho(テックラッチョ)〜エンジニアの「?」を「!」に〜|BPS株式会社
[Rails] Devise Wiki日本語もくじ6「他の認証プラグインからの移行」「アップグレード」|TechRacho(テックラッチョ)〜エンジニアの「?」を「!」に〜|BPS株式会社
英語の情報源
🐱 本家リポジトリだよ。
GitHub - heartcombo/devise: Flexible authentication solution for Rails with Warden.
🐱 本家Wikiだよ。カスタマイズ方法が充実してるけど、ページ数が多いので全部読むのはなかなか大変だよ。TechRachoさんのまとめから、目当てのページを探すのがおすすめだよ。
Home · heartcombo/devise Wiki · GitHub
チートシート
後から見返す用のまとめ
コントローラー・ビューのメソッド
# リクエストしてきたユーザーを認証する。 # ユーザーがログイン済みの場合はアクセスを許可して、未ログインの場合はroot_pathにリダイレクトする。 # コントローラーで`before_action :authenticate_user!`の形で利用する。 authenticate_user! # ログイン済みの場合はログインユーザーを返す。 current_user # ログイン済みの場合はtrueを返す。 user_signed_in? # ユーザーに紐づくsessionを返す。 user_session # Deviseのコントローラーだったらtrueを返す。 devise_controller? # ログインさせる。 sign_in(user) # Wardenのコールバックをバイパスしてログインさせる。 # ユーザーが認証情報を変更した際にログアウトしてしまうので、それを防ぐために利用する。 bypass_sign_in(user) # ログアウトさせる。 sign_out(user)
ルーティングのメソッド
# 有効なモジュールに対応するルーティングを定義する。 devise_for :users # 独自のルーティングを定義する。 devise_scope :user do get "sign_in", to: "devise/sessions#new" end # ログイン後のルーティングを定義する。 authenticated do root to: 'dashboard#show', as: :authenticated_root end # ログイン前のルーティングを定義する。 unauthenticated do root to: 'dashboard2#show', as: :unauthenticated_root end # 認証付きルーティングを定義する。 authenticate do resources :cats end
モデルのメソッド
# ==> Database Authenticatableモジュール # passwordをセットする。 # 内部で暗号化して`encrypted_password`にセットしてくれるよ。 user.password = "password" # パスワードが正しければtrue。 # 引数のパスワードをハッシュ化してencrypted_passwordの値と比較してくれる。 user.valid_password?('password') #=> true # passwordとpassword_confirmationにnilをセット。 user.clean_up_passwords # ==> Rememberableモジュール # remember_tokenを作成 user.remember_me! # remember_tokenを削除 user.forget_me! # user情報を使ってcookieを作成 User.serialize_into_cookie(user) # cookie情報を使ってuserを取得 User.serialize_from_cookie(cookie_string) # ==> Recoverableモジュール # パスワードリセットメール送信 user.send_reset_password_instructions # パスワードリセット # user.reset_password(new_password, new_password_confirmation) user.reset_password('password123', 'password123') # reset_password_tokenが有効期限内かどうかを、reset_password_sent_atを使い判定 user.reset_password_period_valid? #=> true # tokenを使ってuserを取得 User.with_reset_password_token(token) #=> user # ==> Timeoutableモジュール # タイムアウトならtrue user.timedout?(Time.current) # ==> Lockableモジュール # ロック(メール送信もする) user.lock_access! # ロック(メール送信しない) user.lock_access!(send_instructions: false) # アンロック user.unlock_access! # アンロックのメール送信 user.resend_unlock_instructions # ==> Confirmableモジュール # confirmする # 具体的にはconfirmed_atに現在時刻を設定する user.confirm # confirm済みなら、true user.confirmed? # 手動でConfirmメールを送信 user.send_confirmation_instructions
リンク(path)
<!-- ログイン前 --> <%= link_to("サインアップ", new_user_registration_path) %> <%= link_to("ログイン", new_user_session_path) %> <%= link_to("パスワードをお忘れですか?", new_user_password_path) %> <%= link_to("アカウント確認のメールを受け取っていませんか?", new_user_confirmation_path) %> <%= link_to("アンロック指示のメールを受け取っていませんか?", new_user_unlock_path) %> <!-- ログイン後 --> <%= link_to("ログアウト", destroy_user_session_path, method: :delete) %> <%= link_to("アカウント編集", edit_user_registration_path) %> <%= link_to("アカウント削除", user_registration_path, method: :delete) %>
モジュール
| モジュール名 | 機能 | デフォルト |
|---|---|---|
| Registerable | サインアップ機能 | 有効 |
| Database Authenticatable | Email/Password入力によるログイン機能 | 有効 |
| Rememberable | Remember Me機能(ブラウザを閉じてもログインが継続する機能) | 有効 |
| Recoverable | パスワードリセット機能 | 有効 |
| Validatable | Email/Passwordのバリデーション機能 | 有効 |
| Confirmable | サインアップ時に本登録用のメールを送信して、メールアドレスを確認する機能 | 無効 |
| Trackable | ログイン時の情報(IPアドレスなど)をDBに保存する機能 | 無効 |
| Timeoutable | 一定期間アクセスがないと強制ログアウトさせる機能 | 無効 |
| Lockable | 指定回数ログイン失敗でアカウントをロックする機能 | 無効 |
| Omniauthable | Omniauthとの連携機能(Twitter・Googleアカウントなどでログインできる) | 無効 |
コントローラーとルーティング
Registerableモジュール
| HTTPメソッド | path | コントローラーアクション | 目的 |
|---|---|---|---|
| GET | /users/sign_up | devise/registrations#new | サインアップ画面 |
| GET | /users/edit | devise/registrations#edit | アカウント編集画面。emailやpasswordを編集できる。 |
| POST | /users | devise/registrations#create | アカウント登録 |
| PATCH/PUT | /users | devise/registrations#update | アカウント更新 |
| DELETE | /users | devise/registrations#destroy | アカウント削除 |
| GET | /users/cancel | devise/registrations#cancel | session削除。OAuthのsessionデータを削除したい場合に使う。 |
Database Authenticatableモジュール
| HTTPメソッド | path | コントローラー#アクション | 目的 |
|---|---|---|---|
| GET | /users/sign_in | devise/sessions#new | ログイン画面 |
| POST | /users/sign_in | devise/sessions#create | ログイン |
| DELETE | /users/sign_out | devise/sessions#destroy | ログアウト |
Recoverableモジュール
| HTTPメソッド | path | コントローラー#アクション | 目的 |
|---|---|---|---|
| GET | /users/password/new | devise/passwords#new | パスワードリセットのメール送信画面 |
| GET | /users/password/edit | devise/passwords#edit | パスワード再設定画面 |
| POST | /users/password | devise/passwords#create | パスワードリセットのメール送信 |
| PATCH/PUT | /users/password | devise/passwords#update | パスワード再設定 |
Confirmableモジュール
| HTTPメソッド | path | コントローラー#アクション | 目的 |
|---|---|---|---|
| GET | /users/confirmation | devise/confirmations#show | confirm。 メールのリンク先はここ。 クエリパラメーターのconfirmation_tokenが一致しないとアクセスできない。 |
| GET | /users/confirmation/new | devise/confirmations#new | confirm指示メール再送信画面。 |
| POST | /users/confirmation | devise/confirmations#create | confirm指示メール送信。 |
Lockableモジュール
| HTTPメソッド | path | コントローラー#アクション | 目的 |
|---|---|---|---|
| GET | /users/unlock | devise/unlocks#show | アンロック。 メールのリンク先はここ。 クエリパラメーターのunlock_tokenが一致しないとアクセスできない。 |
| GET | /users/unlock/new | devise/unlocks#new | アンロック指示メール再送信画面。 |
| POST | /users/unlock | devise/unlocks#create | アンロック指示メール送信。 |
カラム
Database Authenticatableモジュール
| カラム | 概要 |
|---|---|
| メールアドレス。 認証に利用。 DB的にはユニークキーになり、ユーザーは重複するメールアドレスを登録することができないよ。 |
|
| encrypted_password | ハッシュ化されたパスワード。 認証に利用。 パスワードを直接DBに保存するのはセキュリティー的に問題があるので、ハッシュ化したパスワードをDBに保存するよ。Deviseでは内部的にbcryptというハッシュ化関数を使っていて、DB保存前に自動的にハッシュ化してくれるよ。 |
Rememberableモジュール
| カラム | 概要 |
|---|---|
| remember_created_at | Remenber Meした時刻 |
| remember_token | remember_me用のtoken remember_tokenカラムがなければ、encrypted_passwordの先頭30文字で代用するので、別になくてもOKだよ。マイグレーションファイルにも記載されないよ。 |
Recoverableモジュール
| カラム | 概要 |
|---|---|
| reset_password_token | パスワードリセットで利用するトークン。 一意のランダムなトークンが生成される。 パスワードリセットメールからパスワード再設定画面( /users/password/edit)へアクセスする際に、ユーザーを判定するのに利用する。 |
| reset_password_sent_at | パスワードリセットメール送信時刻。 パスワードリセットメールの有効期限の判定に利用する。 |
Confirmableモジュール
| カラム | 概要 |
|---|---|
| confirmation_token | confirmする際に利用するトークン。 一意のランダムなトークンが生成される。 confirm指示メールからconfirmアクション( /users/confirmattion)へアクセスする際に、ユーザーを判定するのに利用する。 |
| confirmed_at | confirmされた時刻。 confirm済みかどうかはこのカラムがnilかどうかで判定する。 |
| confirmation_sent_at | confirmation_token作成時刻。 |
| unconfirmed_email | まだconfirmされていないメールアドレス。 email変更時のconfirmで利用する。 config.unconfirmed_email = trueの場合だけ必要。confirmされるまでは新しいはemailはこのカラムに保存され、confirm時にemailのカラムにコピーされる。 |
Trackableモジュール
| カラム | 概要 |
|---|---|
| sign_in_count | ログイン回数 |
| current_sign_in_at | 最新のログイン時刻 |
| last_sign_in_at | 1つ前のログイン時刻 |
| current_sign_in_ip | 最新のログイン時IPアドレス |
| last_sign_in_ip | 1つ前のログイン時IPアドレス |
Lockableモジュール
| カラム | 概要 |
|---|---|
| failed_attempts | 失敗回数。config.lock_strategy = :failed_attemptsの場合にだけ必要。 |
| unlock_token | メールからアンロックする際に利用するtoken。 一意のランダムなトークンが生成される。 アンロック指示メールからアンロックアクション( /users/unlock)へアクセスする際に、ユーザーを判定するのに利用する。config.unlock_strategyが:emailか:bothの場合にだけ必要。 |
| locked_at | ロック時刻。 これがnullでない場合にロック状態とみなされる。 |
メール
Database Authenticatable
| メーラー#メソッド | 概要 |
|---|---|
| Devise::Mailer#email_changed | Eメール変更完了メール。Eメール変更時に送信する。 |
| Devise::Mailer#password_change | パスワード変更完了メール。パスワード変更時に送信する。 |
Recoverable
| メーラー#メソッド | 概要 |
|---|---|
| Devise::Mailer#reset_password_instructions | パスワードリセットメール |
Confirmable
| メーラー#メソッド | 概要 |
|---|---|
| Devise::Mailer#confirmation_instructions | confirm指示メール |
Lockable
| メーラー#メソッド | 概要 |
|---|---|
| Devise::Mailer#unlock_instructions | アカウントアンロック指示メール |
ジェネレーター
# 設定ファイルとロケールファイルを作成する。 $ rails g devise:install # モデルを作成する。 # User以外も指定可能。 $ rails g devise User $ rails g devise Admin # ビューをコピーする。 # Scopeを指定可能。Scopeを指定しない場合は`devise`名前空間のビューが作成される。 # `-v`オプションで指定ビューだけをコピーできる。 $ rails g devise:views $ rails g devise:views user $ rails g devise:views -v registrations confirmations # コントローラーを作成する。 # ビューと違いScope指定は必須。 # `-c`オプションで指定コントローラーだけ作成。 $ rails g devise:controllers users $ rails g devise:controllers users -c=sessions
設定
# config/initializers/devise.rb # frozen_string_literal: true Devise.setup do |config| # Deviseが使用する秘密鍵。 # Deviseはこのキーを利用してtokenを作成する(confirmation_token、reset_password_token、unlock_token)。 # このキーを変更すると全てのtokenが無効になる。 # デフォルトではsecret_key_baseをsecret_keyとして利用する。 # config.secret_key = '48bf747d05636bd17b63751533ac6879106a058e94253754a0bfe552d60ab822ad52c25b322c93b90d7479a91fe28da84ac038f8b295d523a4c2a18c08ed9c42' # ==> Controllerの設定 # Devise::SessionsControllerなどのDeviseの各コントローラーの親クラス。 # config.parent_controller = 'DeviseController' # ==> Mailerの設定 # Mailerのfrom。 config.mailer_sender = 'please-change-me-at-config-initializers-devise@example.com' # Mailerクラス # カスタムMailerを利用する場合はここを変更する。 # 詳細は『035 メーラーをカスタマイズする』を参照。 # config.mailer = 'Devise::Mailer' # Devise::Mailerの親クラス。 # config.parent_mailer = 'ActionMailer::Base' # ==> ORMの設定 # ORMをロードする。 # ActiveRcordとMongoidをサポートしている。 require 'devise/orm/active_record' # ==> 認証全般の設定 # 認証キー(ユーザーを認証する際に利用するキー)。 # email以外のキーを利用したい場合に変更する。 # 詳細は『024 emailの代わりにusernameでログインさせる』を参照。 # config.authentication_keys = [:email] # 認証に使用するリクエストオブジェクトのパラメータ。 # config.request_keys = [] # 大文字小文字を区別しない認証キー。 # Userの作成/修正/認証/検索時に大文字小文字を区別しない 。 config.case_insensitive_keys = [:email] # 空白を削除する認証キー。 # Userの作成/修正/認証/検索時に空白を削除する。 config.strip_whitespace_keys = [:email] # request.paramsによる認証を有効にする。 # `config.params_authenticatable = [:database]`とすればDB認証(メール + パスワード)認証のみを有効にする。 # config.params_authenticatable = true # HTTP Authによる認証を有効にする。 # `config.http_authenticatable = [:database]` とすればDB認証のみを有効にする。 # config.http_authenticatable = false # Ajaxリクエストに対して401を返す。 # config.http_authenticatable_on_xhr = true # Basic認証で利用されるrealm。 # config.http_authentication_realm = 'Application' # paranoidモード。 # メールアドレスが登録されているかどうかを確認するのを防ぐ。 # 詳細は https://github.com/heartcombo/devise/wiki/How-To:-Using-paranoid-mode,-avoid-user-enumeration-on-registerable # config.paranoid = true # userをsessionに保存する処理をスキップする箇所。 config.skip_session_storage = [:http_auth] # セキュリティーのため認証時にCSRFトークンをsessionから削除する。 # trueだとサインインやサインアップでAjaxを使用する場合、サーバーから新しいCSRFトークンを取得する必要がある。 # config.clean_up_csrf_token_on_authentication = true # eager load時にルーティングをリロードする。 # before_eager_loadフックを利用。 # falseにするとアプリ起動が高速になるが、Deviseのマッピングをロードする必要がある場合は正常に起動できない。 # config.reload_routes = true # ==> Database Authenticatableモジュールの設定 # ハッシュ化のレベル。 # ハッシュ化には結構時間がかかる。 # bcrypt(デフォルトのアルゴリズム)の場合、レベルに応じて指数関数的に遅くなり、例えばレベル20では60秒程度かかる。 # テストの時はレベル1にして速度を上げる。 # 本番ではレベル10以下は利用すべきでない。 config.stretches = Rails.env.test? ? 1 : 12 # ハッシュ化する際のpepper。 # pepperはsaltみたいなやつ。 # 詳細は https://stackoverflow.com/questions/6831796/whats-the-most-secure-possible-devise-configuration # config.pepper = '9a11b4eaf0250fec05630de0b518c3f63086fa403a8309d74408b3223d57a2312cef3ef746152f43c508da74b11cf21f982d9573ef552a186e36d83818129029' # email変更時にemail変更完了メールを送信する。 # config.send_email_changed_notification = false # password変更時にpassword変更完了メールを送信する。 # config.send_password_change_notification = false # ==> Confirmableモジュールの設定 # confirmなしでログインできる期間。 # これを設定すると一定期間はconfirm前でもログインできるようになる。 # nilに設定すると無期限にログインできるようになる。 # デフォルトは 0.days。(confirmなしにはログインできない。) # config.allow_unconfirmed_access_for = 2.days # confirmation_tokenの有効期限。 # ユーザーはこの期限内にconfirm指示メールのリンクをクリックしないといけない。 # デフォルトは nil。(制限なし。) # config.confirm_within = 3.days # サインアップ時だけでなく、email変更時にもConfirmメールを送信する。 # unconfirmed_emailカラムが必要。 config.reconfirmable = true # confirmのキー。 # config.confirmation_keys = [:email] # ==> Rememberableモジュールの設定 # Sessionが切れるまでの時間。 # デフォルトは2.weeks。 # config.remember_for = 2.weeks # ログアウト時にremember_tokenを期限切れにする。 config.expire_all_remember_me_on_sign_out = true # cookie利用時に期間を伸ばす。 # config.extend_remember_period = false # cookieにセットするオプション。 # config.rememberable_options = {} # ==> Validatableモジュールの設定 # passwordの長さ。 # Rangeで指定。この場合は6文字から128文字。 config.password_length = 6..128 # emailバリデーションで利用する正規表現 config.email_regexp = /\A[^@\s]+@[^@\s]+\z/ # ==> Timeoutableモジュールの設定 # タイムアウト時間 # config.timeout_in = 30.minutes # ==> lockableモジュールの設定 # ロック方法 # - failed_attempts: 指定回数間違えたらロック # - none: 自動ロックはなしで、サーバ管理者が手動でロック # config.lock_strategy = :failed_attempts # アンロックのキー # config.unlock_keys = [:email] # アンロック方法 # - email: メールでアンロックのリンクを送信 # - time: 数時間後にアンロック(config.unlock_inと一緒に使う) # - both: emailとtimeの両方 # - none: 自動アンロックはなしで、サーバ管理者が手動でアンロック # config.unlock_strategy = :both # ロックまでの回数 # config.maximum_attempts = 20 # アンロックまでの時間(`config.unlock_strategy = :time`の場合) # config.unlock_in = 1.hour # ロック前に警告する # config.last_attempt_warning = true # ==> Recoverableモジュールの設定 # # パスワードリセット時にキーになるカラム。 # config.reset_password_keys = [:email] # パスワードリセットの有効期限。 config.reset_password_within = 6.hours # パスワードリセット後に自動ログイン。 # config.sign_in_after_reset_password = true # ==> devise-encryptable gemの設定 # bcrypt以外のハッシュ化アルゴリズム。 # devise-encryptable gemのインストールが必要。 # bcrypt以外のアルゴリズムは:sha1、:sha512、:clearance_sha1、:authlogic_sha512、:sha1など。 # config.encryptor = :sha512 # ==> Scopeの設定 # Scope用のビューを優先的に使うようになる。 # trueにすると`devise`名前空間のビューではなく、`users`などのScope対応のビューを利用する。 # デフォルトは高速化のため`false`に設定されている。 # 詳細は『023 複数モデルを利用する』を参照。 # config.scoped_views = false # デフォルトのScope。 # 通常であればuserになる。 # config.default_scope = :user # ログアウト時に全てのScopeでのログアウトとする。 # falseの場合は/users/sign_outでログアウトした場合、user scopeだけログアウトになる。 # config.sign_out_all_scopes = true # ==> Navigationの設定 # ナビゲーションとして扱われるフォーマットのリスト。 # config.navigational_formats = ['*/*', :html] # ログアウト時のHTTPメソッド config.sign_out_via = :delete # ==> OmniAuthの設定 # OmniAuthの設定。 # config.omniauth :github, 'APP_ID', 'APP_SECRET', scope: 'user,public_repo' # ==> Wardenの設定 # Wardenの設定。 # strategy追加したりfailure_app変更したり。 # # config.warden do |manager| # manager.intercept_401 = false # manager.default_strategies(scope: :user).unshift :some_external_strategy # end # ==> Mountable Engineの設定 # Mountable Engineで使う際のrouter名。 # config.router_name = :my_engine # # OmniAuthのpath。 # OmniAuthを利用する場合に設定する。 # config.omniauth_path_prefix = '/my_engine/users/auth' # ==> Turbolinksの設定 # Turbolinksを利用している場合、リダイレクトを正しく動作させるためにTurbolinks::Controllerをincludeする。 # # ActiveSupport.on_load(:devise_failure_app) do # include Turbolinks::Controller # end # ==> Registerableモジュールの設定 # パスワード変更後に自動的にサインインさせる。 # config.sign_in_after_change_password = true end